Cherry Pie Bombs
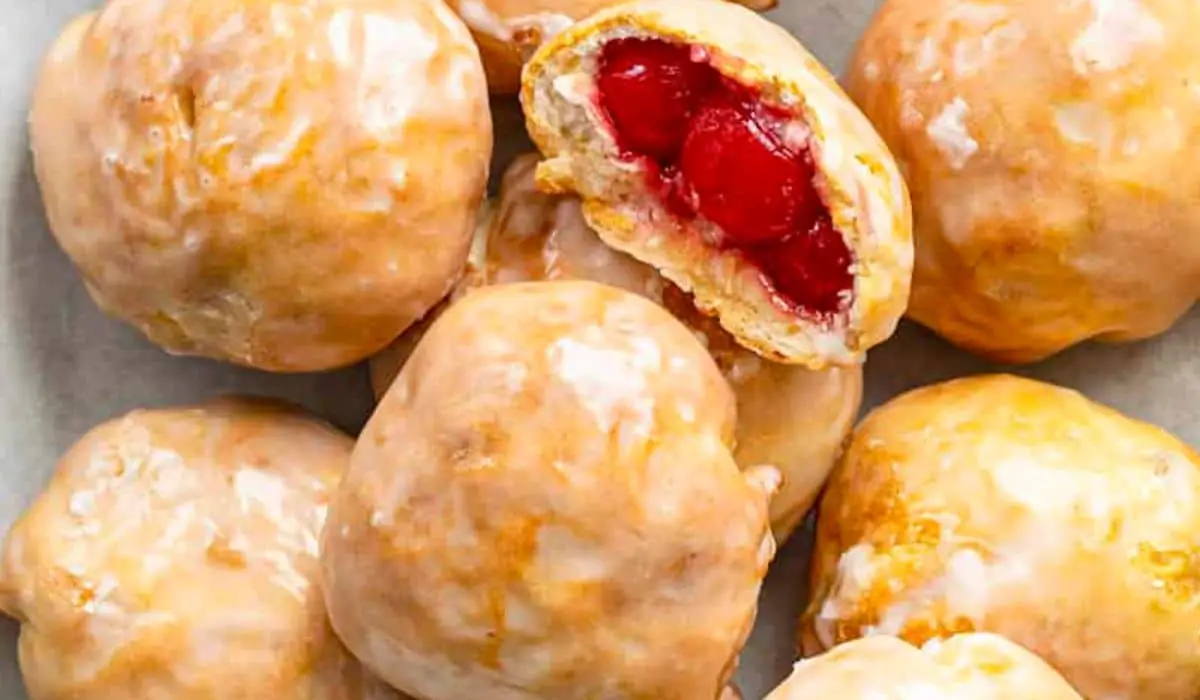
Imagine biting into a warm, flaky crust, only to be greeted by the sweet and tangy burst of cherry pie filling. That’s exactly what you get with these Cherry Pie Bombs. Perfect for satisfying your sweet tooth, these bite-sized treats are a delightful twist on the classic cherry pie, offering the same delicious taste in a fun, mini format. Whether you’re hosting a party or just craving something sweet, these Cherry Pie Bombs are sure to be a hit!
Not only are these Cherry Pie Bombs irresistibly tasty, but they’re also incredibly easy to make, especially with the help of an air fryer. The golden, flaky exterior paired with the rich, cherry-filled center makes for a perfect combination of textures and flavors. Plus, their bite-sized nature makes them ideal for serving at gatherings or as a quick dessert for your family. Get ready to impress everyone with these charming and delectable treats!
Table of contents
Cherry Pie Bombs Recipe
Ingredients
For Pie Bombs:
- 1 can (8-count) of Pillsbury Grand biscuits (opt for the non-flaky layers variety)
- 1 cup (255 g) of cherry pie filling, for that sweet, fruity burst
- ½ cup (1 stick / 113 g) of unsalted butter, melted, to add a rich, buttery flavor
For the Glaze:
- 2 cups (250 g) of confectioners’ sugar, for a smooth and sweet coating
- 3-4 tablespoons of whole milk, at room temperature, to achieve the perfect glaze consistency
[adsforwp id=”8803″]
Instructions
- Preparing the Dough: Begin by taking the biscuits out of the can. Carefully peel them apart into two layers each, transforming them into 16 thin circles, each about 4 inches in diameter.
- Adding the Filling: Place a generous tablespoon of the cherry pie filling in the center of each biscuit circle, ensuring a fruity surprise in every bite.
- Shaping the Bombs: Gently fold and pinch the sides of the biscuits to encase the filling, shaping them into neat balls. Aim for uniform thickness in the dough to ensure even cooking.
- Butter Up: Brush each pie bomb with melted butter for a golden, crispy finish.
- Air Fryer Magic: Lightly spray the air fryer basket with nonstick cooking spray. Place the pie bombs in the basket, spaced about 2 inches apart. Cook them in batches to avoid overcrowding.
- Cooking Time: Set your air fryer to 330°F and cook the pie bombs for 7-8 minutes. They should turn a lovely golden brown. Once done, remove them and let them cool slightly.
- Glaze Creation: While the pie bombs are cooling, prepare the glaze. In a medium bowl, whisk together the confectioners’ sugar and milk until smooth. Adjust the milk quantity to get your desired glaze thickness.
- Glazing the Bombs: Dip or gently roll each pie bomb in the glaze, ensuring a generous coating. Place them on a wire rack set over a baking sheet to catch any drips.
- Final Touch: Allow the glaze to set, either serving the pie bombs warm or at room temperature for a delightful treat.
[adsforwp id=”8803″]
Cherry Pie Bombs FAQS
Cherry pie, especially when homemade or freshly baked, is not considered shelf stable. This is due to its moist filling, which can be a breeding ground for bacteria if left at room temperature for too long. Commercially packaged cherry pies might have preservatives that allow them to be shelf stable for a longer period, but it’s always best to check the packaging for storage instructions.
To store a baked cherry pie, let it cool completely after baking. Once cooled, you can cover it loosely with plastic wrap or aluminum foil. If you plan to eat the pie within a couple of days, it can be kept at room temperature. For longer storage, it’s best to refrigerate it, where it can last for about 4-5 days. Ensure it’s covered well to prevent it from absorbing other odors from the fridge.
Sara Lee cherry pie is a specific brand of frozen pie, known for its convenience and delicious taste. To prepare a Sara Lee cherry pie, you typically need to preheat your oven to the temperature specified on the packaging. Remove the pie from the box and unwrap it. Place it on a baking sheet and then bake according to the package instructions, usually until the crust is golden brown and the filling is bubbly. Let it cool for a few minutes before serving.
A homemade pie’s shelf life depends on its ingredients. A fruit pie, like cherry pie, usually lasts up to two days at room temperature or about 4-5 days in the refrigerator. If your pie contains dairy or eggs, like a custard pie or pumpkin pie, it should be refrigerated and is best consumed within 3-4 days.
Yes, it’s generally recommended to refrigerate homemade cherry pie. While it can be left at room temperature for a day or so, refrigerating it will extend its freshness and prevent the growth of bacteria. Before refrigerating, make sure the pie has cooled down to room temperature. Cover it loosely with plastic wrap or aluminum foil to keep it fresh and to prevent it from absorbing any fridge odors.
[adsforwp id=”8805″]
Print
Cherry Pie Bombs
Get your dessert fix with these adorable Cherry Pie Bombs – a delightful treat that’s as fun to make as it is to eat! ????????????
- Total Time: 18 minutes
- Yield: 8 1x
Ingredients
For Pie Bombs:
- 1 can (8-count) of Pillsbury Grand biscuits (opt for the non-flaky layers variety)
- 1 cup (255 g) of cherry pie filling, for that sweet, fruity burst
- ½ cup (1 stick / 113 g) of unsalted butter, melted, to add a rich, buttery flavor
For the Glaze:
- 2 cups (250 g) of confectioners’ sugar, for a smooth and sweet coating
- 3–4 tablespoons of whole milk, at room temperature, to achieve the perfect glaze consistency
Instructions
- Preparing the Dough: Begin by taking the biscuits out of the can. Carefully peel them apart into two layers each, transforming them into 16 thin circles, each about 4 inches in diameter.
- Adding the Filling: Place a generous tablespoon of the cherry pie filling in the center of each biscuit circle, ensuring a fruity surprise in every bite.
- Shaping the Bombs: Gently fold and pinch the sides of the biscuits to encase the filling, shaping them into neat balls. Aim for uniform thickness in the dough to ensure even cooking.
- Butter Up: Brush each pie bomb with melted butter for a golden, crispy finish.
- Air Fryer Magic: Lightly spray the air fryer basket with nonstick cooking spray. Place the pie bombs in the basket, spaced about 2 inches apart. Cook them in batches to avoid overcrowding.
- Cooking Time: Set your air fryer to 330°F and cook the pie bombs for 7-8 minutes. They should turn a lovely golden brown. Once done, remove them and let them cool slightly.
- Glaze Creation: While the pie bombs are cooling, prepare the glaze. In a medium bowl, whisk together the confectioners’ sugar and milk until smooth. Adjust the milk quantity to get your desired glaze thickness.
- Glazing the Bombs: Dip or gently roll each pie bomb in the glaze, ensuring a generous coating. Place them on a wire rack set over a baking sheet to catch any drips.
- Final Touch: Allow the glaze to set, either serving the pie bombs warm or at room temperature for a delightful treat.
- Prep Time: 10 minutes
- Cook Time: 8 minutes
Nutrition
- Calories: 210 kcal


