Philadelphia Mini No-Bake Cheesecakes: A Beginner-Friendly Delight

There is something undeniably satisfying about a rich, creamy cheesecake. However, traditional cheesecake recipes can be intimidating for beginners due to their baking requirements and the risk of cracking. That is where this Philadelphia Mini No-Bake Cheesecake recipe comes in. It eliminates the need for complicated baking techniques while still delivering a smooth and luscious dessert. These bite-sized treats are perfect for any occasion, whether it is a family gathering, holiday party, or a personal indulgence after a long day.
Print
Philadelphia Mini No-Bake Cheesecakes: A Beginner-Friendly Delight
Creamy, rich, and perfectly bite-sized—these Philadelphia Mini No-Bake Cheesecakes are a foolproof treat! With a velvety smooth filling on a buttery crust, they’re effortless elegance in every bite! 🍰✨
- Total Time: 4 hours 25 minutes
- Yield: 12 mini cheesecakes 1x
Ingredients
Crust
- 1 1/4 cups (140 g) graham cracker crumbs
- 1/4 cup (1/2 stick or 60 g) butter, melted
- 2 tablespoons light brown sugar
Filling
- 8 ounces (240 g) Philadelphia cream cheese (brick-style, full fat), softened
- 1/2 cup (100 g) granulated sugar
- 2 tablespoons sour cream
- 1 teaspoon vanilla extract
- 1/2 teaspoon freshly grated lemon zest
- 1/2 cup (120 ml) heavy cream, cold
Optional Garnishes
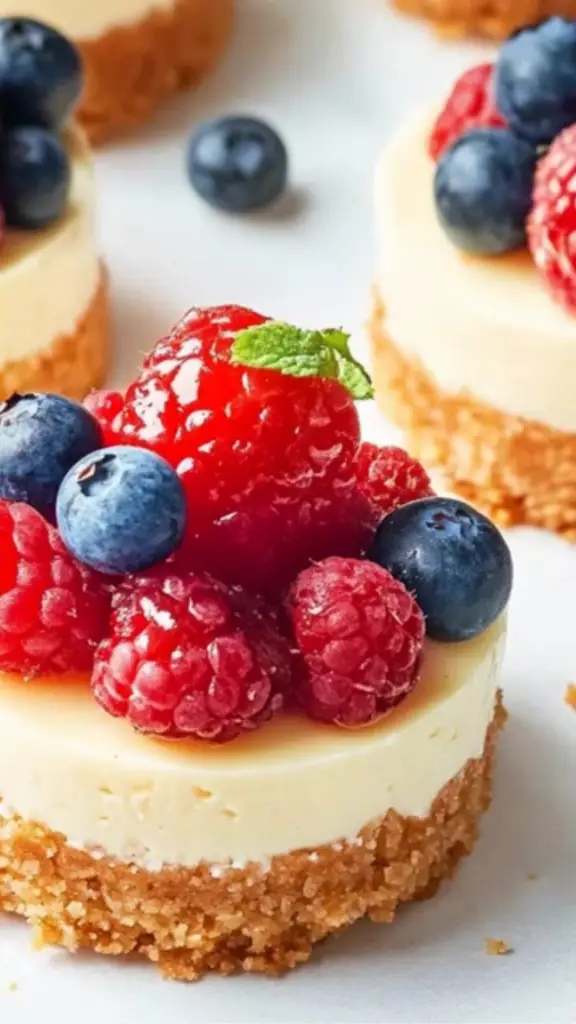
- Fresh berries (strawberries, raspberries, or blueberries)
- Berry sauce or fruit compote
- Chocolate shavings or drizzle
Instructions
Step 1: Prepare the Crust
- In a large mixing bowl, combine the graham cracker crumbs, brown sugar, and melted butter. Stir until all the crumbs are evenly moistened.
- Line a 12-hole muffin pan with paper liners. Divide the crumb mixture evenly among the liners.
- Use the back of a spoon or the bottom of a drinking glass to press the mixture firmly into the liners, creating a compact crust.
- Optional step: For a firmer crust, preheat the oven to 350°F (180°C) and bake the crusts for 5 minutes. This step is not required but helps hold the crust together. Let the crusts cool completely before adding the filling.
Step 2: Make the Cheesecake Filling
- In a large mixing bowl, combine the softened cream cheese, granulated sugar, sour cream, vanilla extract, and lemon zest.
- Using a hand mixer or stand mixer on medium speed, beat the mixture until smooth and creamy, scraping down the sides of the bowl as needed.
- In a separate mixing bowl, pour in the cold heavy cream and beat it with an electric mixer until stiff peaks form. This should take about 3 minutes.
- Gently fold the whipped cream into the cream cheese mixture, using slow, sweeping motions to maintain the airiness. Avoid overmixing, as this can cause the filling to become too dense.
Step 3: Assemble the Cheesecakes
- Spoon the cheesecake filling onto the prepared crusts, using about 2 tablespoons per cheesecake.
- Smooth out the tops with the back of a spoon or use a piping bag for a more polished look.
- Place the muffin pan in the refrigerator and chill for at least 4 hours. This allows the cheesecakes to set properly and develop the right texture. They can also be left in the fridge for up to 2 days before serving.
Step 4: Garnish and Serve
- Once the mini cheesecakes are firm, carefully remove them from the muffin pan.
- Top each cheesecake with a spoonful of berry sauce or fresh fruit for a refreshing contrast to the creamy filling.
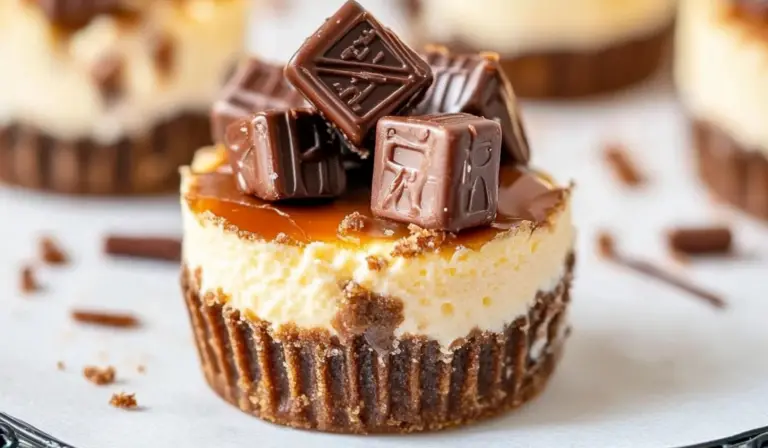
- If desired, drizzle with melted chocolate or garnish with a dusting of cocoa powder for an extra layer of flavor.
Notes
- Softening Cream Cheese: The cream cheese should be at room temperature before mixing. This ensures a smooth texture without lumps. To soften quickly, cut the cream cheese into small cubes and let it sit at room temperature for 15-20 minutes.
- Whipping Cream Properly: Using a cold bowl and beaters will help heavy cream whip faster. Beating too long can cause it to become grainy, so stop once stiff peaks form.
- Preventing a Grainy Texture: Always mix the sugar thoroughly with the cream cheese to allow it to dissolve completely, ensuring a silky filling.
- Folding the Whipped Cream: Be gentle when folding the whipped cream into the cheesecake mixture to maintain its light and airy texture.
- Chilling Time Matters: These cheesecakes need at least 4 hours to set, but overnight refrigeration enhances the texture and flavor.
- Making in Advance: Mini cheesecakes can be prepared up to two days in advance and stored in the refrigerator until ready to serve.
- Prep Time: 20 minutes
- Cook Time: 5 minutes
This recipe is designed for simplicity, making it an excellent starting point for those new to the kitchen. The steps are straightforward, requiring only a few ingredients that are easy to find. The best part is that the cheesecakes set in the refrigerator, removing any guesswork about doneness. This guide will walk you through the entire process, from preparing the graham cracker crust to whipping up the perfect creamy filling. Along the way, you will find helpful tips to ensure your cheesecakes turn out perfectly every time.
Ingredients and Preparation
Crust
- 1 1/4 cups (140 g) graham cracker crumbs
- 1/4 cup (1/2 stick or 60 g) butter, melted
- 2 tablespoons light brown sugar
Filling
- 8 ounces (240 g) Philadelphia cream cheese (brick-style, full fat), softened
- 1/2 cup (100 g) granulated sugar
- 2 tablespoons sour cream
- 1 teaspoon vanilla extract
- 1/2 teaspoon freshly grated lemon zest
- 1/2 cup (120 ml) heavy cream, cold
Optional Garnishes
- Fresh berries (strawberries, raspberries, or blueberries)
- Berry sauce or fruit compote
- Chocolate shavings or drizzle
Ingredient Substitutions and Variations
- Graham crackers: If graham crackers are not available, digestive biscuits or vanilla wafer cookies can be used instead.
- Butter: Unsalted or salted butter both work, but if using salted butter, slightly reduce the added salt in the crust.
- Sour cream: Greek yogurt can be used as a substitute for sour cream if needed.
- Lemon zest: While lemon zest adds a subtle brightness to the filling, it can be omitted or replaced with orange zest for a different flavor.
- Heavy cream: If heavy cream is unavailable, whipped topping can be used, though the texture may be slightly different.
Step-by-Step Instructions
Step 1: Prepare the Crust
- In a large mixing bowl, combine the graham cracker crumbs, brown sugar, and melted butter. Stir until all the crumbs are evenly moistened.
- Line a 12-hole muffin pan with paper liners. Divide the crumb mixture evenly among the liners.
- Use the back of a spoon or the bottom of a drinking glass to press the mixture firmly into the liners, creating a compact crust.
- Optional step: For a firmer crust, preheat the oven to 350°F (180°C) and bake the crusts for 5 minutes. This step is not required but helps hold the crust together. Let the crusts cool completely before adding the filling.
Step 2: Make the Cheesecake Filling
- In a large mixing bowl, combine the softened cream cheese, granulated sugar, sour cream, vanilla extract, and lemon zest.
- Using a hand mixer or stand mixer on medium speed, beat the mixture until smooth and creamy, scraping down the sides of the bowl as needed.
- In a separate mixing bowl, pour in the cold heavy cream and beat it with an electric mixer until stiff peaks form. This should take about 3 minutes.
- Gently fold the whipped cream into the cream cheese mixture, using slow, sweeping motions to maintain the airiness. Avoid overmixing, as this can cause the filling to become too dense.
Step 3: Assemble the Cheesecakes
- Spoon the cheesecake filling onto the prepared crusts, using about 2 tablespoons per cheesecake.
- Smooth out the tops with the back of a spoon or use a piping bag for a more polished look.
- Place the muffin pan in the refrigerator and chill for at least 4 hours. This allows the cheesecakes to set properly and develop the right texture. They can also be left in the fridge for up to 2 days before serving.
Step 4: Garnish and Serve
- Once the mini cheesecakes are firm, carefully remove them from the muffin pan.
- Top each cheesecake with a spoonful of berry sauce or fresh fruit for a refreshing contrast to the creamy filling.
- If desired, drizzle with melted chocolate or garnish with a dusting of cocoa powder for an extra layer of flavor.
Beginner Tips and Notes
- Softening Cream Cheese: The cream cheese should be at room temperature before mixing. This ensures a smooth texture without lumps. To soften quickly, cut the cream cheese into small cubes and let it sit at room temperature for 15-20 minutes.
- Whipping Cream Properly: Using a cold bowl and beaters will help heavy cream whip faster. Beating too long can cause it to become grainy, so stop once stiff peaks form.
- Preventing a Grainy Texture: Always mix the sugar thoroughly with the cream cheese to allow it to dissolve completely, ensuring a silky filling.
- Folding the Whipped Cream: Be gentle when folding the whipped cream into the cheesecake mixture to maintain its light and airy texture.
- Chilling Time Matters: These cheesecakes need at least 4 hours to set, but overnight refrigeration enhances the texture and flavor.
- Making in Advance: Mini cheesecakes can be prepared up to two days in advance and stored in the refrigerator until ready to serve.
Serving Suggestions
- Fruit Pairings: Fresh berries, sliced mangoes, or citrus zest complement the rich cheesecake flavor.
- Chocolate Enhancements: A drizzle of melted chocolate or a sprinkle of chocolate shavings adds a decadent touch.
- Caramel or Nut Toppings: A light drizzle of caramel sauce or a sprinkle of chopped nuts introduces a delightful crunch.
- Whipped Cream Finish: A small dollop of whipped cream on top creates an elegant presentation.
- Spiced Variations: Adding a pinch of cinnamon or nutmeg to the graham cracker crust provides warmth and depth to the flavor.
Storage Tips
- Refrigeration: Keep mini cheesecakes covered in the refrigerator for up to 3-4 days.
- Freezing Option: These mini cheesecakes can be frozen for up to 2 months. Place them in an airtight container and thaw in the refrigerator overnight before serving.
Engagement Features
Cheesecake is a timeless dessert that never fails to impress. These no-bake mini cheesecakes are especially rewarding because they require minimal effort yet deliver maximum flavor and elegance. Whether you are making them for a party or as a personal treat, they are sure to be a crowd-pleaser.
If you try this recipe, share your experience. Did you add any special toppings? Try a different variation? Let others know in the comments below. Cooking is a journey, and every attempt helps build confidence in the kitchen. There is no better time to start than now.
Now that you have mastered this simple yet indulgent dessert, what will you make next? Perhaps a fruit compote to pair with your cheesecakes, or another beginner-friendly dessert like chocolate mousse or panna cotta. The possibilities are endless, and the best part is that every step brings you closer to becoming a confident home cook.