Silky Coffee Crème Brûlée: A Beginner’s Dream Dessert

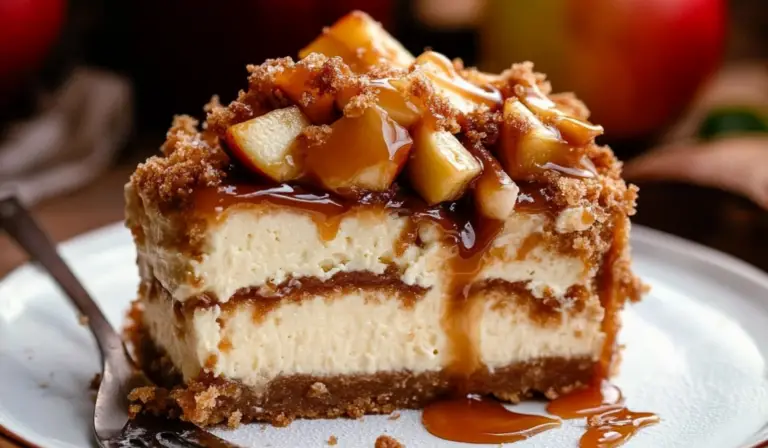
If you’ve ever been intimidated by the thought of making crème brûlée at home, you’re not alone. It seems like one of those desserts that only professional chefs can master. But when I first attempted Coffee Crème Brûlée, I quickly discovered how simple and rewarding it could be. The rich, velvety custard paired with the crackling caramelized sugar topping made for an unforgettable treat. As I scooped through the smooth custard, followed by that perfect crunch of sugar, I knew I had found a dessert that would not only impress guests but become a go-to in my recipe arsenal.
Print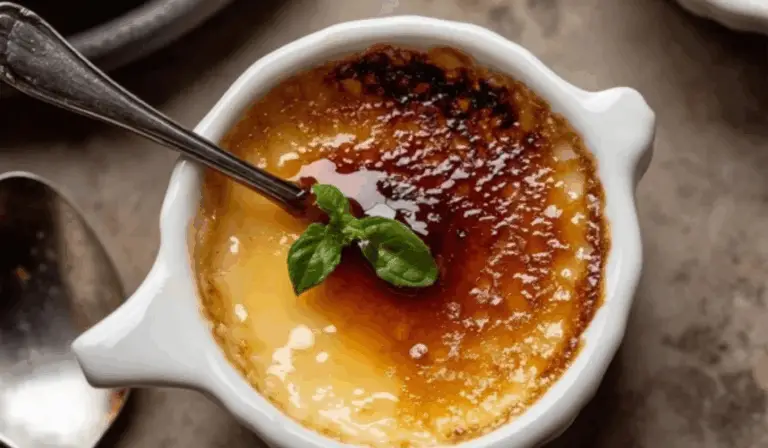
Silky Coffee Crème Brûlée: A Beginner’s Dream Dessert
Creamy, dreamy, and with a bold coffee kick—this Silky Coffee Crème Brûlée is elegance made easy! ☕🍮 Crack through that caramelized sugar top and dive into a rich, velvety custard that’s surprisingly simple to make. ✨ Perfect for impressing guests or treating yourself to something fancy without the fuss. 👩🍳💖
- Total Time: 4 hours 50 minutes (includes inactive chilling time)
- Yield: 4 servings 1x
Ingredients
For the Custard:
- 2 cups (473 ml) heavy cream
- ¼ cup (50 g) granulated sugar (plus an additional ¼ cup for the topping)
- Pinch of Kosher salt
- 5 large egg yolks, at room temperature
- 1 tablespoon instant espresso powder
- 1 tablespoon Kahlua (a coffee-flavored liqueur)
For the Topping:
- Additional ¼ cup (50 g) granulated sugar, for caramelizing
You’ll also need a few essential kitchen tools:
- 4 ramekins (small, oven-safe dishes)
- 9×9-inch baking pan
- Kettle for boiling water
- Medium saucepan
- Large mixing bowl
- Whisk
- Fine mesh strainer
- Large measuring cup or bowl with spout
- Wire rack
- Kitchen torch for caramelizing the sugar topping (or use your broiler if you don’t have one)
Instructions
- Preheat Your Oven and Prepare the Ramekins:
Begin by preheating your oven to 300°F (150°C). Place the 4 ramekins into a 9×9-inch baking pan. This is the pan you’ll use for baking the custard. You’ll need a large kettle of water to create a water bath, so go ahead and bring that to a boil. - Warm the Cream Mixture:
In a medium saucepan, combine the heavy cream, ¼ cup of granulated sugar, and a pinch of Kosher salt. Set the saucepan over medium heat. Stir occasionally until the sugar has dissolved, and the cream begins to steam. Don’t let it come to a boil. You’re looking to warm it enough to incorporate into the egg yolks without scrambling them. - Whisk the Egg Yolks:
While the cream is warming, place the egg yolks into a large mixing bowl. Whisk the yolks until they become slightly thickened and lighter in color. This helps create a smooth custard texture later on. - Combine the Cream and Egg Yolks:
Once the cream mixture is warm (but not boiling), slowly pour it into the egg yolks while whisking constantly. This technique, called tempering, ensures that the hot cream doesn’t scramble the eggs. Continue whisking until the cream is fully incorporated into the yolks. - Add the Espresso and Kahlua:
In a small bowl, whisk together the instant espresso powder and Kahlua until the powder dissolves. Stir this mixture into the custard base, infusing it with a rich coffee flavor that will shine through in every spoonful. - Strain the Custard:
To ensure your custard is silky smooth and free of any cooked egg bits, strain the mixture through a fine mesh sieve into a large measuring cup or bowl with a spout. This step ensures that the texture of your crème brûlée is flawless. - Fill the Ramekins:
Evenly divide the custard mixture among the prepared ramekins. You should have just enough to fill them nearly to the top. - Create the Water Bath:
Once the ramekins are filled, carefully pour the hot water from the kettle into the baking pan, around the ramekins. The water should come about halfway up the sides of the ramekins. This water bath (bain-marie) helps the custard cook evenly and gently, preventing it from curdling. - Bake the Custard:
Place the baking pan in the preheated oven and bake for about 35-40 minutes. You’ll know the custard is done when the edges are set, but the center still has a slight wobble. If you insert a knife or toothpick into the center, it should come out clean but moist. - Cool and Chill:
Once baked, remove the ramekins from the water bath and set them on a wire rack to cool. After about 30 minutes, cover each ramekin with plastic wrap and refrigerate them for at least 4 hours (or overnight if you prefer to prepare them ahead of time). - Caramelize the Sugar Topping:
Just before serving, sprinkle the remaining ¼ cup of granulated sugar evenly over the top of each custard. Using a kitchen torch, carefully caramelize the sugar by moving the flame over the surface until it turns golden brown and crispy. If you don’t have a torch, you can also place the ramekins under a broiler for 1-2 minutes, but be sure to watch them closely to avoid burning.
Notes
- Room Temperature Eggs:
Be sure your eggs are at room temperature before you begin. This allows the yolks to blend more easily into the cream mixture, ensuring a smooth custard. - Slowly Add the Cream:
When tempering the egg yolks with the warm cream, do it slowly. Adding the cream too quickly can cause the eggs to cook too fast, leading to a lumpy texture. Patience is key here! - Water Bath Essentials:
The water bath is an important step in the baking process. It ensures even heat distribution and helps the custard cook gently. Make sure the water doesn’t touch the top of the ramekins to prevent water from getting into the custard. A good tip is to use a kettle to avoid spills when adding the hot water. - Proper Baking Time:
Crème brûlée needs to be baked at a low temperature to prevent overcooking. If the custard seems too runny after the recommended baking time, you may need to bake it for a few more minutes. Always check for the slight wobble in the center to avoid overcooking. - Caramelizing the Sugar:
If you’re using a kitchen torch, keep it moving to prevent burning. The goal is a crisp, golden topping, not a dark or overly hard one. If using a broiler, make sure the ramekins are positioned about 6 inches from the heat source for even browning.
- Prep Time: 15 minutes
- Cook Time: 35 minutes
What’s even better? This coffee-infused crème brûlée is gluten-free, making it a perfect option for a variety of diets. It’s also incredibly customizable, with the ability to adjust flavors to suit your preferences, and it can be prepared in advance, making it an ideal choice for both casual gatherings and special celebrations.
Whether you’re a beginner baker or just looking to add a new skill to your kitchen repertoire, this Coffee Crème Brûlée is a dessert you’ll want to try.
Ingredients and Preparation
Before we dive into the steps of making this dessert, let’s gather everything we need. This recipe yields four servings of decadent coffee crème brûlée and requires minimal ingredients, many of which you may already have in your kitchen.
For the Custard:
- 2 cups (473 ml) heavy cream
- ¼ cup (50 g) granulated sugar (plus an additional ¼ cup for the topping)
- Pinch of Kosher salt
- 5 large egg yolks, at room temperature
- 1 tablespoon instant espresso powder
- 1 tablespoon Kahlua (a coffee-flavored liqueur)
For the Topping:
- Additional ¼ cup (50 g) granulated sugar, for caramelizing
You’ll also need a few essential kitchen tools:
- 4 ramekins (small, oven-safe dishes)
- 9×9-inch baking pan
- Kettle for boiling water
- Medium saucepan
- Large mixing bowl
- Whisk
- Fine mesh strainer
- Large measuring cup or bowl with spout
- Wire rack
- Kitchen torch for caramelizing the sugar topping (or use your broiler if you don’t have one)
This list may seem long, but don’t worry—everything is straightforward, and once you get started, the process is easy to follow.
Step-by-Step Instructions
- Preheat Your Oven and Prepare the Ramekins:
Begin by preheating your oven to 300°F (150°C). Place the 4 ramekins into a 9×9-inch baking pan. This is the pan you’ll use for baking the custard. You’ll need a large kettle of water to create a water bath, so go ahead and bring that to a boil. - Warm the Cream Mixture:
In a medium saucepan, combine the heavy cream, ¼ cup of granulated sugar, and a pinch of Kosher salt. Set the saucepan over medium heat. Stir occasionally until the sugar has dissolved, and the cream begins to steam. Don’t let it come to a boil. You’re looking to warm it enough to incorporate into the egg yolks without scrambling them. - Whisk the Egg Yolks:
While the cream is warming, place the egg yolks into a large mixing bowl. Whisk the yolks until they become slightly thickened and lighter in color. This helps create a smooth custard texture later on. - Combine the Cream and Egg Yolks:
Once the cream mixture is warm (but not boiling), slowly pour it into the egg yolks while whisking constantly. This technique, called tempering, ensures that the hot cream doesn’t scramble the eggs. Continue whisking until the cream is fully incorporated into the yolks. - Add the Espresso and Kahlua:
In a small bowl, whisk together the instant espresso powder and Kahlua until the powder dissolves. Stir this mixture into the custard base, infusing it with a rich coffee flavor that will shine through in every spoonful. - Strain the Custard:
To ensure your custard is silky smooth and free of any cooked egg bits, strain the mixture through a fine mesh sieve into a large measuring cup or bowl with a spout. This step ensures that the texture of your crème brûlée is flawless. - Fill the Ramekins:
Evenly divide the custard mixture among the prepared ramekins. You should have just enough to fill them nearly to the top. - Create the Water Bath:
Once the ramekins are filled, carefully pour the hot water from the kettle into the baking pan, around the ramekins. The water should come about halfway up the sides of the ramekins. This water bath (bain-marie) helps the custard cook evenly and gently, preventing it from curdling. - Bake the Custard:
Place the baking pan in the preheated oven and bake for about 35-40 minutes. You’ll know the custard is done when the edges are set, but the center still has a slight wobble. If you insert a knife or toothpick into the center, it should come out clean but moist. - Cool and Chill:
Once baked, remove the ramekins from the water bath and set them on a wire rack to cool. After about 30 minutes, cover each ramekin with plastic wrap and refrigerate them for at least 4 hours (or overnight if you prefer to prepare them ahead of time). - Caramelize the Sugar Topping:
Just before serving, sprinkle the remaining ¼ cup of granulated sugar evenly over the top of each custard. Using a kitchen torch, carefully caramelize the sugar by moving the flame over the surface until it turns golden brown and crispy. If you don’t have a torch, you can also place the ramekins under a broiler for 1-2 minutes, but be sure to watch them closely to avoid burning.
Beginner Tips and Notes
Making crème brûlée for the first time might seem like a daunting task, but with a few tips and tricks, you’ll be an expert in no time. Here are some helpful pointers to ensure success:
- Room Temperature Eggs:
Be sure your eggs are at room temperature before you begin. This allows the yolks to blend more easily into the cream mixture, ensuring a smooth custard. - Slowly Add the Cream:
When tempering the egg yolks with the warm cream, do it slowly. Adding the cream too quickly can cause the eggs to cook too fast, leading to a lumpy texture. Patience is key here! - Water Bath Essentials:
The water bath is an important step in the baking process. It ensures even heat distribution and helps the custard cook gently. Make sure the water doesn’t touch the top of the ramekins to prevent water from getting into the custard. A good tip is to use a kettle to avoid spills when adding the hot water. - Proper Baking Time:
Crème brûlée needs to be baked at a low temperature to prevent overcooking. If the custard seems too runny after the recommended baking time, you may need to bake it for a few more minutes. Always check for the slight wobble in the center to avoid overcooking. - Caramelizing the Sugar:
If you’re using a kitchen torch, keep it moving to prevent burning. The goal is a crisp, golden topping, not a dark or overly hard one. If using a broiler, make sure the ramekins are positioned about 6 inches from the heat source for even browning.

Serving Suggestions
Crème brûlée is decadent enough to stand on its own, but here are a few ideas to elevate your dessert:
- Fresh Berries: Serve with a side of fresh raspberries, strawberries, or blueberries. The acidity of the fruit balances the richness of the custard.
- Whipped Cream: A dollop of freshly whipped cream adds an extra layer of creaminess and indulgence.
- Chocolate Shavings: For chocolate lovers, finely shave some dark chocolate on top of the custard before caramelizing the sugar.
- Coffee Pairing: Since this is a coffee-flavored dessert, consider pairing it with a well-brewed cup of espresso or a rich latte.
For leftovers, store the ramekins in the refrigerator (without the sugar topping). When you’re ready to serve again, simply add fresh sugar and caramelize it as you did before.
Engagement Features
I hope this Coffee Crème Brûlée recipe brings as much joy to your kitchen as it did to mine. It’s a beautiful way to practice your baking skills while treating yourself and your loved ones to something truly special. If you’ve never tried making this dessert before, don’t be intimidated! It’s more straightforward than it seems, and the end result is absolutely worth it.
Have you tried this recipe or any other versions of crème brûlée? I’d love to hear about your experience! Drop a comment below to share your thoughts or ask any questions—I’ll be happy to help. If you enjoyed this recipe, consider sharing it with a friend or adding it to your next dinner party menu. Happy baking!