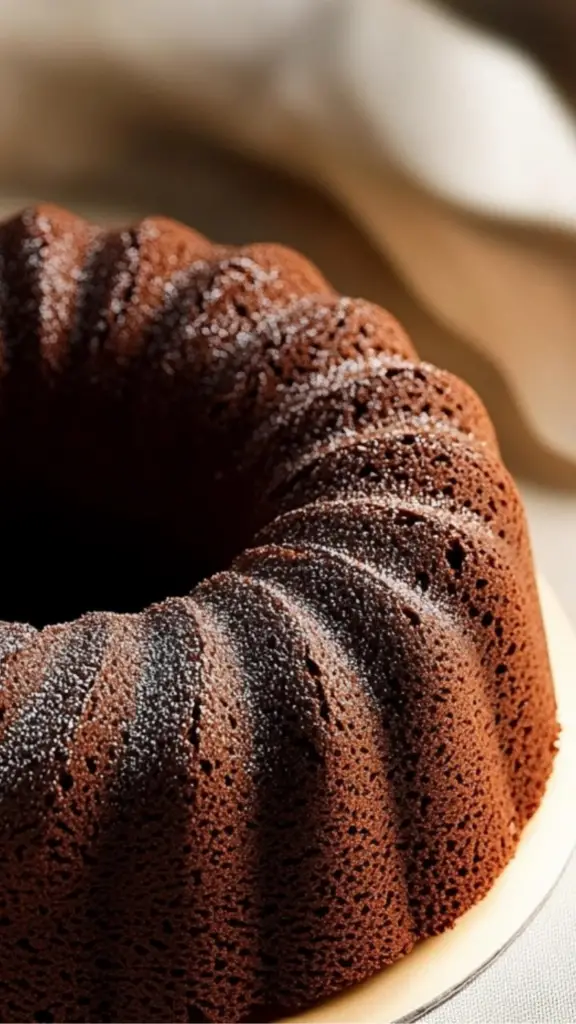
Chocolate Chiffon Cake: A Heavenly Delight

Chiffon cake is often regarded as one of the most versatile and beloved cakes in the world of baking. Its airy, light texture, combined with a delicate sweetness, makes it a go-to treat for any occasion. The Chocolate Chiffon Cake, in particular, is a showstopper with its rich chocolate flavor and soft, spongy structure. Originating from Japan, where it has captured the hearts of many, this cake is found in numerous pastry shops and cafes across the country. Its popularity is no surprise, as the perfect balance of sweetness and cocoa makes every bite a delightful experience. If you haven’t yet had the pleasure of tasting a chiffon cake, this recipe will certainly change that!
Print
Chocolate Chiffon Cake: A Heavenly Delight
Prepare to be blown away by the softness and richness of Chocolate Chiffon Cake! 🍫💫 This light-as-air cake is a dream come true for chocolate lovers. Perfectly baked to a delicate texture with a deep chocolate flavor that melts in your mouth. 🍰 Ready to elevate your dessert game? Let’s dive in! 😋🍴
#ChocolateLoversUnite 🍫 #FluffyAndRich 🍰 #ChiffonCakeMagic ✨ #BakingPerfection 🧑🍳 #ChocolateCravings ❤️ #SweetBites 🍰 #DessertLovers 🌟 #CakeGoals 🧁 #ChocoDelight 🍴 #PerfectlyBaked 🌸
- Total Time: 1 hour
- Yield: 8–10 servings 1x
Ingredients
Cake Ingredients:
- ⅔ cup cake flour (make sure to weigh your flour or use the fluff-and-sprinkle method to measure it)
- 1¼ tsp baking powder
- ½ cup Dutch-process cocoa powder
- 5 large eggs (about 50 g each, separated into yolks and whites)
- ⅔ cup granulated sugar (divided in half)
- ¼ cup neutral oil (such as vegetable oil or canola oil)
- 95 ml whole milk or water (⅓ cup + 1½ Tbsp)
- 1 tsp vanilla extract
For Serving (Optional):
- 1 tbsp confectioners’ sugar (for dusting)
- Fresh raspberries and mint leaves (for decoration)
Equipment You’ll Need
Before we dive into the recipe, let’s ensure you have all the necessary equipment. For this Chocolate Chiffon Cake, you’ll need:
- A 20 cm (8-inch) chiffon cake pan (it’s essential for achieving the iconic structure of a chiffon cake)
- A stand mixer or hand mixer with a whisk attachment (for whipping the egg whites into stiff peaks)
- A kitchen scale (to ensure precise measurements)
- A whisk and spatula (for mixing the batter and folding the meringue)
- A wooden skewer or cake tester (to check if the cake is fully baked)
- An offset spatula (for gently loosening the cake from the pan after baking)
Instructions
Step 1: Preheat the Oven and Prepare the Pan
Begin by preheating your oven to 340°F (170°C). If you are using a convection oven, reduce the temperature by 25°F (15°C). Grease is not required for the chiffon cake pan, as the batter needs to cling to the sides to rise properly. Instead, ensure that the pan is clean and free of any grease.
Step 2: Sift and Combine the Dry Ingredients
Sifting the dry ingredients is crucial for the light, airy texture that defines chiffon cakes. In a bowl, whisk together the cake flour, baking powder, and Dutch-process cocoa powder. The cocoa powder gives this cake its deep chocolate flavor, while the cake flour ensures a soft, tender crumb. Set the dry ingredients aside.
Step 3: Beat the Egg Yolks and Add the Wet Ingredients
Separate the egg yolks from the egg whites. Place the egg whites in a separate clean bowl, as they will be whipped into a meringue later. In a large mixing bowl, whisk the egg yolks by hand or with a hand mixer until they become creamy and pale yellow. Gradually add half of the granulated sugar and whisk until fully incorporated.
Next, add the neutral oil, whole milk (or water), and vanilla extract. Whisk the mixture thoroughly until all the ingredients are well combined. This wet mixture will provide the cake with moisture and a slight richness, without being too heavy.
Step 4: Sift in the Dry Ingredients
Using a fine-mesh sieve, sift half of the dry ingredients into the wet mixture. Use a hand whisk to gently mix the ingredients until just combined. Be careful not to overmix, as this can cause the cake to become dense. Once the first half of the dry ingredients is incorporated, sift in the remaining dry ingredients and whisk again until smooth and free of lumps.
Set the batter aside while you prepare the meringue.
Preparing the Meringue
Step 5: Beat the Egg Whites
For this step, the egg whites need to be cold to form a stable meringue. Place the bowl with the egg whites in the refrigerator or freezer for about 15 minutes. This will ensure the egg whites whip up beautifully into stiff peaks.
Once chilled, place the egg whites in the bowl of a stand mixer (or use a hand mixer) with the whisk attachment. Begin beating the egg whites on medium speed until they become frothy and opaque. Gradually add the remaining granulated sugar, a little at a time, while continuing to beat.
Increase the mixer speed to high and continue beating until the egg whites form stiff peaks. To check if the meringue is ready, pull the whisk out of the mixture. The egg whites should stand up in peaks, with a glossy texture. Be careful not to overbeat the egg whites, as they may become dry and grainy.
Step 6: Folding the Meringue into the Batter
The meringue needs to be carefully folded into the batter to preserve its airy texture. Begin by adding one-quarter of the meringue into the batter. Use a hand whisk to combine it until smooth. Then, add about a third of the remaining meringue and gently fold it into the batter using a spatula. Repeat this process with the remaining meringue, being careful not to deflate the air bubbles.
The final batter should fall from the spatula in thick ribbons. Make sure that the batter is completely mixed, scraping the sides and bottom of the bowl to incorporate any chocolate accumulation.
Baking the Chocolate Chiffon Cake
Step 7: Pour the Batter into the Pan
Prepare the chiffon cake pan by ensuring it is clean and ungreased. Gently pour the batter into the pan in one spot, avoiding any air pockets that may form during the pouring process. Tap the pan lightly on the counter to remove any remaining air bubbles.
Step 8: Bake the Cake
Place the pan on the middle rack of the preheated oven. Bake the cake at 340°F (170°C) for 35 to 40 minutes. Start checking the cake around the 35-minute mark by inserting a wooden skewer or cake tester into the center of the cake. If it comes out clean, the cake is done.
If the top of the cake starts to darken too much during baking, loosely cover it with aluminum foil to prevent burning. This will help ensure an even, golden-brown finish.
Step 9: Cool the Cake
Once baked, remove the cake from the oven and immediately drop the pan onto the counter from a small height. This “shock” method prevents the cake from shrinking as it cools. Allow the cake to cool upside down by inverting the pan and placing it on the neck of a bottle. Let the cake cool completely in this position. The upside-down cooling helps the cake retain its loft and fluffy texture.
Unmolding the Cake
Step 10: Remove the Cake from the Pan
Once the cake has cooled completely, use an offset spatula to gently loosen the edges of the cake from the pan. Carefully remove the cake from the pan and run the spatula along the bottom to release it from the base. Invert the cake onto a plate or cake stand, and it will naturally slide off the inner tube. At this point, the chiffon cake will have a lovely, smooth top.
Serving the Chocolate Chiffon Cake
Step 11: Decorating and Serving
For an elegant touch, dust the top of the cake with a light sprinkling of confectioners’ sugar. You can also garnish it with fresh raspberries and mint leaves for a pop of color and freshness. The mild sweetness of the cake pairs beautifully with the tartness of the raspberries, creating a perfect balance.
Slice the cake using a serrated knife for the best results. Each slice will reveal the airy, fluffy texture that makes chiffon cakes so delightful.
Step 12: Storing the Cake
For the best flavor and freshness, it’s recommended to enjoy the cake within 1–2 days. You can store the cake at room temperature for this period, covering it with a cake dome or placing it on a stand to keep it fresh.
If you want to store it for longer, wrap individual slices in plastic wrap or place them in an airtight container and refrigerate for up to 3 days. For extended storage, freeze the cake for up to 2 weeks. To serve after freezing, simply thaw at room temperature.
Notes
- Ingredient Substitutions: If you can’t find cake flour, you can substitute it with all-purpose flour. However, the texture may not be as light and tender. To make homemade cake flour, replace 2 tablespoons of all-purpose flour with cornstarch for every cup of flour used.
- Add-ins: For a fun twist, you can add chocolate chips, chopped nuts, or even swirl in some raspberry or strawberry puree into the batter before baking. These additions will give the cake extra texture and flavor.
- Serving Suggestions: This cake is perfect on its own, but if you’re looking to elevate it further, you can pair it with whipped cream, chocolate ganache, or even a scoop of vanilla ice cream.
- Prep Time: 20 minutes
- Cook Time: 40 minutes
Whether you are an experienced baker or a novice just looking to try your hand at something new, this Chocolate Chiffon Cake is a perfect choice. It’s simple to make, but the results are spectacular, offering an exquisite flavor and texture that both pleases the palate and impresses guests. Imagine the cake as it rises gently in the oven, its sweet aroma filling your kitchen as it transforms into the perfect chocolate sponge. The mild sweetness paired with deep cocoa notes creates a cake that is not overwhelming but rich enough to satisfy your chocolate cravings.
In this article, I will walk you through the recipe for this irresistible Chocolate Chiffon Cake, offering helpful tips, ingredient substitutions, and serving suggestions. By the end, you’ll have everything you need to create this delectable cake at home and enjoy it with your loved ones. Let’s get started!
Ingredients for Chocolate Chiffon Cake
To make a successful Chocolate Chiffon Cake, the ingredients must be measured carefully. Using a kitchen scale is highly recommended, especially for baking, where precision is key. Here’s a breakdown of the ingredients you’ll need:
Cake Ingredients:
- ⅔ cup cake flour (make sure to weigh your flour or use the fluff-and-sprinkle method to measure it)
- 1¼ tsp baking powder
- ½ cup Dutch-process cocoa powder
- 5 large eggs (about 50 g each, separated into yolks and whites)
- ⅔ cup granulated sugar (divided in half)
- ¼ cup neutral oil (such as vegetable oil or canola oil)
- 95 ml whole milk or water (⅓ cup + 1½ Tbsp)
- 1 tsp vanilla extract
For Serving (Optional):
- 1 tbsp confectioners’ sugar (for dusting)
- Fresh raspberries and mint leaves (for decoration)
Equipment You’ll Need
Before we dive into the recipe, let’s ensure you have all the necessary equipment. For this Chocolate Chiffon Cake, you’ll need:
- A 20 cm (8-inch) chiffon cake pan (it’s essential for achieving the iconic structure of a chiffon cake)
- A stand mixer or hand mixer with a whisk attachment (for whipping the egg whites into stiff peaks)
- A kitchen scale (to ensure precise measurements)
- A whisk and spatula (for mixing the batter and folding the meringue)
- A wooden skewer or cake tester (to check if the cake is fully baked)
- An offset spatula (for gently loosening the cake from the pan after baking)
Preparing the Cake Batter
Step 1: Preheat the Oven and Prepare the Pan
Begin by preheating your oven to 340°F (170°C). If you are using a convection oven, reduce the temperature by 25°F (15°C). Grease is not required for the chiffon cake pan, as the batter needs to cling to the sides to rise properly. Instead, ensure that the pan is clean and free of any grease.
Step 2: Sift and Combine the Dry Ingredients
Sifting the dry ingredients is crucial for the light, airy texture that defines chiffon cakes. In a bowl, whisk together the cake flour, baking powder, and Dutch-process cocoa powder. The cocoa powder gives this cake its deep chocolate flavor, while the cake flour ensures a soft, tender crumb. Set the dry ingredients aside.
Step 3: Beat the Egg Yolks and Add the Wet Ingredients
Separate the egg yolks from the egg whites. Place the egg whites in a separate clean bowl, as they will be whipped into a meringue later. In a large mixing bowl, whisk the egg yolks by hand or with a hand mixer until they become creamy and pale yellow. Gradually add half of the granulated sugar and whisk until fully incorporated.
Next, add the neutral oil, whole milk (or water), and vanilla extract. Whisk the mixture thoroughly until all the ingredients are well combined. This wet mixture will provide the cake with moisture and a slight richness, without being too heavy.
Step 4: Sift in the Dry Ingredients
Using a fine-mesh sieve, sift half of the dry ingredients into the wet mixture. Use a hand whisk to gently mix the ingredients until just combined. Be careful not to overmix, as this can cause the cake to become dense. Once the first half of the dry ingredients is incorporated, sift in the remaining dry ingredients and whisk again until smooth and free of lumps.
Set the batter aside while you prepare the meringue.
Preparing the Meringue
Step 5: Beat the Egg Whites
For this step, the egg whites need to be cold to form a stable meringue. Place the bowl with the egg whites in the refrigerator or freezer for about 15 minutes. This will ensure the egg whites whip up beautifully into stiff peaks.
Once chilled, place the egg whites in the bowl of a stand mixer (or use a hand mixer) with the whisk attachment. Begin beating the egg whites on medium speed until they become frothy and opaque. Gradually add the remaining granulated sugar, a little at a time, while continuing to beat.
Increase the mixer speed to high and continue beating until the egg whites form stiff peaks. To check if the meringue is ready, pull the whisk out of the mixture. The egg whites should stand up in peaks, with a glossy texture. Be careful not to overbeat the egg whites, as they may become dry and grainy.
Step 6: Folding the Meringue into the Batter
The meringue needs to be carefully folded into the batter to preserve its airy texture. Begin by adding one-quarter of the meringue into the batter. Use a hand whisk to combine it until smooth. Then, add about a third of the remaining meringue and gently fold it into the batter using a spatula. Repeat this process with the remaining meringue, being careful not to deflate the air bubbles.
The final batter should fall from the spatula in thick ribbons. Make sure that the batter is completely mixed, scraping the sides and bottom of the bowl to incorporate any chocolate accumulation.
Baking the Chocolate Chiffon Cake
Step 7: Pour the Batter into the Pan
Prepare the chiffon cake pan by ensuring it is clean and ungreased. Gently pour the batter into the pan in one spot, avoiding any air pockets that may form during the pouring process. Tap the pan lightly on the counter to remove any remaining air bubbles.
Step 8: Bake the Cake
Place the pan on the middle rack of the preheated oven. Bake the cake at 340°F (170°C) for 35 to 40 minutes. Start checking the cake around the 35-minute mark by inserting a wooden skewer or cake tester into the center of the cake. If it comes out clean, the cake is done.
If the top of the cake starts to darken too much during baking, loosely cover it with aluminum foil to prevent burning. This will help ensure an even, golden-brown finish.
Step 9: Cool the Cake
Once baked, remove the cake from the oven and immediately drop the pan onto the counter from a small height. This “shock” method prevents the cake from shrinking as it cools. Allow the cake to cool upside down by inverting the pan and placing it on the neck of a bottle. Let the cake cool completely in this position. The upside-down cooling helps the cake retain its loft and fluffy texture.
Unmolding the Cake
Step 10: Remove the Cake from the Pan
Once the cake has cooled completely, use an offset spatula to gently loosen the edges of the cake from the pan. Carefully remove the cake from the pan and run the spatula along the bottom to release it from the base. Invert the cake onto a plate or cake stand, and it will naturally slide off the inner tube. At this point, the chiffon cake will have a lovely, smooth top.
Serving the Chocolate Chiffon Cake
Step 11: Decorating and Serving
For an elegant touch, dust the top of the cake with a light sprinkling of confectioners’ sugar. You can also garnish it with fresh raspberries and mint leaves for a pop of color and freshness. The mild sweetness of the cake pairs beautifully with the tartness of the raspberries, creating a perfect balance.
Slice the cake using a serrated knife for the best results. Each slice will reveal the airy, fluffy texture that makes chiffon cakes so delightful.
Step 12: Storing the Cake
For the best flavor and freshness, it’s recommended to enjoy the cake within 1–2 days. You can store the cake at room temperature for this period, covering it with a cake dome or placing it on a stand to keep it fresh.
If you want to store it for longer, wrap individual slices in plastic wrap or place them in an airtight container and refrigerate for up to 3 days. For extended storage, freeze the cake for up to 2 weeks. To serve after freezing, simply thaw at room temperature.
Tips and Variations
- Ingredient Substitutions: If you can’t find cake flour, you can substitute it with all-purpose flour. However, the texture may not be as light and tender. To make homemade cake flour, replace 2 tablespoons of all-purpose flour with cornstarch for every cup of flour used.
- Add-ins: For a fun twist, you can add chocolate chips, chopped nuts, or even swirl in some raspberry or strawberry puree into the batter before baking. These additions will give the cake extra texture and flavor.
- Serving Suggestions: This cake is perfect on its own, but if you’re looking to elevate it further, you can pair it with whipped cream, chocolate ganache, or even a scoop of vanilla ice cream.
With this Chocolate Chiffon Cake recipe, you’ll create a dessert that’s both impressive and delicious. Whether it’s for a special occasion or a weekend treat, this cake is sure to leave a lasting impression. Enjoy baking, and more importantly, enjoy every bite of this airy, chocolatey delight!
Conclusion
The Chocolate Chiffon Cake is a delightful dessert that perfectly blends the richness of chocolate with the airy, light texture of a chiffon cake. Whether you’re baking for a special occasion or simply craving a decadent treat, this cake is sure to impress. Its moist crumb, delicate sweetness, and subtle chocolate flavor make it an irresistible choice for any dessert lover.
While the process may seem a bit intricate with the meringue folding and the precise technique required to achieve the perfect texture, the result is worth every step. The cake’s lightness and fluffiness are the ultimate reward, and it’s sure to become a favorite in your dessert repertoire.
Not only does this cake taste amazing, but it also offers versatility. You can serve it plain with a dusting of confectioners’ sugar, or you can elevate it further with fresh fruit, whipped cream, or a chocolate ganache drizzle. It’s a showstopper at any gathering and will leave your guests asking for the recipe.
Enjoy the process of creating this elegant treat, and don’t be afraid to make it your own with various flavor or decoration variations. Whether you’re a novice baker or an experienced one, the Chocolate Chiffon Cake provides a fun, rewarding baking experience with a delicious, professional-quality result. So, grab your ingredients and get ready to bake a cake that will not only fill your kitchen with the irresistible aroma of chocolate but will also satisfy your sweet tooth in the most delightful way. Happy baking!