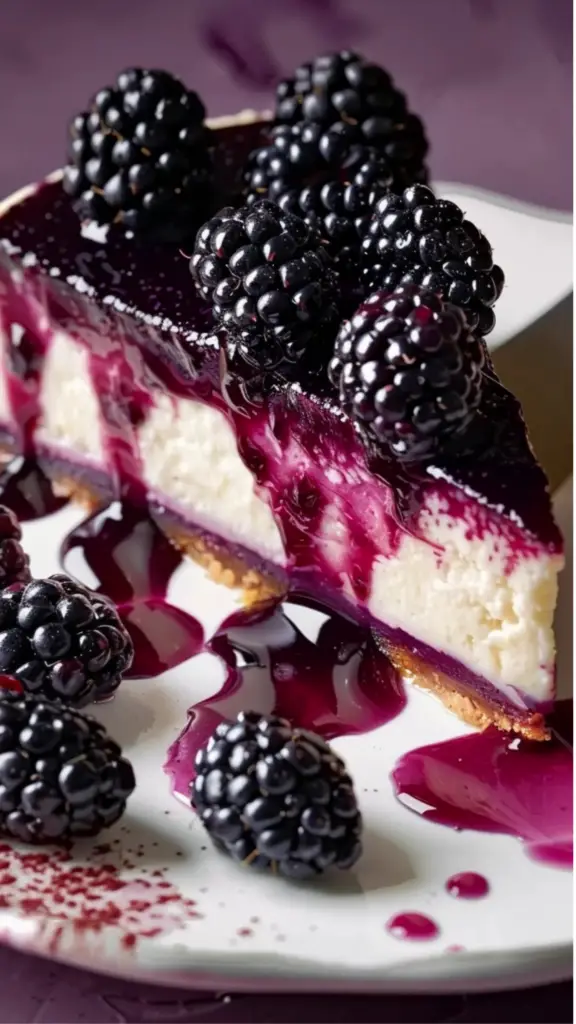
Blackberry Cheesecake

If you’re looking for a stunning dessert that combines creamy textures with a fruity punch, this no-bake blackberry cheesecake is the perfect choice. It’s a layered treat with a buttery graham cracker crust, a luscious cream cheese filling, and a vibrant blackberry puree topping. Best of all, it requires no baking, making it ideal for warm days or when you need a simple yet impressive dessert. Whether it’s for a dinner party or a family gathering, this cheesecake will quickly become a favorite.
Print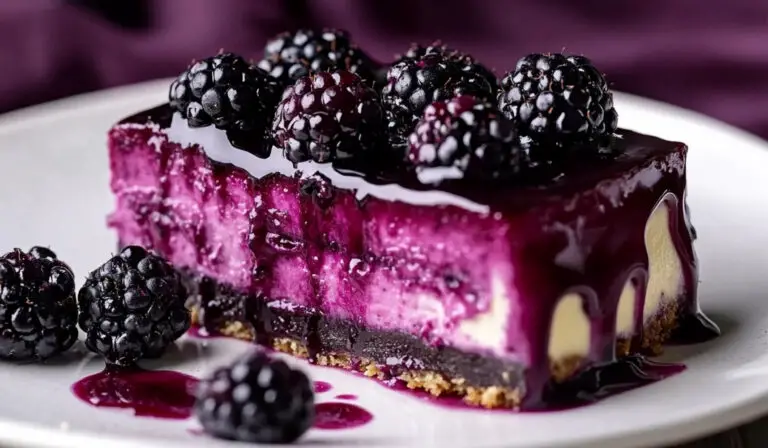
Blackberry Cheesecake
This no-bake blackberry cheesecake is a showstopper! With a buttery graham cracker crust, smooth cream cheese filling, and a luscious blackberry puree, it’s the ultimate dessert to impress your guests. 😍🍰💜
- Total Time: 1 hour 30 minutes
- Yield: 12 servings
Ingredients
For the Crust:
- 1 1/2 cups graham cracker crumbs – The classic base that adds a sweet, crunchy texture to your cheesecake.
- 1/3 cup unsalted butter, melted – Helps bind the crumbs together while adding rich flavor.
- 1/4 cup granulated sugar – Adds sweetness and helps the crust hold its shape.
For the Cheesecake Filling:
- 1 1/4 cups heavy cream – Whipped to create a light, airy filling.
- 2 teaspoons gelatin powder – Stabilizes the cheesecake, ensuring it holds its form without the need for baking.
- 1/4 cup cold water – Used to bloom the gelatin.
- 2 (8 oz) packages cream cheese, room temperature – The star ingredient that gives the filling its creamy, tangy richness.
- 2/3 cup granulated sugar – Balances the tanginess of the cream cheese with sweetness.
- 2 teaspoons vanilla extract – Adds a touch of warm, fragrant flavor to the filling.
For the Blackberry Puree Layer:
- 2 cups fresh blackberries (plus more for decorating) – Provide a tart, fruity contrast to the rich cheesecake.
- 1/2 cup granulated sugar – Sweetens the blackberry puree.
- 2 teaspoons gelatin powder – Sets the puree layer, making it easy to slice.
- 1/4 cup water – Used to dissolve the gelatin for the puree.
Instructions
1. Preparing the Graham Cracker Crust
A perfect cheesecake begins with a well-made crust. The graham cracker base is essential for adding texture and flavor.
- In a medium bowl, combine the graham cracker crumbs, melted butter, and granulated sugar. Stir until the mixture resembles wet sand and the ingredients are fully incorporated.
- Press the mixture evenly into the bottom of a 9-inch springform pan. Make sure the crust is packed tightly using the back of a spoon or the bottom of a glass to avoid crumbling later.
- Chill the crust in the refrigerator while you prepare the filling, which allows it to firm up and hold the cheesecake layers.
2. Making the Cheesecake Filling
The creamy cheesecake layer is the heart of this dessert, and thanks to gelatin, it sets beautifully without needing to bake.
- Bloom the gelatin by sprinkling 2 teaspoons of gelatin powder over 1/4 cup cold water in a small bowl. Let it sit for 5-10 minutes until the gelatin absorbs the water and becomes spongy.
- In a small saucepan, gently heat the bloomed gelatin until it fully dissolves, stirring continuously. Be careful not to let it boil. Once dissolved, set the mixture aside to cool slightly.
- In a large mixing bowl, beat the cream cheese, granulated sugar, and vanilla extract together using a hand mixer or stand mixer until smooth and creamy. Make sure there are no lumps.
- In a separate bowl, whip the heavy cream to stiff peaks using a hand mixer. This step is crucial for giving the cheesecake its airy, mousse-like texture.
- Gently fold the whipped cream into the cream cheese mixture using a spatula. This folding technique helps to maintain the fluffiness of the whipped cream while blending it smoothly with the cream cheese.
- Slowly stir in the cooled gelatin mixture, ensuring it’s evenly distributed throughout the filling.
- Pour the cheesecake filling over the prepared crust in the springform pan. Smooth the top with a spatula to create an even layer.
- Refrigerate for at least 1 hour to allow the filling to set before adding the blackberry puree layer.
3. Preparing the Blackberry Puree Layer
The blackberry layer adds a burst of color and flavor, making this dessert as beautiful as it is delicious.
- In a blender, combine the fresh blackberries and granulated sugar. Blend until smooth, then strain the mixture through a fine mesh sieve to remove the seeds. You should be left with a smooth blackberry puree.
- Bloom the gelatin by sprinkling 2 teaspoons of gelatin powder over 1/4 cup water in a small bowl. Let it sit for 5-10 minutes.
- Heat the bloomed gelatin in a small saucepan over low heat until dissolved. Remove from heat and let it cool slightly before mixing it into the blackberry puree.
- Allow the blackberry mixture to cool to room temperature, then carefully pour it over the cheesecake layer, ensuring an even spread.
- Return the cheesecake to the refrigerator and chill for at least 4 hours or overnight until fully set.
4. Decorating and Serving the Blackberry Cheesecake
Once your cheesecake is fully set, it’s time to add the final touches that make it truly irresistible.
- Carefully remove the cheesecake from the springform pan by running a knife along the edges and gently releasing the latch. Transfer the cheesecake to a serving platter.
- Decorate the top with fresh blackberries for an extra pop of color and texture.
- For clean slices, dip a sharp knife into warm water before each cut, wiping it clean between slices.
- Serve the cheesecake chilled and enjoy the perfect blend of creamy, tangy, and fruity flavors.
Notes
- Room Temperature Cream Cheese: Always use room temperature cream cheese to avoid lumps in your filling. Cold cream cheese can be difficult to blend smoothly.
- Gelatin Technique: When dissolving gelatin, make sure it’s fully melted before adding it to your cheesecake mixture or puree. Undissolved gelatin can cause clumps in your final product.
- Chill Time: Allowing the cheesecake to chill thoroughly is key to achieving clean slices. If you’re in a hurry, you can place it in the freezer for the last hour of chilling, but be sure to keep an eye on it to avoid freezing the layers completely.
- Use Fresh or Frozen Blackberries: While fresh blackberries are ideal for the puree layer, you can also use frozen blackberries if they’re out of season. Just thaw and drain them before blending.
- Optional Garnishes: For a more decadent presentation, drizzle melted white or dark chocolate over the top, or sprinkle powdered sugar for an elegant touch.
Ingredients Breakdown
For the Crust:
- 1 1/2 cups graham cracker crumbs – The classic base that adds a sweet, crunchy texture to your cheesecake.
- 1/3 cup unsalted butter, melted – Helps bind the crumbs together while adding rich flavor.
- 1/4 cup granulated sugar – Adds sweetness and helps the crust hold its shape.
For the Cheesecake Filling:
- 1 1/4 cups heavy cream – Whipped to create a light, airy filling.
- 2 teaspoons gelatin powder – Stabilizes the cheesecake, ensuring it holds its form without the need for baking.
- 1/4 cup cold water – Used to bloom the gelatin.
- 2 (8 oz) packages cream cheese, room temperature – The star ingredient that gives the filling its creamy, tangy richness.
- 2/3 cup granulated sugar – Balances the tanginess of the cream cheese with sweetness.
- 2 teaspoons vanilla extract – Adds a touch of warm, fragrant flavor to the filling.
For the Blackberry Puree Layer:
- 2 cups fresh blackberries (plus more for decorating) – Provide a tart, fruity contrast to the rich cheesecake.
- 1/2 cup granulated sugar – Sweetens the blackberry puree.
- 2 teaspoons gelatin powder – Sets the puree layer, making it easy to slice.
- 1/4 cup water – Used to dissolve the gelatin for the puree.
Step-by-Step Instructions
1. Preparing the Graham Cracker Crust
A perfect cheesecake begins with a well-made crust. The graham cracker base is essential for adding texture and flavor.
- In a medium bowl, combine the graham cracker crumbs, melted butter, and granulated sugar. Stir until the mixture resembles wet sand and the ingredients are fully incorporated.
- Press the mixture evenly into the bottom of a 9-inch springform pan. Make sure the crust is packed tightly using the back of a spoon or the bottom of a glass to avoid crumbling later.
- Chill the crust in the refrigerator while you prepare the filling, which allows it to firm up and hold the cheesecake layers.
2. Making the Cheesecake Filling
The creamy cheesecake layer is the heart of this dessert, and thanks to gelatin, it sets beautifully without needing to bake.
- Bloom the gelatin by sprinkling 2 teaspoons of gelatin powder over 1/4 cup cold water in a small bowl. Let it sit for 5-10 minutes until the gelatin absorbs the water and becomes spongy.
- In a small saucepan, gently heat the bloomed gelatin until it fully dissolves, stirring continuously. Be careful not to let it boil. Once dissolved, set the mixture aside to cool slightly.
- In a large mixing bowl, beat the cream cheese, granulated sugar, and vanilla extract together using a hand mixer or stand mixer until smooth and creamy. Make sure there are no lumps.
- In a separate bowl, whip the heavy cream to stiff peaks using a hand mixer. This step is crucial for giving the cheesecake its airy, mousse-like texture.
- Gently fold the whipped cream into the cream cheese mixture using a spatula. This folding technique helps to maintain the fluffiness of the whipped cream while blending it smoothly with the cream cheese.
- Slowly stir in the cooled gelatin mixture, ensuring it’s evenly distributed throughout the filling.
- Pour the cheesecake filling over the prepared crust in the springform pan. Smooth the top with a spatula to create an even layer.
- Refrigerate for at least 1 hour to allow the filling to set before adding the blackberry puree layer.
3. Preparing the Blackberry Puree Layer
The blackberry layer adds a burst of color and flavor, making this dessert as beautiful as it is delicious.
- In a blender, combine the fresh blackberries and granulated sugar. Blend until smooth, then strain the mixture through a fine mesh sieve to remove the seeds. You should be left with a smooth blackberry puree.
- Bloom the gelatin by sprinkling 2 teaspoons of gelatin powder over 1/4 cup water in a small bowl. Let it sit for 5-10 minutes.
- Heat the bloomed gelatin in a small saucepan over low heat until dissolved. Remove from heat and let it cool slightly before mixing it into the blackberry puree.
- Allow the blackberry mixture to cool to room temperature, then carefully pour it over the cheesecake layer, ensuring an even spread.
- Return the cheesecake to the refrigerator and chill for at least 4 hours or overnight until fully set.
4. Decorating and Serving the Blackberry Cheesecake
Once your cheesecake is fully set, it’s time to add the final touches that make it truly irresistible.
- Carefully remove the cheesecake from the springform pan by running a knife along the edges and gently releasing the latch. Transfer the cheesecake to a serving platter.
- Decorate the top with fresh blackberries for an extra pop of color and texture.
- For clean slices, dip a sharp knife into warm water before each cut, wiping it clean between slices.
- Serve the cheesecake chilled and enjoy the perfect blend of creamy, tangy, and fruity flavors.
Tips for the Perfect Blackberry Cheesecake
To ensure your cheesecake turns out flawless every time, here are a few helpful tips:
- Room Temperature Cream Cheese: Always use room temperature cream cheese to avoid lumps in your filling. Cold cream cheese can be difficult to blend smoothly.
- Gelatin Technique: When dissolving gelatin, make sure it’s fully melted before adding it to your cheesecake mixture or puree. Undissolved gelatin can cause clumps in your final product.
- Chill Time: Allowing the cheesecake to chill thoroughly is key to achieving clean slices. If you’re in a hurry, you can place it in the freezer for the last hour of chilling, but be sure to keep an eye on it to avoid freezing the layers completely.
- Use Fresh or Frozen Blackberries: While fresh blackberries are ideal for the puree layer, you can also use frozen blackberries if they’re out of season. Just thaw and drain them before blending.
- Optional Garnishes: For a more decadent presentation, drizzle melted white or dark chocolate over the top, or sprinkle powdered sugar for an elegant touch.
Variations on the Classic Blackberry Cheesecake
If you’re looking to switch things up or accommodate dietary preferences, consider these variations:
1. Mixed Berry Cheesecake
Instead of using only blackberries, try adding a mix of berries such as raspberries, blueberries, and strawberries to the puree for a burst of different flavors and a colorful topping.
2. Gluten-Free Cheesecake
Substitute regular graham crackers with gluten-free graham crackers or another gluten-free cookie for the crust. Ensure that the gelatin and other ingredients are gluten-free as well.
3. Vegan Cheesecake
For a plant-based option, use a dairy-free cream cheese alternative, such as cashew-based cream cheese. Substitute gelatin with agar-agar powder, and replace heavy cream with coconut cream.
4. Chocolate Blackberry Cheesecake
Enhance the richness of this cheesecake by adding a layer of melted chocolate between the crust and cheesecake filling. You can also drizzle chocolate ganache over the top before serving.
Storing and Freezing Your Cheesecake
This no-bake blackberry cheesecake can be made in advance and stored for future enjoyment.
- Refrigerate: Store the cheesecake in an airtight container in the refrigerator for up to 4-5 days. The flavors often deepen after a day or two, making it even more delicious.
- Freeze: To freeze, wrap the cheesecake tightly in plastic wrap and then in aluminum foil. Freeze for up to 2 months. To serve, thaw the cheesecake in the refrigerator overnight.
Why You’ll Love This Blackberry Cheesecake
- No-Bake Convenience: You don’t need an oven to create this stunning dessert. Simply mix, chill, and serve.
- Beautiful Presentation: The contrast of creamy white cheesecake and vibrant blackberry topping makes this dessert a showstopper.
- Customizable: With variations and potential for added layers, this cheesecake can easily be adapted to your taste or dietary needs.
Final Thoughts
This no-bake blackberry cheesecake is not only easy to make but also a visually impressive dessert that will please any crowd. The combination of a buttery graham cracker crust, rich cream cheese filling, and tart blackberry topping creates a delightful balance of flavors and textures. Whether you’re celebrating a special occasion or simply indulging in a sweet treat, this cheesecake is a refreshing and elegant choice.