Taco Tortilla Roll Ups: A Flavor-Packed Starter for New Cooks
The first time I made these Taco Tortilla Roll Ups, I was hosting a casual movie night with friends. I wanted something fun, tasty, and easy to make—without spending hours in the kitchen. A quick internet search led me to the idea of tortilla roll ups, and after a bit of experimenting, this Mexican-inspired version became an instant hit.
Print
Taco Tortilla Roll Ups: A Flavor-Packed Starter for New Cooks
Roll into flavor town with these Taco Tortilla Roll Ups! 🌮✨ Loaded with seasoned meat, creamy cheese, and bold taco goodness, these no-cook wonders are perfect for beginners and snack lovers alike. 🧀🌯 Simple to make, easy to serve, and totally addictive—what more could you want? Great for game day, picnics, or lunch on the go! 🚀🍴
- Total Time: 40 minutes
- Yield: 8 servings 1x
Ingredients
- 4 large flour tortillas
- 8 oz cream cheese, softened
- 1/2 cup sour cream
- 1 packet (1 oz) taco seasoning
- 1 cup shredded cheddar cheese or Mexican blend cheese
- 1/2 cup diced tomatoes (seeds removed to prevent sogginess)
- 1/2 cup sliced black olives (optional)
- 1/2 cup chopped green onions
- 1/2 cup cooked and crumbled ground beef or shredded chicken (optional)
- 1/4 cup chopped fresh cilantro (optional)
Instructions
Step 1: Prepare the Filling
In a medium-sized bowl, combine the softened cream cheese, sour cream, and taco seasoning. Stir until the mixture is completely smooth. You should see no lumps of cream cheese. This is your flavor-packed base.
Step 2: Add the Mix-Ins
Fold in the shredded cheese, diced tomatoes, green onions, black olives (if using), and your choice of cooked ground beef or shredded chicken. Make sure everything is evenly distributed. The mix should be thick but spreadable.
Note: If using freshly cooked meat, make sure it’s completely cooled before mixing it in. Warm meat can melt the cheese and sour cream, making the mixture too runny.
Step 3: Spread the Filling
Lay one tortilla flat on a clean surface or cutting board. Use a butter knife or rubber spatula to spread about 1/4 of the mixture across the tortilla in a thin, even layer. Leave about a 1/2-inch border around the edges to prevent spillage when rolling.
Step 4: Roll It Tightly
Starting from one edge, roll the tortilla up tightly into a log. You want to roll firmly so the filling stays inside, but not so tight that it squeezes out. Place the roll seam-side down and repeat with the remaining tortillas.
Step 5: Wrap and Chill
Wrap each roll tightly in plastic wrap and refrigerate for at least 30 minutes. This step is crucial—it helps the filling firm up and makes slicing cleaner and easier.
Beginner Tip: If you’re in a hurry, 20 minutes of chilling will do, but the longer the rolls sit, the better they hold together.
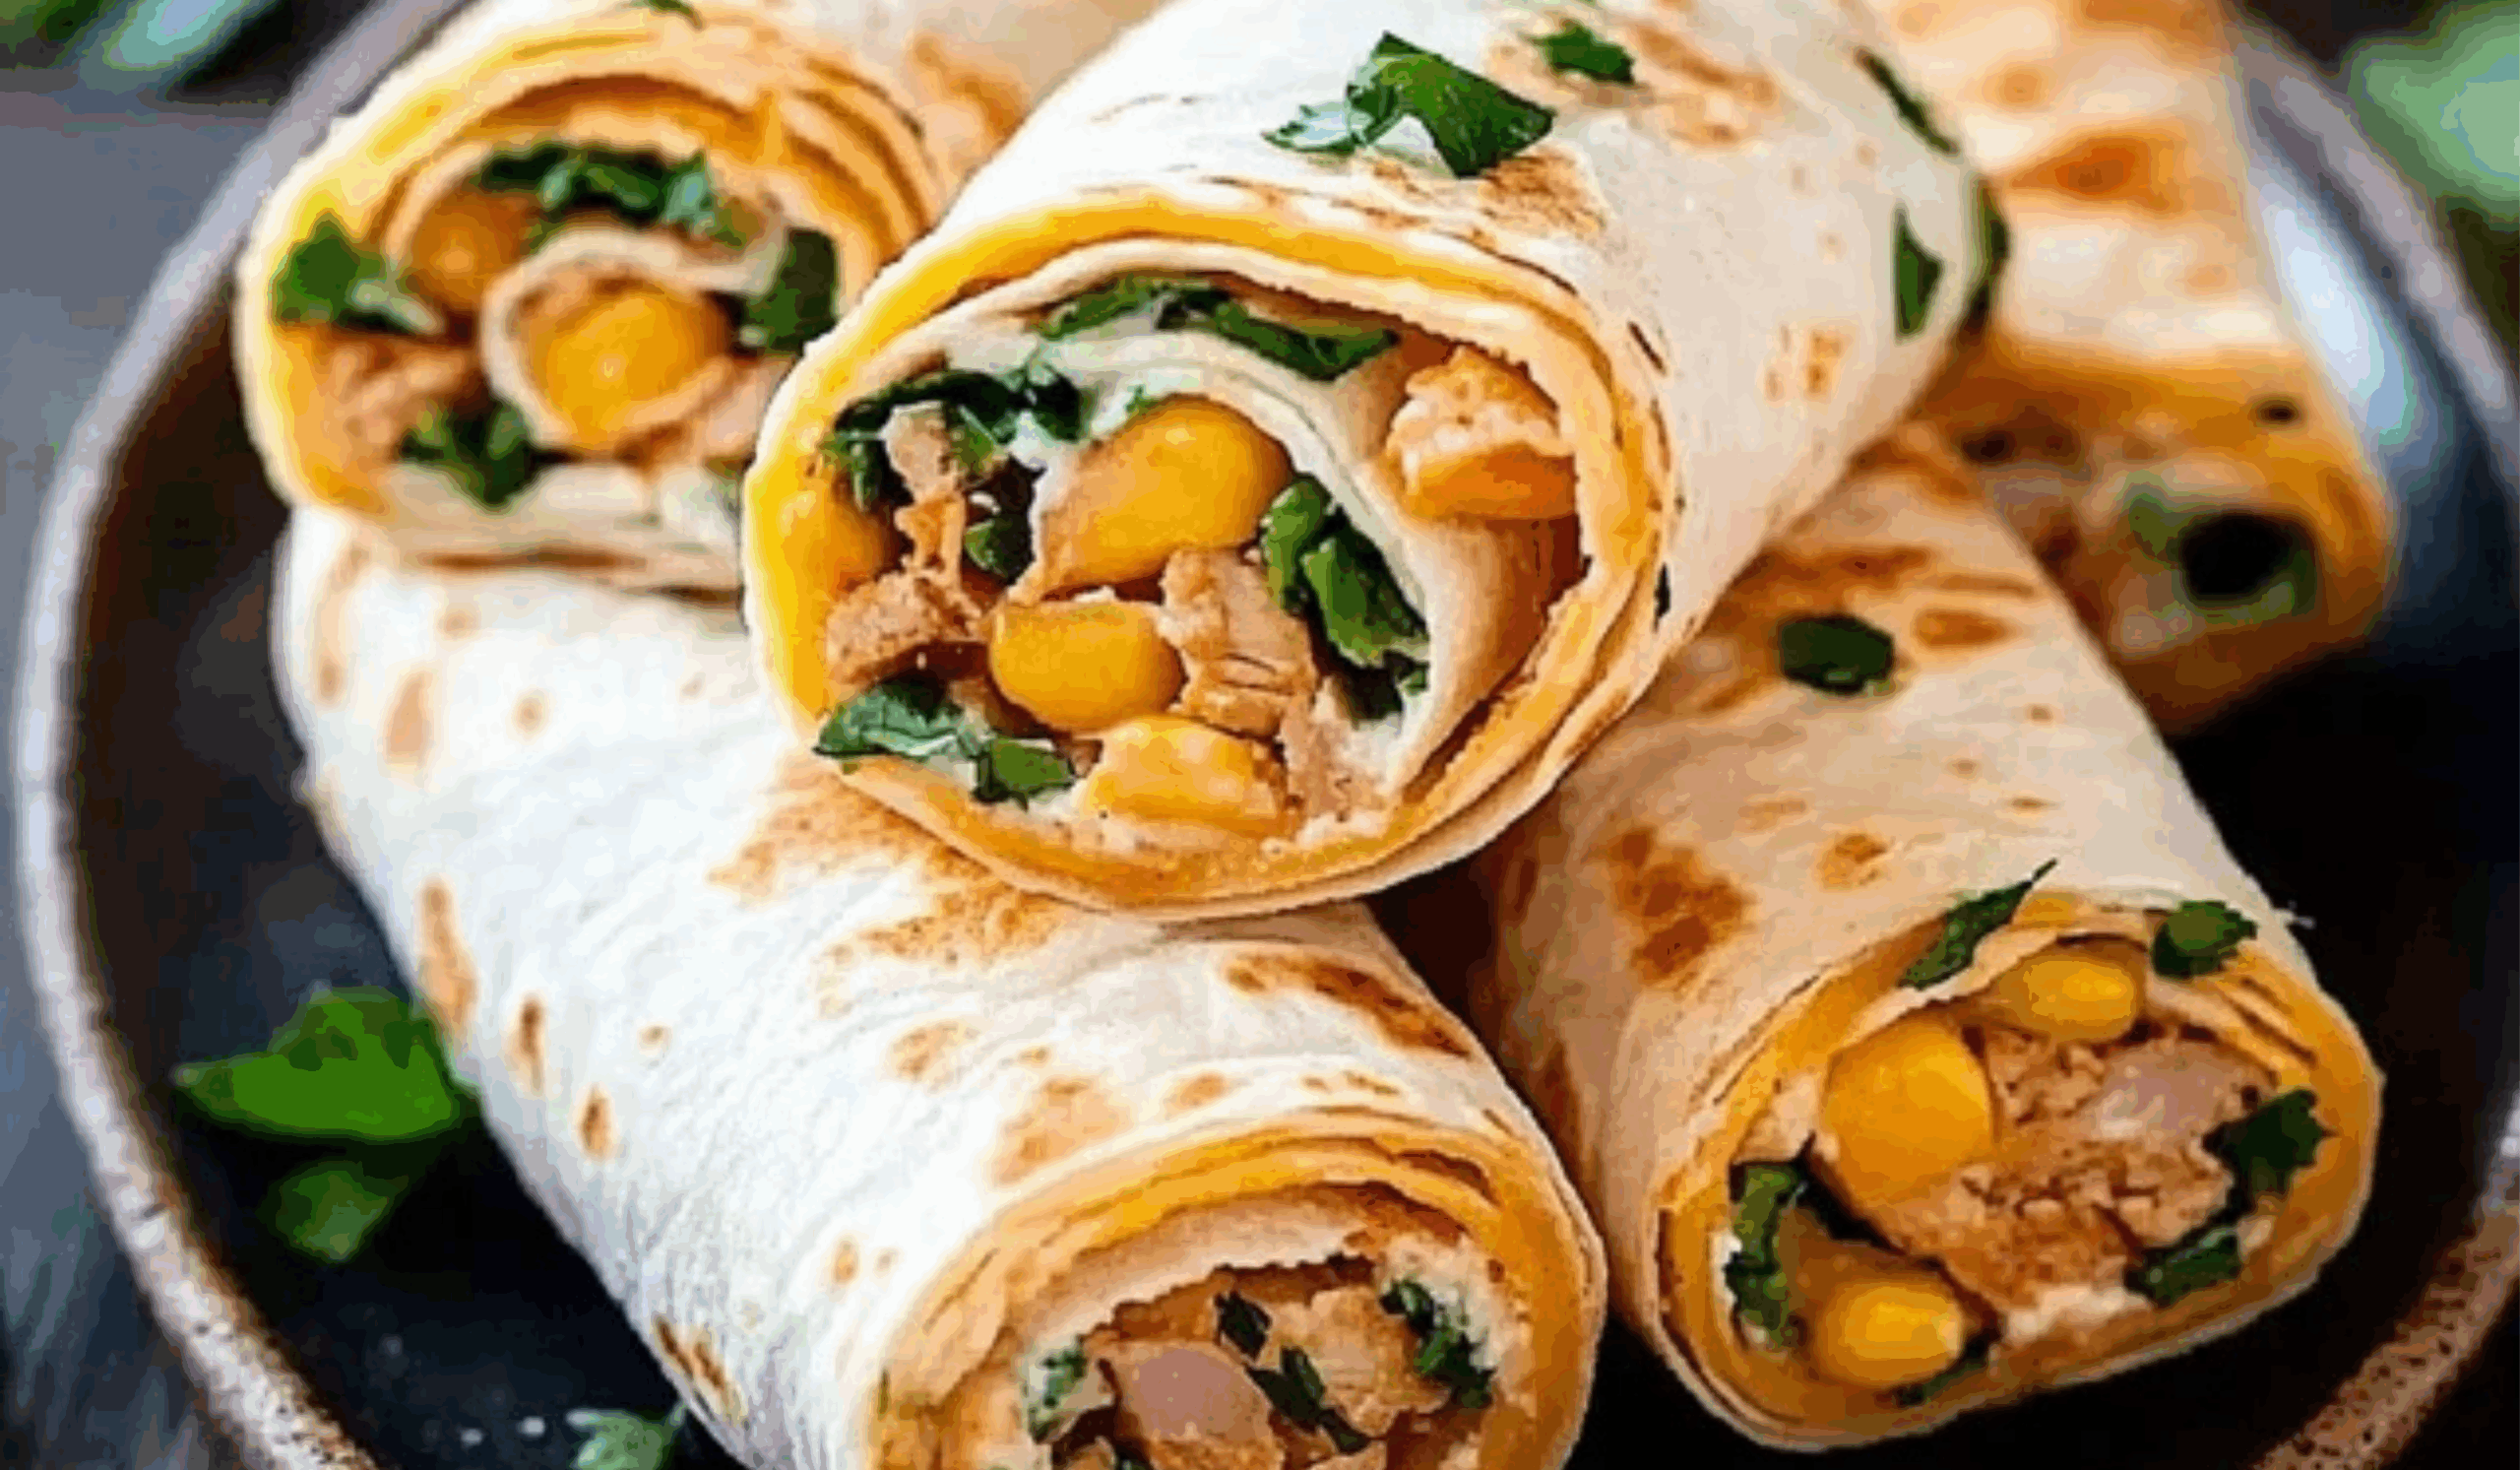
Step 6: Slice and Serve
After chilling, unwrap the rolls and place them seam-side down on a cutting board. Use a sharp knife to slice each roll into 1-inch pieces. Arrange them on a platter and garnish with chopped cilantro if desired.
Notes
Troubleshooting Common Issues
- Roll Ups Falling Apart: This usually happens if the filling is too warm or if the rolls weren’t chilled long enough. Make sure your mixture is cool, and always refrigerate before slicing.
- Tortillas Tearing: If your tortillas crack while rolling, they might be a little dry. Warm them briefly in the microwave (5–10 seconds wrapped in a damp paper towel) to make them more pliable.
- Too Much Filling: It’s tempting to pile on the filling, but less is more here. Overstuffed tortillas won’t roll well and can fall apart when sliced.
Kitchen Efficiency Tips
- Prep All Ingredients First: Dice your tomatoes, slice your olives, and cook your meat ahead of time so the assembly goes smoothly.
- Use a Bench Scraper or Ruler: To get evenly sized slices, you can lightly mark the top of the tortilla rolls before cutting.
- Keep a Damp Paper Towel Nearby: Use it to wipe your knife between slices for cleaner cuts.
- Prep Time: 10 minutes
- Cook Time: 30 minutes (for optional protein like ground beef or chicken)
What makes this recipe so special isn’t just the bold, crowd-pleasing flavor; it’s how approachable it is. Whether you’re new to cooking or just need something foolproof for your next gathering, these roll ups deliver every time. They require no baking beyond preparing the optional protein, use common kitchen tools, and can be prepped ahead—making them perfect for both spontaneous snacking and planned parties.
If you’re just starting your cooking journey, this is a great confidence-booster. You don’t need any fancy techniques or special equipment, and there’s plenty of flexibility if you’re missing an ingredient or two. Let’s walk through this beginner-friendly recipe, step-by-step.
Ingredients and Preparation
Here’s everything you’ll need to make Taco Tortilla Roll Ups. This recipe makes about 8 servings, perfect for an appetizer platter or game-day snack.
Ingredients
- 4 large flour tortillas
- 8 oz cream cheese, softened
- 1/2 cup sour cream
- 1 packet (1 oz) taco seasoning
- 1 cup shredded cheddar cheese or Mexican blend cheese
- 1/2 cup diced tomatoes (seeds removed to prevent sogginess)
- 1/2 cup sliced black olives (optional)
- 1/2 cup chopped green onions
- 1/2 cup cooked and crumbled ground beef or shredded chicken (optional)
- 1/4 cup chopped fresh cilantro (optional)
Alternative Ingredient Suggestions
- Tortillas: Swap flour tortillas for spinach or whole wheat tortillas for a healthier twist.
- Cream Cheese: Greek yogurt cream cheese is a lighter option with a similar texture.
- Sour Cream: Can be replaced with plain Greek yogurt for a protein boost.
- Cheese: Any melty cheese like Monterey Jack or Colby works well.
- Protein Options: If you want a vegetarian version, leave out the meat and add black beans or chopped roasted bell peppers for texture.
- Toppings: If cilantro isn’t your thing, try chopped parsley or skip the garnish entirely.
Make sure your cream cheese is fully softened before you begin. If it’s too cold, it won’t mix smoothly and will be hard to spread.
Step-by-Step Instructions
Follow these simple steps, and you’ll have perfectly rolled, flavorful bites that are ready to impress.
Step 1: Prepare the Filling
In a medium-sized bowl, combine the softened cream cheese, sour cream, and taco seasoning. Stir until the mixture is completely smooth. You should see no lumps of cream cheese. This is your flavor-packed base.
Step 2: Add the Mix-Ins
Fold in the shredded cheese, diced tomatoes, green onions, black olives (if using), and your choice of cooked ground beef or shredded chicken. Make sure everything is evenly distributed. The mix should be thick but spreadable.
Note: If using freshly cooked meat, make sure it’s completely cooled before mixing it in. Warm meat can melt the cheese and sour cream, making the mixture too runny.
Step 3: Spread the Filling
Lay one tortilla flat on a clean surface or cutting board. Use a butter knife or rubber spatula to spread about 1/4 of the mixture across the tortilla in a thin, even layer. Leave about a 1/2-inch border around the edges to prevent spillage when rolling.
Step 4: Roll It Tightly
Starting from one edge, roll the tortilla up tightly into a log. You want to roll firmly so the filling stays inside, but not so tight that it squeezes out. Place the roll seam-side down and repeat with the remaining tortillas.
Step 5: Wrap and Chill
Wrap each roll tightly in plastic wrap and refrigerate for at least 30 minutes. This step is crucial—it helps the filling firm up and makes slicing cleaner and easier.
Beginner Tip: If you’re in a hurry, 20 minutes of chilling will do, but the longer the rolls sit, the better they hold together.
Step 6: Slice and Serve
After chilling, unwrap the rolls and place them seam-side down on a cutting board. Use a sharp knife to slice each roll into 1-inch pieces. Arrange them on a platter and garnish with chopped cilantro if desired.
Beginner Tips and Notes
Even simple recipes can have a few pitfalls. Here’s how to avoid them and cook with confidence:
Troubleshooting Common Issues
- Roll Ups Falling Apart: This usually happens if the filling is too warm or if the rolls weren’t chilled long enough. Make sure your mixture is cool, and always refrigerate before slicing.
- Tortillas Tearing: If your tortillas crack while rolling, they might be a little dry. Warm them briefly in the microwave (5–10 seconds wrapped in a damp paper towel) to make them more pliable.
- Too Much Filling: It’s tempting to pile on the filling, but less is more here. Overstuffed tortillas won’t roll well and can fall apart when sliced.
Kitchen Efficiency Tips
- Prep All Ingredients First: Dice your tomatoes, slice your olives, and cook your meat ahead of time so the assembly goes smoothly.
- Use a Bench Scraper or Ruler: To get evenly sized slices, you can lightly mark the top of the tortilla rolls before cutting.
- Keep a Damp Paper Towel Nearby: Use it to wipe your knife between slices for cleaner cuts.

Serving Suggestions
Taco Tortilla Roll Ups are extremely versatile and can be served in a variety of ways:
What to Serve Them With
- Dipping Sauces: Serve with salsa, guacamole, or a spicy chipotle ranch. A creamy avocado-lime dip also works beautifully.
- As Part of a Platter: Pair them with tortilla chips, mini quesadillas, or a small bowl of Mexican street corn salad for a festive spread.
- As a Light Meal: Add a simple green salad or a side of seasoned rice, and you’ve got a satisfying lunch or dinner.
Storage Tips
- Refrigeration: Store leftovers in an airtight container in the fridge for up to 3 days. Place parchment paper between layers to prevent sticking.
- Make Ahead: These roll ups are perfect for prepping ahead. Make them up to a day in advance, wrap tightly, and slice just before serving.
- Freezing: Not recommended, as the cream cheese and sour cream base doesn’t freeze well and may become watery when thawed.
Engagement Features
Cooking is more than just following steps—it’s about enjoying the process and making it your own. Whether you’re trying your hand at meal prepping or impressing guests with a fun appetizer, this recipe is a great place to start. It’s adaptable, satisfying, and just the right balance of comforting and exciting.
If you try this recipe, I’d love to hear how it turned out for you. Did you stick with the classic ingredients, or put your own spin on it? Maybe you tried a spicy version with jalapeños, or kept it vegetarian with black beans and corn. Whatever you did, share your experience, questions, or kitchen wins in the comments below.
This recipe is just the beginning. The more you experiment, the more confident you’ll become. So grab those tortillas, mix up that filling, and start rolling—your kitchen adventure is just getting started.