Homemade KFC-Style Popcorn Chicken: A Crispy, Flavorful Treat for Beginners

Popcorn chicken is one of the most beloved fast-food snacks, known for its crispy coating, juicy interior, and irresistible seasoning. While KFC’s version is a favorite, making it at home is not only easy but also allows you to control the ingredients and flavors. This recipe is perfect for beginners because it requires simple techniques and minimal ingredients, making it a great starting point for those new to cooking. Whether you need a quick snack, a party appetizer, or a main dish for dinner, this homemade KFC-style popcorn chicken delivers big flavors with little effort.
Print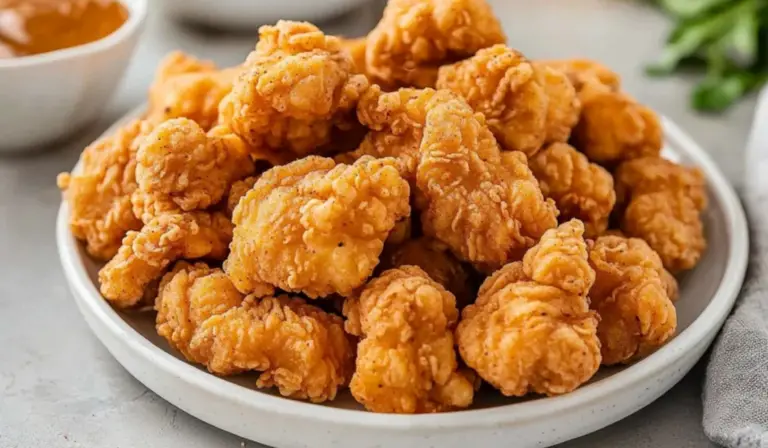
Homemade KFC-Style Popcorn Chicken: A Crispy, Flavorful Treat for Beginners
Crispy, golden, and packed with flavor! 🔥🍗 This Homemade KFC-Style Popcorn Chicken gives you that irresistible crunch with tender, juicy chicken inside. Super easy to make and beginner-friendly, these bite-sized delights are perfect for snacking, dipping, or adding to any meal. Say goodbye to takeout and hello to homemade goodness!
- Total Time: 1 hour
- Yield: 4 servings 1x
Ingredients
Main Ingredients
- 1 pound boneless, skinless chicken breasts, diced – You can also use boneless chicken thighs for a juicier texture.
- 1 cup buttermilk – If buttermilk is unavailable, mix 1 cup of milk with 1 tablespoon of lemon juice or vinegar and let it sit for 5 minutes.
- 1 teaspoon salt – Enhances the natural flavor of the chicken.
- 1 teaspoon black pepper – Adds a mild heat and depth of flavor.
Coating Ingredients
- 1 ½ cups all-purpose flour – Forms the base of the crispy coating.
- 2 tablespoons cornflour (cornstarch) – Creates a light and crispy texture.
- 1 tablespoon paprika – Gives a mild smokiness and color.
- 1 tablespoon garlic powder – Provides a rich, savory flavor.
- 1 tablespoon onion powder – Adds depth to the seasoning blend.
- ½ teaspoon cayenne pepper – Adjust the heat level to your preference.
- 1 teaspoon salt – Ensures the coating is well-seasoned.
Frying Ingredient
- Vegetable oil – Canola, sunflower, or peanut oil works best for frying due to their high smoke points.
Instructions
1. Prepare the Chicken
Start by cutting the chicken breasts into small, bite-sized pieces. Keep them uniform in size to ensure even cooking. Place the chicken pieces in a bowl, pour the buttermilk over them, and add salt and black pepper. Mix well, ensuring all pieces are coated. Marinate for at least 30 minutes, or for better flavor, refrigerate overnight.
2. Prepare the Coating Mixture
In a separate bowl, combine the all-purpose flour, cornflour, paprika, garlic powder, onion powder, cayenne pepper, and salt. Stir well to distribute the seasoning evenly. This coating will give the chicken its signature crispy texture.
3. Coat the Chicken
Remove the marinated chicken from the buttermilk mixture. One piece at a time, dip it into the seasoned flour mixture, pressing firmly so the coating sticks well. Place the coated chicken on a parchment-lined baking sheet and repeat the process for all pieces. Let the coated chicken rest for 5 minutes before frying. This helps the coating adhere and prevents it from falling off during cooking.
4. Heat the Oil
Pour vegetable oil into a deep fryer or a large heavy-bottomed pot, filling it about halfway. Heat the oil to 350°F (175°C). To check if the oil is ready, drop a small piece of coated chicken into the oil—if it sizzles and rises to the top, the oil is hot enough. If using a thermometer, maintaining the correct temperature is crucial for achieving crispy, golden results.
5. Fry the Chicken
Carefully place a few pieces of coated chicken into the hot oil, making sure not to overcrowd the pot. Fry in small batches to keep the oil temperature consistent. Cook each batch for about 3-5 minutes, stirring occasionally for even cooking. The chicken is done when it turns golden brown and reaches an internal temperature of 165°F (75°C).
6. Drain and Serve
Use a slotted spoon or tongs to transfer the fried popcorn chicken onto a paper towel-lined plate. This will help absorb excess oil and keep the chicken crisp. Allow it to cool slightly before serving.
Notes
How to Tell If the Chicken is Cooked
- Cut one piece in half; it should be completely white inside with no pink.
- Use a meat thermometer to ensure the internal temperature is at least 165°F (75°C).
Troubleshooting Common Issues
- Chicken is too dry: Marinate longer or use chicken thighs instead of breasts for extra juiciness.
- Coating falls off while frying: Let the coated chicken rest before frying, and avoid excessive handling.
- Chicken browns too quickly but is raw inside: The oil is too hot. Reduce the temperature and fry in smaller batches.
Helpful Kitchen Tips
- Prep efficiently: Cut and marinate the chicken ahead of time for a quick cooking process.
- Use a wire rack: Place the fried chicken on a wire rack instead of paper towels to keep it extra crispy.
- Substituting tools: If you don’t have a deep fryer, use a heavy-bottomed pan and a cooking thermometer to regulate the temperature.
- Prep Time: 40 minutes
- Cook Time: 20 minutes
This article will walk you through everything you need to know, from ingredient substitutions to step-by-step instructions, troubleshooting tips, and serving suggestions. By the end, you’ll feel confident in the kitchen and ready to impress your family and friends with this crispy, golden delight.
Why This Recipe is Perfect for Beginners
Many people are intimidated by frying, but this recipe simplifies the process by using basic kitchen equipment and step-by-step instructions. Here’s why this is a great choice for new cooks:
- Easy to Make: The recipe follows simple steps, from marinating to coating and frying.
- Quick Cooking Time: Each batch cooks in just a few minutes, making it faster than ordering takeout.
- Budget-Friendly: Uses pantry staples like flour and spices, saving money compared to restaurant versions.
- Customizable: You can adjust the seasoning to your preference and try different dipping sauces.
Now, let’s dive into the ingredients and preparation.
Ingredients and Substitutions
Main Ingredients
- 1 pound boneless, skinless chicken breasts, diced – You can also use boneless chicken thighs for a juicier texture.
- 1 cup buttermilk – If buttermilk is unavailable, mix 1 cup of milk with 1 tablespoon of lemon juice or vinegar and let it sit for 5 minutes.
- 1 teaspoon salt – Enhances the natural flavor of the chicken.
- 1 teaspoon black pepper – Adds a mild heat and depth of flavor.
Coating Ingredients
- 1 ½ cups all-purpose flour – Forms the base of the crispy coating.
- 2 tablespoons cornflour (cornstarch) – Creates a light and crispy texture.
- 1 tablespoon paprika – Gives a mild smokiness and color.
- 1 tablespoon garlic powder – Provides a rich, savory flavor.
- 1 tablespoon onion powder – Adds depth to the seasoning blend.
- ½ teaspoon cayenne pepper – Adjust the heat level to your preference.
- 1 teaspoon salt – Ensures the coating is well-seasoned.
Frying Ingredient
- Vegetable oil – Canola, sunflower, or peanut oil works best for frying due to their high smoke points.
Step-by-Step Instructions
1. Prepare the Chicken
Start by cutting the chicken breasts into small, bite-sized pieces. Keep them uniform in size to ensure even cooking. Place the chicken pieces in a bowl, pour the buttermilk over them, and add salt and black pepper. Mix well, ensuring all pieces are coated. Marinate for at least 30 minutes, or for better flavor, refrigerate overnight.
2. Prepare the Coating Mixture
In a separate bowl, combine the all-purpose flour, cornflour, paprika, garlic powder, onion powder, cayenne pepper, and salt. Stir well to distribute the seasoning evenly. This coating will give the chicken its signature crispy texture.
3. Coat the Chicken
Remove the marinated chicken from the buttermilk mixture. One piece at a time, dip it into the seasoned flour mixture, pressing firmly so the coating sticks well. Place the coated chicken on a parchment-lined baking sheet and repeat the process for all pieces. Let the coated chicken rest for 5 minutes before frying. This helps the coating adhere and prevents it from falling off during cooking.
4. Heat the Oil
Pour vegetable oil into a deep fryer or a large heavy-bottomed pot, filling it about halfway. Heat the oil to 350°F (175°C). To check if the oil is ready, drop a small piece of coated chicken into the oil—if it sizzles and rises to the top, the oil is hot enough. If using a thermometer, maintaining the correct temperature is crucial for achieving crispy, golden results.
5. Fry the Chicken
Carefully place a few pieces of coated chicken into the hot oil, making sure not to overcrowd the pot. Fry in small batches to keep the oil temperature consistent. Cook each batch for about 3-5 minutes, stirring occasionally for even cooking. The chicken is done when it turns golden brown and reaches an internal temperature of 165°F (75°C).
6. Drain and Serve
Use a slotted spoon or tongs to transfer the fried popcorn chicken onto a paper towel-lined plate. This will help absorb excess oil and keep the chicken crisp. Allow it to cool slightly before serving.
Beginner Tips and Notes
How to Tell If the Chicken is Cooked
- Cut one piece in half; it should be completely white inside with no pink.
- Use a meat thermometer to ensure the internal temperature is at least 165°F (75°C).
Troubleshooting Common Issues
- Chicken is too dry: Marinate longer or use chicken thighs instead of breasts for extra juiciness.
- Coating falls off while frying: Let the coated chicken rest before frying, and avoid excessive handling.
- Chicken browns too quickly but is raw inside: The oil is too hot. Reduce the temperature and fry in smaller batches.
Helpful Kitchen Tips
- Prep efficiently: Cut and marinate the chicken ahead of time for a quick cooking process.
- Use a wire rack: Place the fried chicken on a wire rack instead of paper towels to keep it extra crispy.
- Substituting tools: If you don’t have a deep fryer, use a heavy-bottomed pan and a cooking thermometer to regulate the temperature.

Serving Suggestions
This popcorn chicken pairs well with a variety of sides and dips. Here are some ideas:
Best Dipping Sauces
- Honey mustard
- Barbecue sauce
- Ranch dressing
- Spicy mayo
Side Dishes
- French fries or sweet potato fries
- Coleslaw for a refreshing crunch
- Garlic bread or cornbread for a hearty addition
- Roasted vegetables for a balanced meal
Storage and Reheating Tips
- Refrigeration: Store leftovers in an airtight container for up to 3 days.
- Freezing: Lay the fried chicken pieces on a baking sheet and freeze for 1 hour before transferring them to a freezer-safe bag. Store for up to 3 months.
- Reheating: Bake at 375°F (190°C) for 10-12 minutes or air-fry at 350°F (175°C) for 5 minutes to restore crispiness. Avoid microwaving, as it makes the chicken soggy.
Conclusion: Try This Crispy Delight Today
Homemade KFC-style popcorn chicken is not only easy to make but also incredibly satisfying. With its crispy coating and juicy interior, this dish is a must-try for beginner cooks looking to build confidence in the kitchen. By following these simple steps and tips, you can enjoy a restaurant-quality snack right at home.
Give this recipe a try and experiment with different seasonings and dips to make it your own. If you try it, share your experience, tips, or variations in the comments. Cooking is all about learning and enjoying the process, so have fun and enjoy every bite.