Strawberry Lemonade Bars: A Bright, Beginner-Friendly Dessert for Any Occasion

There’s something magical about the first warm days of summer—the smell of fresh fruit, the sun streaming through the kitchen window, and the excitement of trying out a new recipe that feels just right for the season. I remember the first time I made these Strawberry Lemonade Bars; it was on a whim before a backyard get-together with friends. I was craving something tart but sweet, refreshing but indulgent. What I ended up with was the perfect treat: a dessert that’s like biting into summer itself.
Print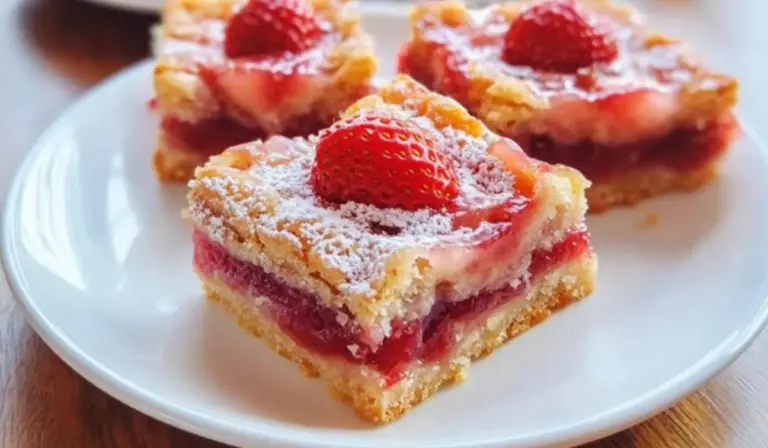
Strawberry Lemonade Bars: A Bright, Beginner-Friendly Dessert for Any Occasion
Zesty lemon meets sweet strawberries in these bright and tangy bars! With a buttery crust and vibrant filling, they’re a cheerful treat perfect for beginners and any celebration! 🍓🍋🧁
- Total Time: 1 hour 15 minutes (defaulting to prep + cook)
- Yield: 9 bars 1x
Ingredients
Crust and Crumble Topping
- ½ cup unsalted butter, melted
- ½ cup granulated sugar
- ¼ cup light brown sugar, packed
- 1 ½ cups all-purpose flour
- Pinch of salt (optional)
Filling
- 1 large egg
- ½ cup plain or vanilla Greek yogurt (lite is okay; sour cream also works)
- ⅓ cup granulated sugar
- 2 tablespoons lemon juice (fresh is best)
- 2 teaspoons vanilla extract
- ¼ cup all-purpose flour
Strawberry Layer
- 2 heaping cups diced strawberries (fresh or frozen, or a combination)
- ⅓ cup granulated sugar (increase to ½ cup if berries are very tart)
- 2 tablespoons lemon juice
- 2 teaspoons lemon zest
- 2 teaspoons cornstarch
- 2 tablespoons all-purpose flour (see notes below)
Alternative Ingredients for Flexibility:
- Butter: You can use plant-based butter for a dairy-free version.
- Yogurt: Sour cream or non-dairy yogurt can be used in place of Greek yogurt.
- Strawberries: Try blueberries, raspberries, or a mixed berry blend if strawberries aren’t available.
- Lemon: Lime juice and zest can work in a pinch, though the flavor will shift slightly.
Instructions
1. Preheat and Prep Your Pan
Preheat your oven to 350°F (175°C). Line an 8-inch square baking pan with aluminum foil and lightly coat it with cooking spray. This makes cleanup easier and helps the bars lift out cleanly.
2. Make the Crust and Crumble Topping
In a large microwave-safe bowl, melt the butter (about 1 minute on high). Add the granulated sugar and brown sugar, whisking to combine. Add the flour and a pinch of salt if using, stirring until the mixture is dry and sandy with some larger crumbles. Set aside ¾ cup of this mixture for the topping.
Press the remaining crust mixture firmly and evenly into the prepared baking pan using a spatula or your fingers. Set the pan aside.
3. Prepare the Filling
In a medium bowl, whisk together the egg, Greek yogurt, sugar, lemon juice, and vanilla extract until smooth. Add the flour and continue to whisk until well combined. Pour the filling over the crust and use a spatula to spread it evenly.
4. Create the Strawberry Layer
In another bowl, combine the diced strawberries, sugar, lemon juice, lemon zest, and cornstarch. Stir gently. If your mixture is very watery (more likely with frozen berries), add up to 2 tablespoons of flour to help it thicken.
Spoon the strawberry mixture evenly over the filling layer, smoothing gently.
5. Add the Crumble Topping
Sprinkle the reserved crumble mixture over the top of the strawberries. For a chunkier topping, squeeze the crumble in your hand before scattering it over the pan.
6. Bake the Bars
Place the pan on a baking sheet to catch any potential overflow. Bake for 60 to 75 minutes. You’ll know it’s done when the edges are bubbling and the topping is just barely golden. Begin checking around the 50-minute mark, especially if you’re using fresh berries, as they bake faster than frozen ones.
7. Cool and Chill Before Slicing
Let the bars cool completely in the pan on a wire rack—this takes at least 2 hours. For cleaner slices, refrigerate the bars for another 2 hours before cutting. If you try to slice too soon, they may fall apart.
Notes
Don’t Skip the Cooling Time: These bars are soft-set, meaning they firm up as they cool. Slicing too early leads to a mess, no matter how great they taste.
How to Know When It’s Done: Look for bubbling around the edges and some in the center. The crumble on top should be pale golden, not deeply browned.
Troubleshooting Watery Strawberries: Frozen berries tend to release more liquid. If your strawberry layer seems too thin or soupy before assembling, don’t hesitate to add the full 2 tablespoons of flour.
Prepping Efficiency: Dice your strawberries first, and while the crust bakes or rests, you can mix the filling and prepare the fruit layer. Group your tools—bowls, spatulas, measuring cups—before starting to keep things stress-free.
Tool Substitutes: No zester? Use the fine side of a box grater. No foil? Parchment paper also works for lining the pan. No mixer? A whisk or fork works fine for blending the filling.
- Prep Time: 15 minutes
- Cook Time: 1 hour
These Strawberry Lemonade Bars are the kind of recipe you want in your back pocket all season long. They combine the sweet-tart zing of lemonade with the juicy freshness of strawberries, all layered over a buttery shortbread-style crust and topped with a tender crumble. Even better? They’re incredibly beginner-friendly. If you’ve never baked a dessert from scratch, this is a great place to start. There’s no complicated technique, no special equipment needed, and plenty of room for variation. It’s a forgiving recipe that still delivers that “wow” factor.
Whether you’re making these bars for a picnic, a potluck, or just to brighten your afternoon, you’ll find this recipe both fun and rewarding. Let’s get started.
Ingredients and Preparation
This recipe is made up of three simple layers: a crust that also doubles as the crumble topping, a creamy lemon-infused filling, and a juicy strawberry layer. Here’s everything you’ll need, plus a few optional swaps if you’re working with what’s already in your kitchen.
Crust and Crumble Topping
- ½ cup unsalted butter, melted
- ½ cup granulated sugar
- ¼ cup light brown sugar, packed
- 1 ½ cups all-purpose flour
- Pinch of salt (optional)
Filling
- 1 large egg
- ½ cup plain or vanilla Greek yogurt (lite is okay; sour cream also works)
- ⅓ cup granulated sugar
- 2 tablespoons lemon juice (fresh is best)
- 2 teaspoons vanilla extract
- ¼ cup all-purpose flour
Strawberry Layer
- 2 heaping cups diced strawberries (fresh or frozen, or a combination)
- ⅓ cup granulated sugar (increase to ½ cup if berries are very tart)
- 2 tablespoons lemon juice
- 2 teaspoons lemon zest
- 2 teaspoons cornstarch
- 2 tablespoons all-purpose flour (see notes below)
Alternative Ingredients for Flexibility:
- Butter: You can use plant-based butter for a dairy-free version.
- Yogurt: Sour cream or non-dairy yogurt can be used in place of Greek yogurt.
- Strawberries: Try blueberries, raspberries, or a mixed berry blend if strawberries aren’t available.
- Lemon: Lime juice and zest can work in a pinch, though the flavor will shift slightly.
Step-by-Step Instructions
1. Preheat and Prep Your Pan
Preheat your oven to 350°F (175°C). Line an 8-inch square baking pan with aluminum foil and lightly coat it with cooking spray. This makes cleanup easier and helps the bars lift out cleanly.
2. Make the Crust and Crumble Topping
In a large microwave-safe bowl, melt the butter (about 1 minute on high). Add the granulated sugar and brown sugar, whisking to combine. Add the flour and a pinch of salt if using, stirring until the mixture is dry and sandy with some larger crumbles. Set aside ¾ cup of this mixture for the topping.
Press the remaining crust mixture firmly and evenly into the prepared baking pan using a spatula or your fingers. Set the pan aside.
3. Prepare the Filling
In a medium bowl, whisk together the egg, Greek yogurt, sugar, lemon juice, and vanilla extract until smooth. Add the flour and continue to whisk until well combined. Pour the filling over the crust and use a spatula to spread it evenly.
4. Create the Strawberry Layer
In another bowl, combine the diced strawberries, sugar, lemon juice, lemon zest, and cornstarch. Stir gently. If your mixture is very watery (more likely with frozen berries), add up to 2 tablespoons of flour to help it thicken.
Spoon the strawberry mixture evenly over the filling layer, smoothing gently.
5. Add the Crumble Topping
Sprinkle the reserved crumble mixture over the top of the strawberries. For a chunkier topping, squeeze the crumble in your hand before scattering it over the pan.
6. Bake the Bars
Place the pan on a baking sheet to catch any potential overflow. Bake for 60 to 75 minutes. You’ll know it’s done when the edges are bubbling and the topping is just barely golden. Begin checking around the 50-minute mark, especially if you’re using fresh berries, as they bake faster than frozen ones.
7. Cool and Chill Before Slicing
Let the bars cool completely in the pan on a wire rack—this takes at least 2 hours. For cleaner slices, refrigerate the bars for another 2 hours before cutting. If you try to slice too soon, they may fall apart.
Beginner Tips and Notes
Don’t Skip the Cooling Time: These bars are soft-set, meaning they firm up as they cool. Slicing too early leads to a mess, no matter how great they taste.
How to Know When It’s Done: Look for bubbling around the edges and some in the center. The crumble on top should be pale golden, not deeply browned.
Troubleshooting Watery Strawberries: Frozen berries tend to release more liquid. If your strawberry layer seems too thin or soupy before assembling, don’t hesitate to add the full 2 tablespoons of flour.
Prepping Efficiency: Dice your strawberries first, and while the crust bakes or rests, you can mix the filling and prepare the fruit layer. Group your tools—bowls, spatulas, measuring cups—before starting to keep things stress-free.
Tool Substitutes: No zester? Use the fine side of a box grater. No foil? Parchment paper also works for lining the pan. No mixer? A whisk or fork works fine for blending the filling.

Serving Suggestions
These bars are versatile enough to serve as a picnic dessert, an afternoon snack, or even a light brunch treat. Here are a few ways to elevate the experience:
Pair with:
- A dollop of whipped cream or Greek yogurt on top.
- A scoop of vanilla or lemon sorbet for a summer dessert plate.
- A light iced tea, lemonade, or fruity sparkling water.
Storage Tips:
- Room Temperature: Store in an airtight container for up to 5 days.
- Refrigerator: Keeps for 7–10 days; great if you enjoy a chilled pie texture.
- Freezer: Wrap tightly and freeze for up to 4 months. Thaw overnight in the fridge before serving.
Engagement Features
If you’re just starting your journey in the kitchen, these Strawberry Lemonade Bars are a great confidence booster. They’re simple, vibrant, and absolutely delicious. Try them once and you’ll be hooked—not just on the flavor, but on how approachable baking can be with the right recipe.
I’d love to hear how your bars turn out. Did you go with all fresh strawberries, or a frozen mix? Did you add your own twist, maybe a sprinkle of cinnamon or a different fruit entirely? Share your experience in the comments—successes, surprises, or questions—I’m here to cheer you on.
And if this is your first homemade dessert, congratulations! You’ve just taken a sweet step into the world of baking.