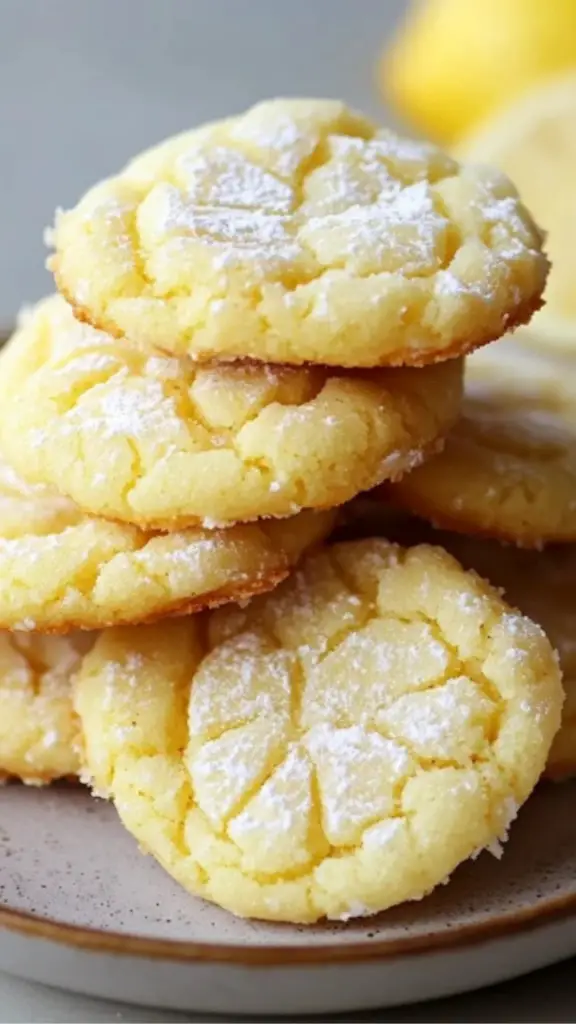
Bright, Buttery Bliss: Best Ever Lemon Gooey Butter Cookies for Beginners

There’s a certain kind of comfort that only home baking can provide, and for me, that comfort began with a lemon. One weekend, I stood in my kitchen with no plan, only a bowl of fresh lemons and a desire to create something cheerful. I wasn’t a seasoned baker then—just someone looking for a way to brighten up a quiet afternoon. What came out of my oven that day was a batch of golden, pillowy cookies with a melt-in-your-mouth texture and a burst of citrus flavor that made everything feel a little sunnier.
Print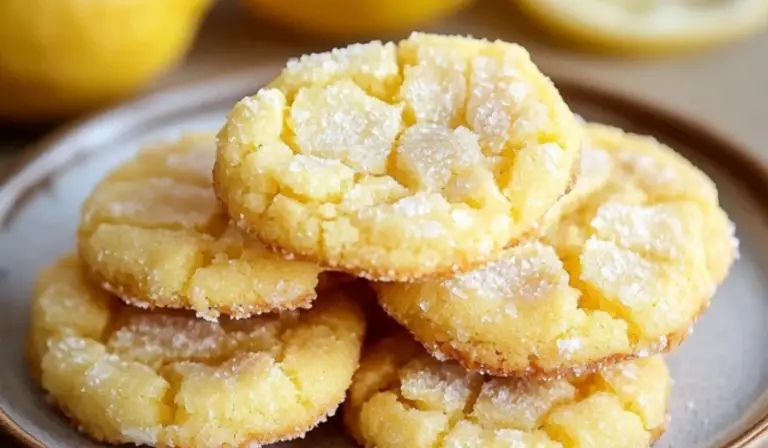
Bright, Buttery Bliss: Best Ever Lemon Gooey Butter Cookies for Beginners
Soft, chewy, and bursting with zesty lemon flavor—these gooey butter cookies are sunshine in every bite! Super easy to make and impossible to resist! 🍋🍪✨
- Total Time: 58 minutes
- Yield: Approximately 24 cookies 1x
Ingredients
- ½ cup unsalted butter, at room temperature
- 1 (8-ounce) package cream cheese, at room temperature
- 1 teaspoon fresh lemon zest (from about 1 lemon)
- 1 tablespoon fresh lemon juice
- 1 ½ cups granulated sugar
- 2 large eggs, at room temperature
- 1 teaspoon lemon extract
- 1 teaspoon vanilla extract
- 2 ½ cups all-purpose flour
- 3 teaspoons baking powder
- ½ teaspoon salt
- 1 cup powdered sugar, divided
Instructions
1. Cream the Wet Ingredients
In a large mixing bowl, combine the butter, cream cheese, lemon zest, and lemon juice. Use a hand mixer or stand mixer on medium speed to blend until smooth and creamy—about 2–3 minutes.
Next, add the granulated sugar and continue mixing until the mixture is light and fluffy. This usually takes another 1–2 minutes. Add in the eggs one at a time, beating well after each addition. Then mix in the lemon extract and vanilla extract until everything is fully incorporated.
2. Combine the Dry Ingredients
In a separate bowl, whisk together the flour, ½ cup of the powdered sugar, baking powder, and salt. Mixing the dry ingredients separately helps distribute the baking powder evenly, so you get consistent rise and texture.
3. Mix Wet and Dry Ingredients
Gradually add the dry ingredients to the wet mixture. Use a spoon or spatula to fold them together in small batches. Mix just until combined—overmixing can make the cookies tough. The dough should be thick and slightly sticky.
4. Chill the Dough
Cover the bowl with plastic wrap and refrigerate the dough for at least 30 minutes. This step firms up the dough, making it easier to handle and helping the cookies keep their shape in the oven.
5. Preheat and Prepare for Baking
While the dough chills, preheat your oven to 350°F (175°C). Line a baking sheet with parchment paper to prevent sticking and ensure even browning.
6. Form and Coat the Cookies
Scoop about 2 tablespoons of dough and roll it into a ball using your hands. Roll each ball in the remaining powdered sugar until fully coated. This gives the cookies their classic crinkled, snow-dusted look.
7. Bake
Place the dough balls on your prepared baking sheet, spacing them about 2 inches apart. Bake for 11 to 13 minutes, or until the edges are just starting to turn golden. The centers should still look slightly soft—this is key to that gooey texture.
8. Cool and Serve
Let the cookies cool on the baking sheet for 5 minutes before transferring them to a wire rack. This helps them set without overbaking. Once cool, they’re ready to enjoy.
Notes
- Room Temperature Ingredients: Let your butter, cream cheese, and eggs sit out for about 30 minutes before using. This helps them mix more evenly and results in a smoother dough.
- Don’t Skip the Chill: Cold dough spreads more slowly in the oven, giving your cookies that perfect soft middle and crackled top.
- Too Sticky to Roll? Lightly flour your hands or chill the dough a bit longer. A small cookie scoop can also make portioning easier.
- Even Baking: If your cookies aren’t browning evenly, rotate the baking sheet halfway through baking.
- Storage: Store leftover cookies in an airtight container at room temperature for up to 4 days. To keep them soft, place a slice of bread in the container—it helps maintain moisture.
- Prep Time: 15 minutes (plus 30 minutes chilling)
- Cook Time: 13 minutes
That’s the story behind these Best Ever Lemon Gooey Butter Cookies. They’re the kind of recipe you’ll want to keep in your back pocket—not just because they taste incredible, but because they’re easy to make and beginner-friendly. Whether you’re just starting to experiment in the kitchen or looking to build confidence with baking, this recipe offers a great introduction. You don’t need any special tools or advanced techniques. With a few bowls, a baking sheet, and a bit of enthusiasm, you can make cookies that feel like a win every time.
These cookies are soft and gooey on the inside, lightly crisp on the outside, and packed with fresh lemon flavor. They’re perfect for sharing, gifting, or enjoying with a cup of tea or coffee. And best of all, they’re quick—only about an hour from start to finish, including chilling time. So if you’re ready to bake something sweet, simple, and seriously satisfying, you’re in the right place.
Ingredients and Preparation
One of the best things about this recipe is how approachable it is. Most of the ingredients are probably already in your pantry or refrigerator, and if not, they’re easy to find. Here’s what you’ll need, along with a few substitutions in case you’re working with a limited pantry.
Ingredients:
- ½ cup unsalted butter, at room temperature
- 1 (8-ounce) package cream cheese, at room temperature
- 1 teaspoon fresh lemon zest (from about 1 lemon)
- 1 tablespoon fresh lemon juice
- 1 ½ cups granulated sugar
- 2 large eggs, at room temperature
- 1 teaspoon lemon extract
- 1 teaspoon vanilla extract
- 2 ½ cups all-purpose flour
- 3 teaspoons baking powder
- ½ teaspoon salt
- 1 cup powdered sugar, divided
Ingredient Notes & Substitutions:
- Butter: Use unsalted to control the salt content. If using salted, omit the additional ½ teaspoon of salt.
- Cream Cheese: Full-fat works best for texture, but light cream cheese can be used if you’re looking for a slightly healthier version.
- Lemon Zest & Juice: Fresh is best for maximum flavor. Bottled lemon juice works in a pinch, but zest is essential for that bright citrus punch.
- Lemon Extract: This adds a concentrated lemony aroma. If you don’t have any, you can use more zest or juice, though the flavor will be more subtle.
- Vanilla Extract: Adds depth and balances the citrus.
- Powdered Sugar: Used for coating the dough balls. Don’t skip it—it gives the cookies their signature crackled top.
Step-by-Step Instructions
To ensure your cookies come out just right, we’ve broken the process into clear, manageable steps. Each one includes helpful notes so you’ll feel confident, even if it’s your first time baking.
1. Cream the Wet Ingredients
In a large mixing bowl, combine the butter, cream cheese, lemon zest, and lemon juice. Use a hand mixer or stand mixer on medium speed to blend until smooth and creamy—about 2–3 minutes.
Next, add the granulated sugar and continue mixing until the mixture is light and fluffy. This usually takes another 1–2 minutes. Add in the eggs one at a time, beating well after each addition. Then mix in the lemon extract and vanilla extract until everything is fully incorporated.
2. Combine the Dry Ingredients
In a separate bowl, whisk together the flour, ½ cup of the powdered sugar, baking powder, and salt. Mixing the dry ingredients separately helps distribute the baking powder evenly, so you get consistent rise and texture.
3. Mix Wet and Dry Ingredients
Gradually add the dry ingredients to the wet mixture. Use a spoon or spatula to fold them together in small batches. Mix just until combined—overmixing can make the cookies tough. The dough should be thick and slightly sticky.
4. Chill the Dough
Cover the bowl with plastic wrap and refrigerate the dough for at least 30 minutes. This step firms up the dough, making it easier to handle and helping the cookies keep their shape in the oven.
5. Preheat and Prepare for Baking
While the dough chills, preheat your oven to 350°F (175°C). Line a baking sheet with parchment paper to prevent sticking and ensure even browning.
6. Form and Coat the Cookies
Scoop about 2 tablespoons of dough and roll it into a ball using your hands. Roll each ball in the remaining powdered sugar until fully coated. This gives the cookies their classic crinkled, snow-dusted look.
7. Bake
Place the dough balls on your prepared baking sheet, spacing them about 2 inches apart. Bake for 11 to 13 minutes, or until the edges are just starting to turn golden. The centers should still look slightly soft—this is key to that gooey texture.
8. Cool and Serve
Let the cookies cool on the baking sheet for 5 minutes before transferring them to a wire rack. This helps them set without overbaking. Once cool, they’re ready to enjoy.
Beginner Tips and Notes
Baking for the first time can feel overwhelming, but with a few practical tips, you’ll avoid common pitfalls and enjoy the process more.
- Room Temperature Ingredients: Let your butter, cream cheese, and eggs sit out for about 30 minutes before using. This helps them mix more evenly and results in a smoother dough.
- Don’t Skip the Chill: Cold dough spreads more slowly in the oven, giving your cookies that perfect soft middle and crackled top.
- Too Sticky to Roll? Lightly flour your hands or chill the dough a bit longer. A small cookie scoop can also make portioning easier.
- Even Baking: If your cookies aren’t browning evenly, rotate the baking sheet halfway through baking.
- Storage: Store leftover cookies in an airtight container at room temperature for up to 4 days. To keep them soft, place a slice of bread in the container—it helps maintain moisture.
Serving Suggestions
These cookies are versatile and shine in a variety of settings. Here are a few ideas to elevate your experience:
- Tea Time Pairing: Serve with hot tea, especially Earl Grey or chamomile, for a soothing afternoon treat.
- Brunch Table Addition: Add to a brunch spread with fresh fruit, scrambled eggs, and roast chicken or beef sausage for a balanced meal.
- Holiday Gift Box: Package in a simple box or tin with parchment paper and a note. These cookies stay fresh and travel well.
- Summer Dessert Platter: Pair with fresh berries and a dollop of whipped cream for a refreshing end to a meal.
Engagement Features
Baking isn’t just about the end result—it’s about the joy of the process. If you try this recipe, I’d love to hear how it went. Did you add your own twist? Were you baking for a special occasion or just craving something sweet? Leave a comment with your experience, or share your photos online to inspire others.
Every cook, no matter how new, has something to bring to the kitchen. These cookies are more than just dessert—they’re a celebration of small victories. So whether you’re baking alone on a quiet morning or making memories with family, take a moment to enjoy the process. The more you practice, the more confidence you’ll gain.
And remember, even if your cookies aren’t picture-perfect, they’ll still be delicious. That’s the beauty of baking: it’s forgiving, fun, and always rewarding.