Strawberry Filled Mini Puff Pastries: A Beginner’s Guide to a Simple Yet Elegant Dessert
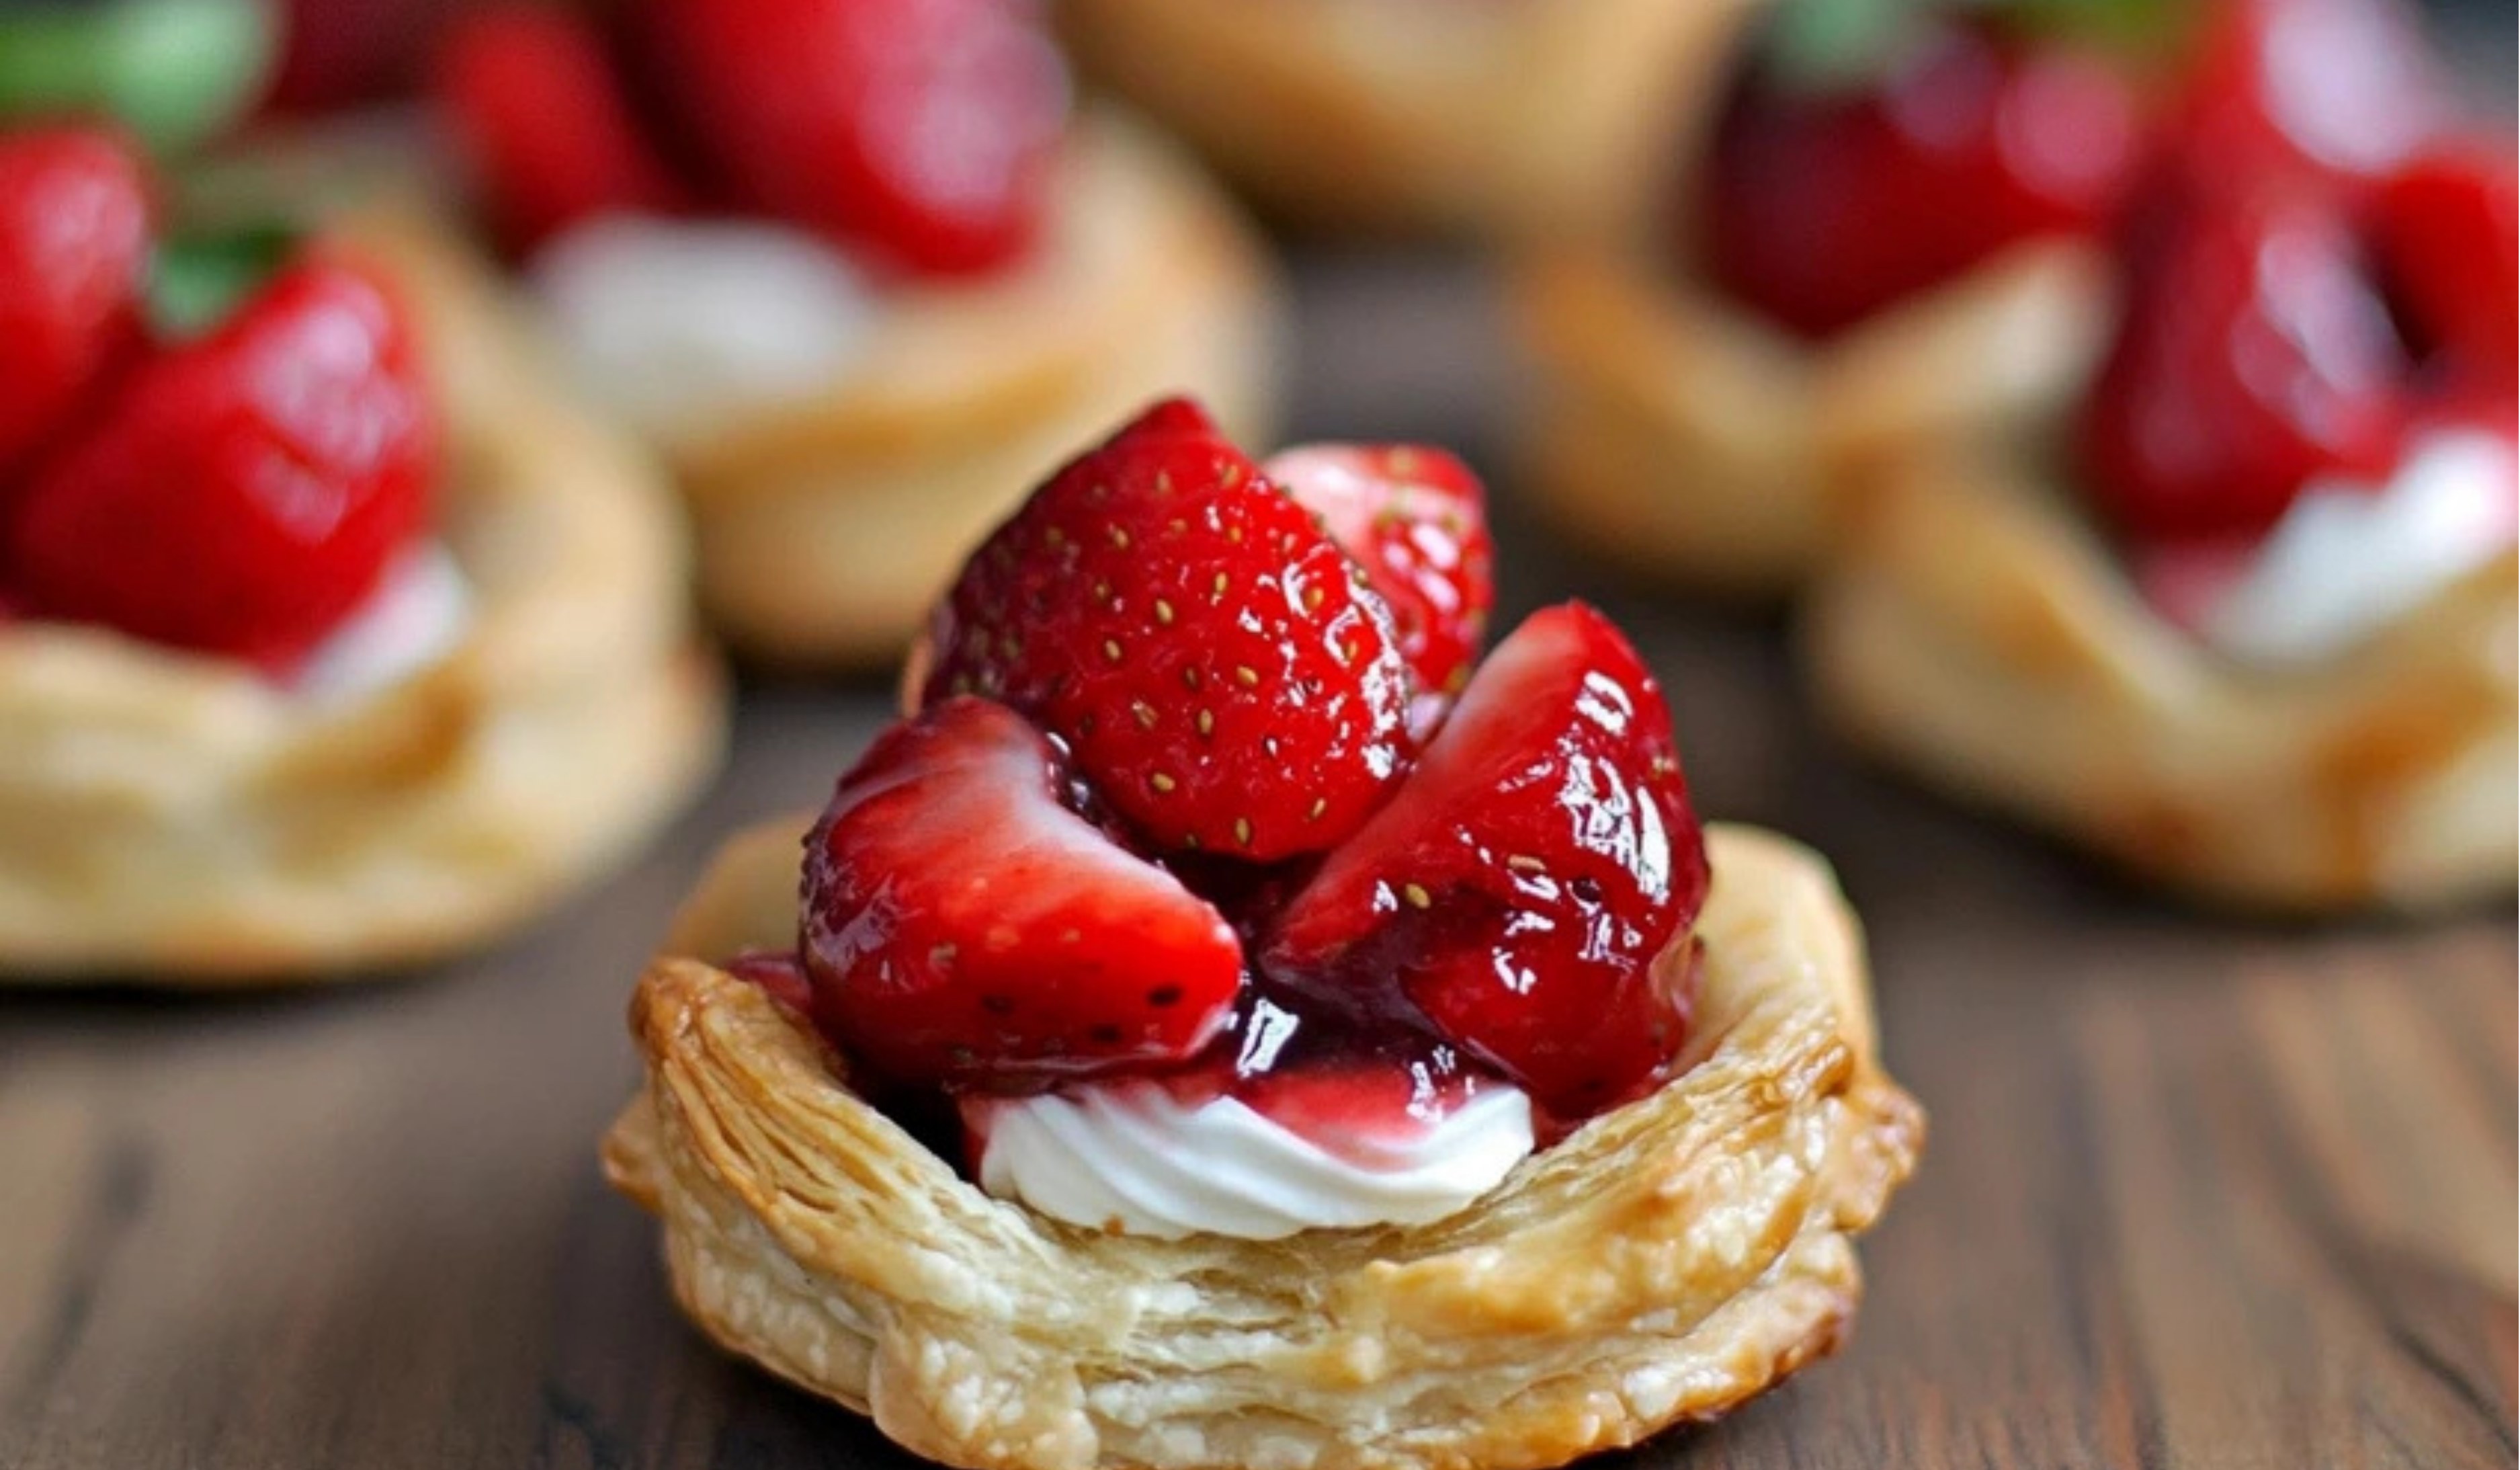
Imagine hosting a gathering where you serve a tray of golden, flaky pastries filled with sweet, juicy strawberries. The moment your guests take a bite, they’re met with the perfect balance of crisp puff pastry, fresh fruit, and a touch of creamy whipped topping. These Strawberry Filled Mini Puff Pastries are not only delicious but also incredibly easy to make, even for beginner cooks.
Print
Strawberry Filled Mini Puff Pastries: A Beginner’s Guide to a Simple Yet Elegant Dessert
These Strawberry Filled Mini Puff Pastries are the perfect mix of crisp, buttery layers and a luscious fruit filling. Easy to make yet elegantly delicious, they’re a beginner-friendly treat that looks as good as it tastes!
- Total Time: 20 minutes
- Yield: 16 servings 1x
Ingredients
- 14 oz puff pastry (store-bought, thawed)
- 2 tbsp unsalted butter, melted
- 2 cups fresh strawberries, diced into small cubes
- 1 tsp granulated sugar
- 1 cup strawberry jam or fruit spread
- ¼ cup prepared whipped cream
Instructions
1. Preparing the Puff Pastry
- Preheat the oven to 375°F (190°C).
- Thaw the puff pastry according to the package instructions. Puff pastry typically takes about 30–40 minutes to thaw at room temperature. If in a hurry, place it in the refrigerator for a couple of hours.
- Lightly flour your work surface to prevent sticking. Using a rolling pin, gently roll the puff pastry into a thin sheet.
- Cut the pastry into 32 small squares using a sharp knife, pastry wheel, or pizza cutter. Each square should be large enough to fit into a mini muffin tin, with a little overhang.
2. Preparing the Pastry Cups
- Grease a mini muffin tin with non-stick spray to prevent sticking.
- Place one square of pastry into each muffin cup, pressing it down gently so that the edges slightly rise above the tin.
- Use parchment paper squares and pie weights (or dry beans/rice) to prevent the pastry from puffing up too much.
- Bake for 8 minutes, then remove the parchment and pie weights.
- Bake for another 2–4 minutes until the pastry turns golden brown. Set aside to cool completely.
3. Preparing the Strawberry Filling
- Dice the strawberries into small, even pieces.
- Place the strawberries in a bowl and sprinkle with 1 teaspoon of sugar. Let them sit for 20 minutes to soften and release their natural juices (a process called maceration).
- Meanwhile, warm 1 cup of strawberry jam in the microwave for 30–45 seconds until slightly bubbly. Stir well.
- Mix the warm jam with the macerated strawberries to create a glossy, flavorful filling.
4. Assembling the Pastries
- Once the pastry cups have cooled, spoon a small amount of the strawberry filling into each cup. Be careful not to overfill, as the filling may spill over.
- Top each pastry with a dollop of whipped cream for a creamy contrast to the tart strawberries.
Notes
Working with Puff Pastry
- Keep it cold: Puff pastry should be kept cold before baking to ensure it rises properly. If it becomes too soft, place it in the refrigerator for 10 minutes before cutting or baking.
- Do not over-handle: Excessive handling can cause the layers to stick together and prevent proper puffing.
- Use a sharp knife: A dull blade can pinch the layers together and ruin the flaky texture.
Strawberry Tips
- Use ripe strawberries: They provide the best natural sweetness.
- If berries are too tart, add a bit more sugar or a splash of orange juice to balance the flavors.
- Drain excess liquid: If the strawberries release too much juice, drain some before mixing with the jam to prevent soggy pastries.
Oven and Baking Tips
- Watch the pastries closely: Puff pastry bakes quickly, and even a minute too long can result in over-browning.
- Rotate the tray halfway through baking for even cooking.
- Cool completely before filling: This prevents the filling from becoming runny due to heat.
- Prep Time: 10 minutes
- Cook Time: 10 minutes
One of the most rewarding aspects of baking is the ability to create something that looks impressive yet requires minimal effort. This recipe is a fantastic introduction to working with puff pastry, a versatile ingredient that can be used for both sweet and savory dishes. The best part? These pastries require only a handful of ingredients and just 20 minutes from start to finish.
If you have never worked with puff pastry before, this recipe is a great place to start. It teaches essential skills like rolling dough, handling fruit fillings, and assembling pastries in a way that is simple yet elegant. Whether you are making these for a family dessert, a party, or just as a personal treat, this recipe will quickly become a favorite in your kitchen.
Let’s dive into how to make these Strawberry Filled Mini Puff Pastries, with clear, beginner-friendly instructions to ensure success every time.
Ingredients and Preparation
Before starting, gather all the ingredients and tools needed. Being prepared makes the process smoother and more enjoyable.
Ingredients
- 14 oz puff pastry (store-bought, thawed)
- 2 tbsp unsalted butter, melted
- 2 cups fresh strawberries, diced into small cubes
- 1 tsp granulated sugar
- 1 cup strawberry jam or fruit spread
- ¼ cup prepared whipped cream
Alternative Ingredient Suggestions
- Fruit Variation: If strawberries are out of season, substitute with raspberries, blueberries, or even a mix of berries.
- Jam Options: Instead of strawberry jam, try raspberry, apricot, or even a mixed fruit preserve.
- Dairy-Free Alternative: Use a dairy-free butter substitute and coconut whipped cream for a lactose-free version.
- Healthier Version: Reduce the sugar or use a natural sweetener like honey or maple syrup.
Step-by-Step Instructions
1. Preparing the Puff Pastry
- Preheat the oven to 375°F (190°C).
- Thaw the puff pastry according to the package instructions. Puff pastry typically takes about 30–40 minutes to thaw at room temperature. If in a hurry, place it in the refrigerator for a couple of hours.
- Lightly flour your work surface to prevent sticking. Using a rolling pin, gently roll the puff pastry into a thin sheet.
- Cut the pastry into 32 small squares using a sharp knife, pastry wheel, or pizza cutter. Each square should be large enough to fit into a mini muffin tin, with a little overhang.
2. Preparing the Pastry Cups
- Grease a mini muffin tin with non-stick spray to prevent sticking.
- Place one square of pastry into each muffin cup, pressing it down gently so that the edges slightly rise above the tin.
- Use parchment paper squares and pie weights (or dry beans/rice) to prevent the pastry from puffing up too much.
- Bake for 8 minutes, then remove the parchment and pie weights.
- Bake for another 2–4 minutes until the pastry turns golden brown. Set aside to cool completely.
3. Preparing the Strawberry Filling
- Dice the strawberries into small, even pieces.
- Place the strawberries in a bowl and sprinkle with 1 teaspoon of sugar. Let them sit for 20 minutes to soften and release their natural juices (a process called maceration).
- Meanwhile, warm 1 cup of strawberry jam in the microwave for 30–45 seconds until slightly bubbly. Stir well.
- Mix the warm jam with the macerated strawberries to create a glossy, flavorful filling.
4. Assembling the Pastries
- Once the pastry cups have cooled, spoon a small amount of the strawberry filling into each cup. Be careful not to overfill, as the filling may spill over.
- Top each pastry with a dollop of whipped cream for a creamy contrast to the tart strawberries.
Beginner Tips and Notes
Even though this recipe is simple, a few key tips can help ensure the best results.
Working with Puff Pastry
- Keep it cold: Puff pastry should be kept cold before baking to ensure it rises properly. If it becomes too soft, place it in the refrigerator for 10 minutes before cutting or baking.
- Do not over-handle: Excessive handling can cause the layers to stick together and prevent proper puffing.
- Use a sharp knife: A dull blade can pinch the layers together and ruin the flaky texture.
Strawberry Tips
- Use ripe strawberries: They provide the best natural sweetness.
- If berries are too tart, add a bit more sugar or a splash of orange juice to balance the flavors.
- Drain excess liquid: If the strawberries release too much juice, drain some before mixing with the jam to prevent soggy pastries.
Oven and Baking Tips
- Watch the pastries closely: Puff pastry bakes quickly, and even a minute too long can result in over-browning.
- Rotate the tray halfway through baking for even cooking.
- Cool completely before filling: This prevents the filling from becoming runny due to heat.

Serving Suggestions
These pastries are delicious on their own but can be elevated with simple additions.
Complementary Pairings
- A dusting of powdered sugar adds an elegant touch.
- A drizzle of melted chocolate makes them extra indulgent.
- A scoop of vanilla ice cream pairs wonderfully for a restaurant-quality dessert.
- A side of fresh fruit salad balances the sweetness.
Storage and Leftovers
- Refrigeration: Store leftover pastries in an airtight container in the refrigerator for up to 2 days.
- Reheating: For best results, reheat in the oven at 300°F (150°C) for 5 minutes to restore crispness. Avoid microwaving, as it can make the pastry soggy.
- Freezing: Unfilled baked pastry cups can be frozen for up to 2 months. Thaw and reheat before filling.
Conclusion
Baking at home does not have to be complicated or intimidating. These Strawberry Filled Mini Puff Pastries prove that you can create a bakery-worthy dessert with minimal effort and just a few ingredients. Whether you are a complete beginner or someone looking for a quick and easy recipe, this dessert is sure to impress.
The beauty of this recipe lies in its simplicity and flexibility. You can experiment with different fruit fillings, try various toppings, or even add a savory twist with cheese and herbs for a different take.
Now, it’s your turn to give this recipe a try. Gather your ingredients, follow the steps, and enjoy the process of baking something truly special. If you do make these, share your experience, any variations you tried, or any challenges you faced. Happy baking!