Red Velvet Cheesecake Brownies: The Ultimate Dessert for Beginner Cooks
There’s something magical about the combination of cheesecake and brownies—two beloved desserts joining forces to create an indulgent treat that feels both familiar and exciting. If you’re looking to try your hand at baking something that’s both easy to make and impresses at the same time, these Red Velvet Cheesecake Brownies are the perfect choice. The creamy cheesecake swirl nestled within the rich, fudgy red velvet brownie base is a heavenly duo that strikes the perfect balance between tart and sweet, soft and firm. With this recipe, you’ll be able to create a dessert that’s sure to delight family and friends, all while learning some important baking techniques along the way.
Print
Red Velvet Cheesecake Brownies: The Ultimate Dessert for Beginner Cooks
Red velvet + cheesecake + brownies = the ultimate dessert dream! 💭❤️ These Red Velvet Cheesecake Brownies are rich, fudgy, and swirled with creamy cheesecake for that perfect bite every time. 🎂 Whether you’re a newbie in the kitchen or just craving something indulgent, this treat is a total win! 💯 Easy to make, impossible to resist. 🍫✨
- Total Time: 50 Minutes
- Yield: 16 Servings (16 brownies)
Ingredients
Red Velvet Brownie Base
- ½ cup unsalted butter, melted
- 1 cup granulated sugar
- 2 large eggs
- 1½ teaspoons red food coloring
- 2 teaspoons pure vanilla extract
- ½ teaspoon salt
- ¾ cup all-purpose flour
- 3 tablespoons unsweetened cocoa powder
Cream Cheese Swirl
- 8 ounces cream cheese, softened to room temperature
- 1 large egg, room temperature
- ⅓ cup granulated sugar
Alternative Ingredient Suggestions:
- If you don’t have red food coloring, consider using natural alternatives like beet juice to give the batter that rich red hue.
- In place of the butter, you can substitute with vegetable oil for a slightly different texture and flavor.
- If you prefer a more decadent cheesecake swirl, you could use mascarpone cheese instead of cream cheese.
Once you have your ingredients ready, it’s time to gather the kitchen tools you’ll need to get started:
- 8×8-inch baking pan
- Parchment paper
- Mixing bowls
- Rubber spatula
- Measuring cups and spoons
Instructions
Step 1: Preheat and Prepare the Pan
Start by preheating your oven to 350°F (175°C). Prepare your 8×8-inch baking pan by lining it with parchment paper. Ensure that the paper comes up the sides of the pan, which will make it easier to remove the brownies later. You want to make sure the pan is completely lined, so there’s no chance of the batter sticking.
Step 2: Make the Red Velvet Brownie Base
In a medium mixing bowl, whisk together the melted butter and granulated sugar until the mixture becomes glossy. This step is crucial because it helps the sugar dissolve evenly into the butter, giving the brownies a smooth, shiny texture. Once combined, add the eggs one at a time, whisking for about 2 minutes after each addition. This extra whisking is key to achieving that signature crackly top on the brownies.
Next, add the vanilla extract and red food coloring. Stir until everything is evenly mixed, and the batter takes on a beautiful, vibrant red hue.
Step 3: Add Dry Ingredients
To the same bowl, sift in the flour, cocoa powder, and salt. Mix everything gently with a spatula until just combined. Be careful not to overmix at this stage, as this could result in dry brownies. You want the dry ingredients to be incorporated into the wet ingredients without any streaks of flour remaining. The batter should be thick and smooth.
Once combined, spread the red velvet brownie batter evenly into your prepared pan. Use a rubber spatula to smooth the top, making sure it’s level.
Step 4: Prepare the Cream Cheese Swirl
In a separate bowl, combine the softened cream cheese, egg, and sugar. Use an electric mixer or a whisk to mix everything together until the cream cheese mixture becomes smooth and creamy. Make sure there are no lumps, as this will ensure your swirl is as creamy and smooth as possible.
Step 5: Create the Cheesecake Swirl
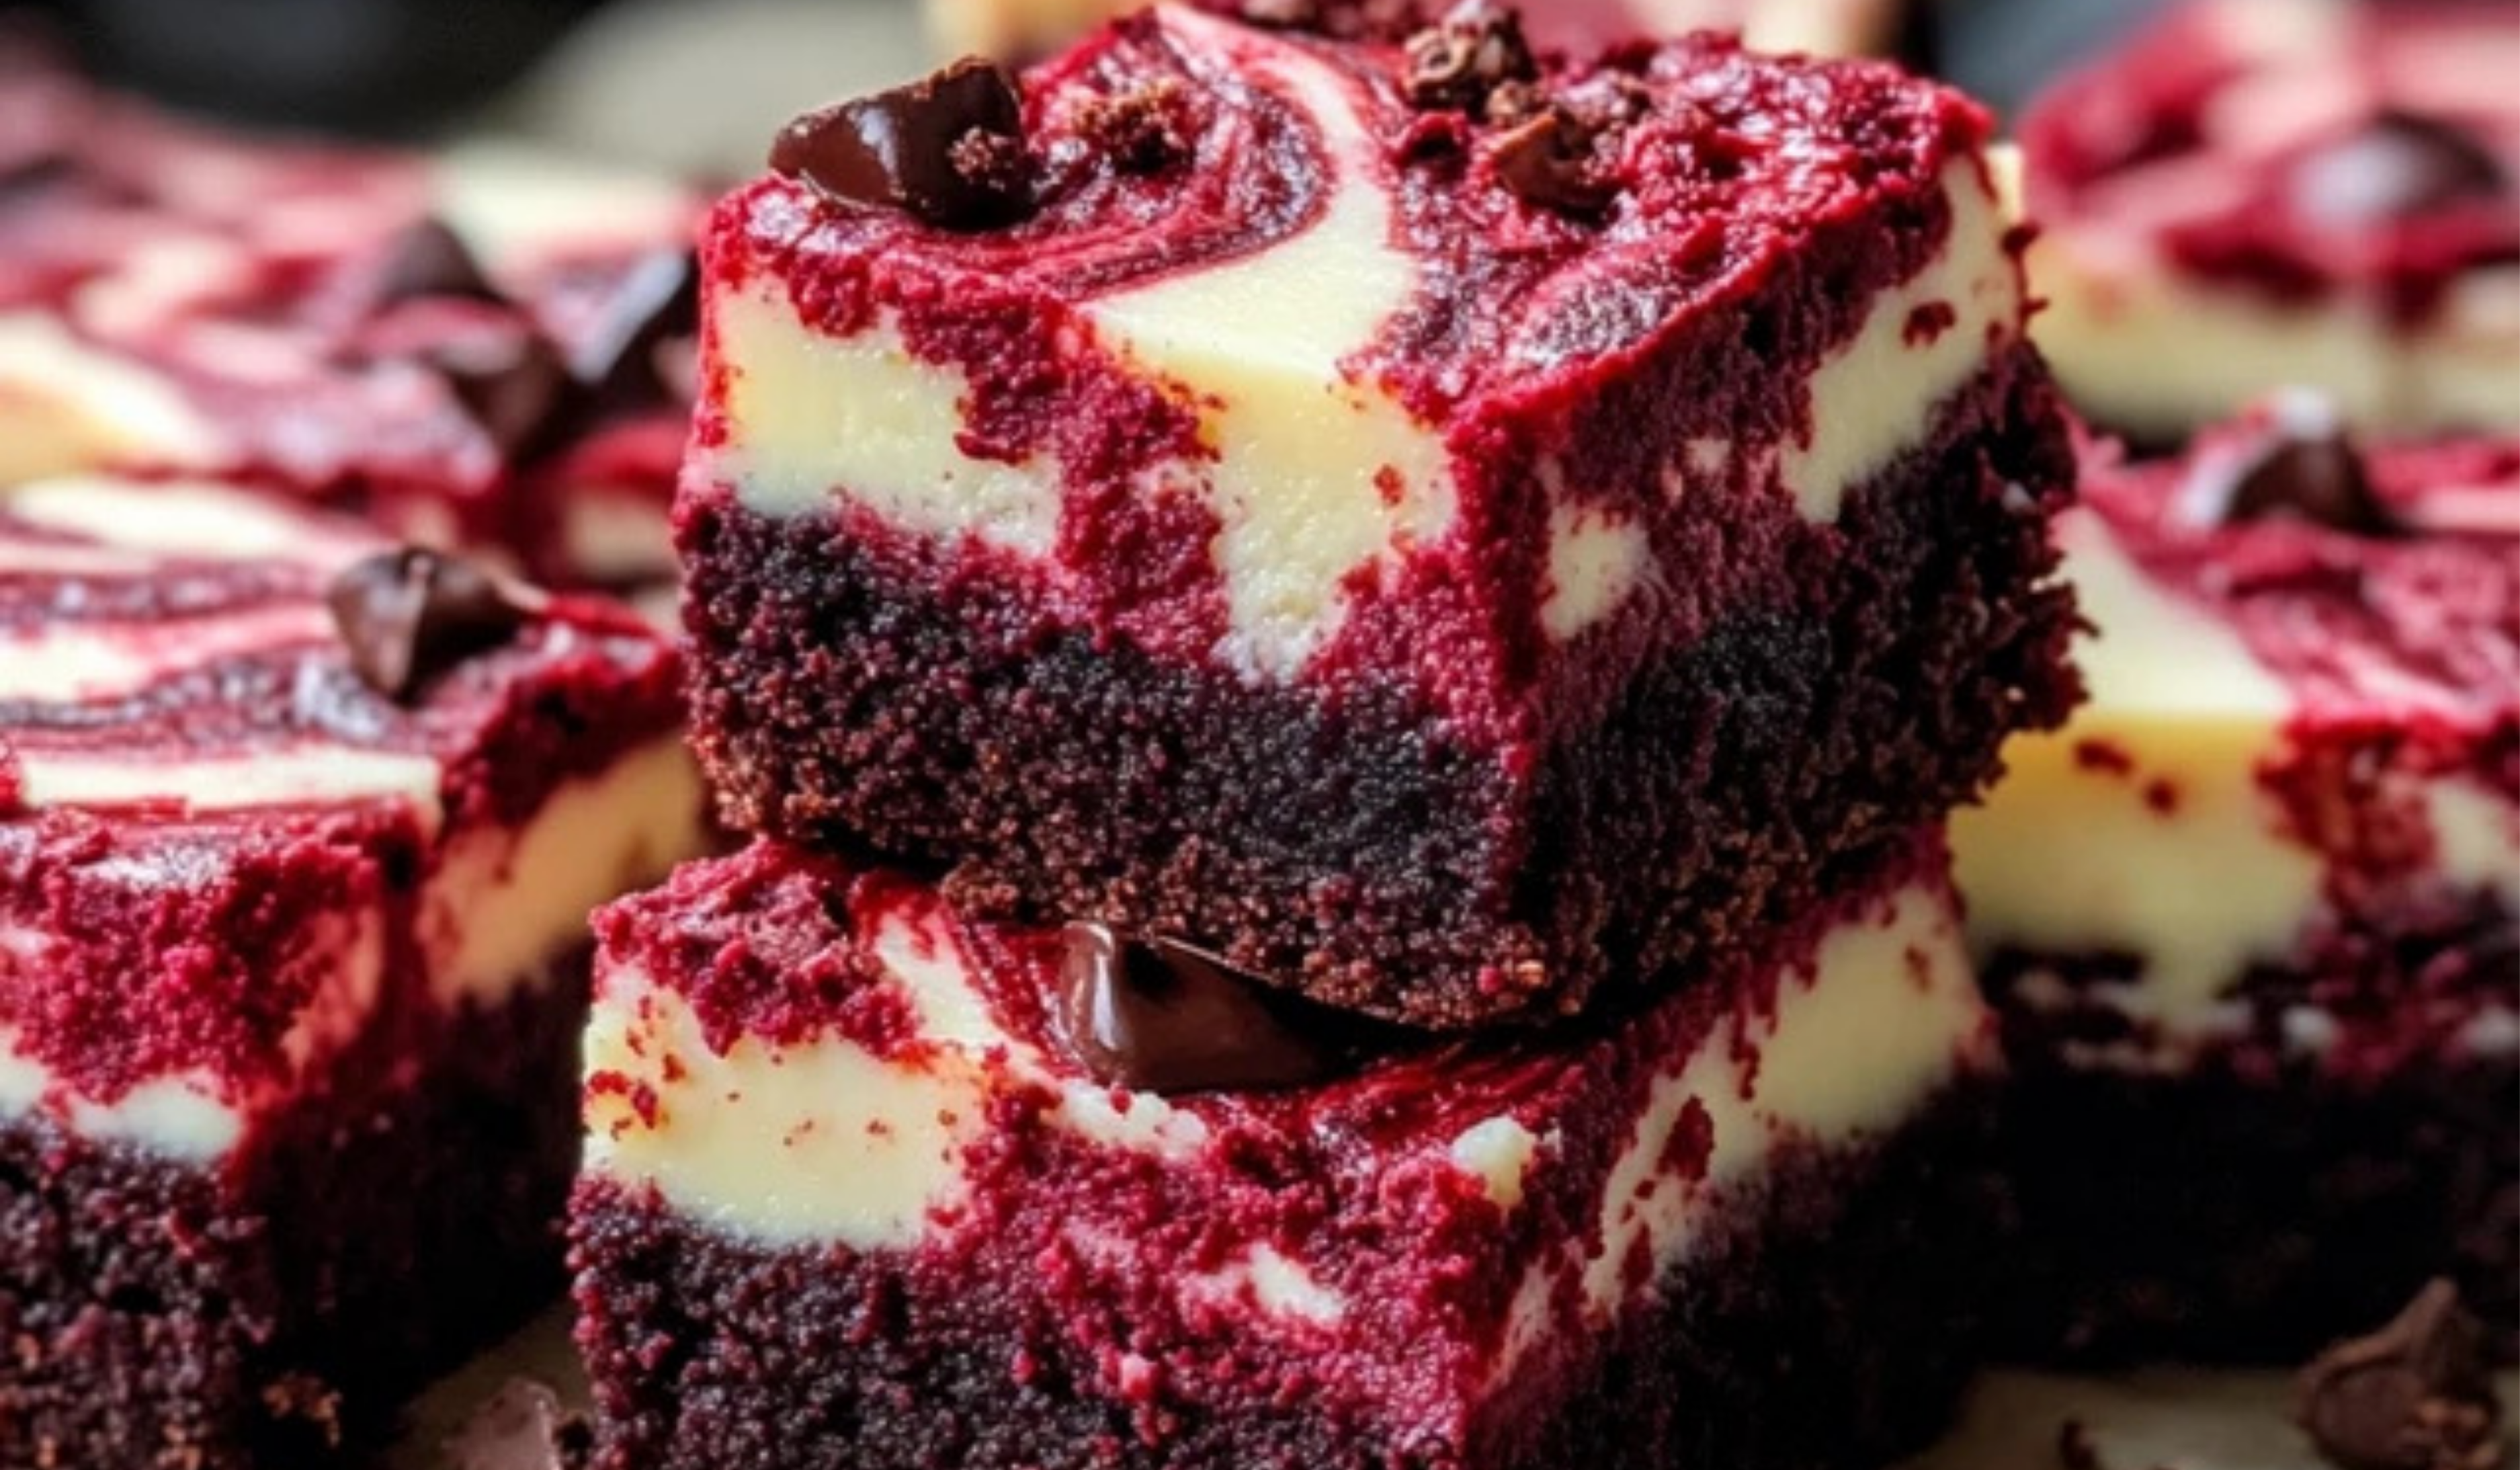
Now comes the fun part—creating that signature marbled swirl! Drop generous spoonfuls of the cream cheese mixture all over the red velvet brownie batter. Don’t worry about being too precise here; the more uneven, the better. Once the cream cheese is dropped onto the batter, use a butter knife or a skewer to swirl the two mixtures together. Be gentle but firm as you move through the batter to create a beautiful, marbled effect.
Step 6: Bake the Brownies
Place your pan in the oven and bake for about 30-35 minutes. Check for doneness by inserting a knife or toothpick into the center of the brownies. If it comes out clean or with just a few moist crumbs, your brownies are ready. Be sure to avoid overbaking, as this can lead to dry brownies.
Step 7: Let Cool and Slice
Once the brownies are baked, allow them to cool completely in the pan before cutting into squares. This will give the flavors time to set and the texture to firm up. You can cut the brownies into 9 large squares or 16 smaller ones, depending on how indulgent you want to be.
Notes
- Room Temperature Ingredients: For the smoothest cream cheese swirl, it’s essential that your cream cheese and egg are at room temperature before mixing. Cold ingredients can lead to lumps in the cream cheese mixture, which will affect the texture of the swirl.
- Don’t Overmix: When combining the dry ingredients with the wet ingredients, be sure to mix until just combined. Overmixing can lead to a dense and tough brownie, instead of the soft, fudgy texture we’re going for.
- Testing for Doneness: Keep an eye on the brownies toward the end of the baking time. When you insert a toothpick or knife into the center, it should come out clean or with just a few crumbs. If the knife comes out with wet batter, they need a bit more time.
- Crackly Top: The secret to achieving that classic crackly top on brownies is to whisk the eggs well and mix them with the sugar for at least two minutes. This helps incorporate air into the batter, which results in the signature shiny, crackled crust on top.
- Chill the Brownies: If you have time, refrigerating the brownies for an hour after they cool to room temperature will make them easier to cut and enhance their flavor.
- Prep Time: 15 Minutes
- Cook Time: 35 Minutes
While the idea of baking something as rich and complex as red velvet cheesecake brownies might sound intimidating, this recipe has been designed with beginners in mind. The steps are simple to follow, and with just a few key tips and tricks, you’ll be able to create a show-stopping dessert in no time. So whether you’re a seasoned baker looking for a fun new challenge or a complete beginner, these brownies will give you an opportunity to shine in the kitchen!
Ingredients and Preparation
Before you begin, make sure you have everything ready. This recipe calls for a handful of basic ingredients that are easy to find at your local grocery store. The preparation is straightforward, and you’ll be able to complete the entire recipe with just a few key kitchen tools.
Red Velvet Brownie Base
- ½ cup unsalted butter, melted
- 1 cup granulated sugar
- 2 large eggs
- 1½ teaspoons red food coloring
- 2 teaspoons pure vanilla extract
- ½ teaspoon salt
- ¾ cup all-purpose flour
- 3 tablespoons unsweetened cocoa powder
Cream Cheese Swirl
- 8 ounces cream cheese, softened to room temperature
- 1 large egg, room temperature
- ⅓ cup granulated sugar
Alternative Ingredient Suggestions:
- If you don’t have red food coloring, consider using natural alternatives like beet juice to give the batter that rich red hue.
- In place of the butter, you can substitute with vegetable oil for a slightly different texture and flavor.
- If you prefer a more decadent cheesecake swirl, you could use mascarpone cheese instead of cream cheese.
Once you have your ingredients ready, it’s time to gather the kitchen tools you’ll need to get started:
- 8×8-inch baking pan
- Parchment paper
- Mixing bowls
- Rubber spatula
- Measuring cups and spoons
Step-by-Step Instructions
Now, let’s dive into the steps to make your Red Velvet Cheesecake Brownies. Don’t worry—this process is easy to follow and will leave you with delicious brownies at the end!
Step 1: Preheat and Prepare the Pan
Start by preheating your oven to 350°F (175°C). Prepare your 8×8-inch baking pan by lining it with parchment paper. Ensure that the paper comes up the sides of the pan, which will make it easier to remove the brownies later. You want to make sure the pan is completely lined, so there’s no chance of the batter sticking.
Step 2: Make the Red Velvet Brownie Base
In a medium mixing bowl, whisk together the melted butter and granulated sugar until the mixture becomes glossy. This step is crucial because it helps the sugar dissolve evenly into the butter, giving the brownies a smooth, shiny texture. Once combined, add the eggs one at a time, whisking for about 2 minutes after each addition. This extra whisking is key to achieving that signature crackly top on the brownies.
Next, add the vanilla extract and red food coloring. Stir until everything is evenly mixed, and the batter takes on a beautiful, vibrant red hue.
Step 3: Add Dry Ingredients
To the same bowl, sift in the flour, cocoa powder, and salt. Mix everything gently with a spatula until just combined. Be careful not to overmix at this stage, as this could result in dry brownies. You want the dry ingredients to be incorporated into the wet ingredients without any streaks of flour remaining. The batter should be thick and smooth.
Once combined, spread the red velvet brownie batter evenly into your prepared pan. Use a rubber spatula to smooth the top, making sure it’s level.
Step 4: Prepare the Cream Cheese Swirl
In a separate bowl, combine the softened cream cheese, egg, and sugar. Use an electric mixer or a whisk to mix everything together until the cream cheese mixture becomes smooth and creamy. Make sure there are no lumps, as this will ensure your swirl is as creamy and smooth as possible.
Step 5: Create the Cheesecake Swirl
Now comes the fun part—creating that signature marbled swirl! Drop generous spoonfuls of the cream cheese mixture all over the red velvet brownie batter. Don’t worry about being too precise here; the more uneven, the better. Once the cream cheese is dropped onto the batter, use a butter knife or a skewer to swirl the two mixtures together. Be gentle but firm as you move through the batter to create a beautiful, marbled effect.
Step 6: Bake the Brownies
Place your pan in the oven and bake for about 30-35 minutes. Check for doneness by inserting a knife or toothpick into the center of the brownies. If it comes out clean or with just a few moist crumbs, your brownies are ready. Be sure to avoid overbaking, as this can lead to dry brownies.
Step 7: Let Cool and Slice
Once the brownies are baked, allow them to cool completely in the pan before cutting into squares. This will give the flavors time to set and the texture to firm up. You can cut the brownies into 9 large squares or 16 smaller ones, depending on how indulgent you want to be.
Beginner Tips and Notes
While this recipe is straightforward, there are a few tips that will help you achieve the best possible results:
- Room Temperature Ingredients: For the smoothest cream cheese swirl, it’s essential that your cream cheese and egg are at room temperature before mixing. Cold ingredients can lead to lumps in the cream cheese mixture, which will affect the texture of the swirl.
- Don’t Overmix: When combining the dry ingredients with the wet ingredients, be sure to mix until just combined. Overmixing can lead to a dense and tough brownie, instead of the soft, fudgy texture we’re going for.
- Testing for Doneness: Keep an eye on the brownies toward the end of the baking time. When you insert a toothpick or knife into the center, it should come out clean or with just a few crumbs. If the knife comes out with wet batter, they need a bit more time.
- Crackly Top: The secret to achieving that classic crackly top on brownies is to whisk the eggs well and mix them with the sugar for at least two minutes. This helps incorporate air into the batter, which results in the signature shiny, crackled crust on top.
- Chill the Brownies: If you have time, refrigerating the brownies for an hour after they cool to room temperature will make them easier to cut and enhance their flavor.

Serving Suggestions
These Red Velvet Cheesecake Brownies are delicious on their own, but you can elevate them further with a few creative additions:
- Pair with Ice Cream: A scoop of vanilla or cream cheese ice cream can complement the tangy cheesecake swirl in the brownies.
- Drizzle with Chocolate Sauce: For extra decadence, drizzle warm chocolate sauce or a rich caramel sauce over the brownies just before serving.
- Serve with Fresh Berries: Fresh raspberries, strawberries, or blackberries can bring a burst of freshness to balance out the sweetness of the brownies.
- Coffee Pairing: These brownies go beautifully with a cup of freshly brewed coffee or a latte, making them perfect for a cozy dessert after dinner.
Engagement Features
We hope you’re feeling inspired to give these Red Velvet Cheesecake Brownies a try! They are the perfect balance of two classic desserts and an easy way to impress your friends and family. Baking doesn’t have to be complicated, and with a few simple ingredients and a little patience, you can create something truly special.
If you try this recipe, we’d love to hear about your experience! Did you add your own twist, or did you follow the recipe exactly? Leave a comment below and share your thoughts or ask any questions you may have. We’re here to help and can’t wait to hear about your delicious results!
Remember, baking is all about experimenting and having fun. Don’t be afraid to get creative with flavors, toppings, or presentation. Most importantly, enjoy the process of making something from scratch that everyone will enjoy!


