Oreo No-Bake Cheesecake Cups

If you’re looking for the perfect summer treat that’s quick, easy, and guaranteed to be a crowd-pleaser, look no further than Oreo No-Bake Cheesecake Cups. This delightful dessert combines the creamy richness of cheesecake with the irresistible crunch of Oreo cookies, all without turning on the oven. With just 5 simple ingredients and only 20 minutes of active prep time, this dessert is perfect for both novice and experienced bakers alike. Plus, it’s the ideal treat for hot summer days when you want something sweet but don’t want to heat up the kitchen.
Print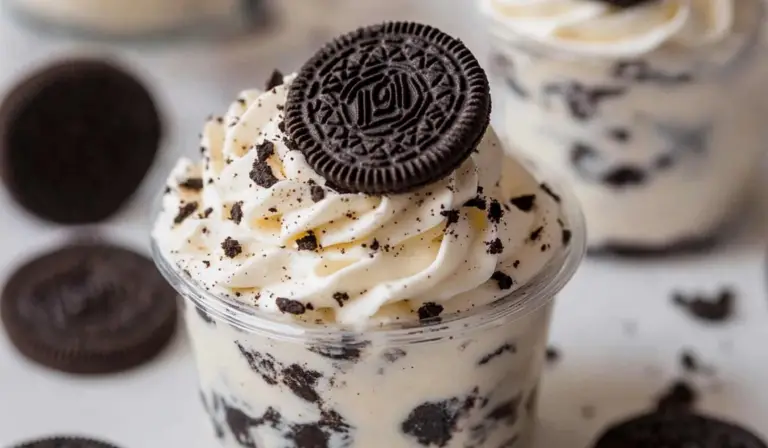
Oreo No-Bake Cheesecake Cups
🍪🍰 Oreo No-Bake Cheesecake Cups—your new go-to indulgence! Rich, creamy cheesecake layered with crunchy Oreo crumbs, all served in individual cups for the perfect bite-sized treat. 😍✨ No baking required, just pure bliss in every spoonful. Perfect for parties, picnics, or a sweet snack anytime! 💕
#OreoCheesecakeMagic 🍪🍰 #NoBakeDelight ✨ #MiniTreats 💖 #CheesecakeLovers 🍰 #OreoCravings 🍪 #EasyDesserts 😋 #SweetIndulgence 🍴 #DessertInspo 🎉 #CreamyAndCrunchy 💕 #FoodieFavorites 🍴
- Total Time: 45 minutes (includes chill time)
Ingredients
- 8 oz block of Cream Cheese (softened): This is the base of your cheesecake filling. It’s important to soften the cream cheese before mixing to achieve that smooth, creamy texture.
- 8 oz Cool Whip or Whipped Topping: The Cool Whip lightens up the cream cheese filling and gives it that fluffy texture that makes no-bake cheesecakes so delightful.
- 2/3 cup Powdered Sugar: Adds just the right amount of sweetness to the filling without being too overpowering.
- 1 tsp Vanilla Extract: Vanilla is key in bringing out the flavors in the cheesecake filling. It adds depth and enhances the creamy texture.
- 24–26 Oreo Cookies: The star of the show! You’ll need some crushed Oreos for the crust and topping, plus a few whole cookies to garnish the cheesecake cups.
Instructions
Step 1: Crush the Oreos
Start by crushing the Oreo cookies. The easiest way to do this is by placing the cookies in a plastic bag, sealing it, and then using a rolling pin or sturdy spoon to crush them into fine crumbs. You can also use a food processor for this step, but a plastic bag and rolling pin work just as well and are a little more fun! Set aside about 1 1/2 to 2 tablespoons of the crushed Oreos to form the base of each cheesecake cup.
Step 2: Make the Cheesecake Filling
In a large mixing bowl, beat the softened cream cheese and powdered sugar together using a hand mixer or stand mixer. Mix until it’s smooth and creamy, making sure there are no lumps. Add the vanilla extract and mix again to incorporate the flavor into the cheesecake filling.
Next, gently fold in the Cool Whip. Be careful not to overmix, as you want to keep the fluffiness of the whipped topping. Once the Cool Whip is fully incorporated, fold in the remaining crushed Oreos, which will give the filling a little texture and that Oreo flavor we all love.
Step 3: Assemble the Cheesecake Cups
Take 6 small dessert dishes or cups (with a capacity of at least 3/4 cup to 1 cup each) and spoon about 1 1/2 to 2 tablespoons of the crushed Oreos into the bottom of each cup. This will form the base of your dessert.
Next, spoon the cheesecake filling into each cup, dividing it evenly between the dishes. Use the back of the spoon to gently press the filling down onto the Oreo crust to compact it slightly.
Step 4: Chill and Set
Place the cheesecake cups in the refrigerator and let them chill for at least 30 minutes. This will help the filling set and firm up, making them easier to serve and eat. You can also chill them for longer if desired, but 30 minutes is usually sufficient.
Step 5: Top and Serve
Once the cheesecake cups are chilled and ready to go, top each one with a dollop of whipped cream. For an extra touch, sprinkle more crushed Oreos on top. If desired, you can even place a whole Oreo cookie on top for added decoration and flavor.
Notes
- Use Room Temperature Cream Cheese: Make sure the cream cheese is softened before mixing. Cold cream cheese can create lumps in the filling, making it difficult to get that smooth texture.
- Customize the Oreos: While classic Oreos are the standard choice for this recipe, you can experiment with different flavors. Try using golden Oreos for a lighter flavor, or mint-flavored Oreos for a refreshing twist. For a more decadent touch, you could even add chocolate or peanut butter-flavored Oreos.
- Cool Whip Alternatives: If you don’t have Cool Whip on hand, you can substitute it with fresh whipped cream. Just be sure to whip it until stiff peaks form, and fold it in gently to maintain the airy texture.
- Chill Longer: For best results, let the cheesecake cups chill for at least an hour before serving. If you have time, you can even prepare them the night before and let them set overnight.
- Add a Drizzle: If you want to elevate the presentation, drizzle some chocolate or caramel sauce over the whipped cream before serving. This adds an extra layer of flavor and makes the dessert look even more tempting.
- Prep Time: 15 minutes
- Cook Time: 0 minutes
These individual cheesecake cups are as delicious as they are cute and make for a perfect dessert for family dinners, potlucks, or a special summer gathering. Whether you’re serving them at a BBQ, birthday party, or enjoying them on a quiet evening at home, these cheesecake cups will leave everyone craving more.
The Magic Behind Oreo No-Bake Cheesecake Cups
No-bake desserts have a special kind of magic about them. The simplicity and ease with which you can prepare them make them a go-to option for busy days when you want something that’s both delicious and low-effort. The Oreo No-Bake Cheesecake Cups are a prime example of this dessert category, combining a creamy cheesecake filling with the crunch of Oreos, making it a perfectly balanced treat.
The filling is smooth and rich, thanks to cream cheese and Cool Whip, with just the right amount of sweetness from powdered sugar. The Oreo crust, created by simply crushing the cookies, provides a delightful contrast in texture, making each bite an indulgent treat. A final topping of whipped cream and extra Oreo crumbs takes the dessert over the top, giving it a final touch of elegance and flavor.
Ingredients Breakdown
This recipe requires only 5 ingredients, which are likely things you already have on hand. Here’s a quick breakdown:
For the Cheesecake Cups:
- 8 oz block of Cream Cheese (softened): This is the base of your cheesecake filling. It’s important to soften the cream cheese before mixing to achieve that smooth, creamy texture.
- 8 oz Cool Whip or Whipped Topping: The Cool Whip lightens up the cream cheese filling and gives it that fluffy texture that makes no-bake cheesecakes so delightful.
- 2/3 cup Powdered Sugar: Adds just the right amount of sweetness to the filling without being too overpowering.
- 1 tsp Vanilla Extract: Vanilla is key in bringing out the flavors in the cheesecake filling. It adds depth and enhances the creamy texture.
- 24-26 Oreo Cookies: The star of the show! You’ll need some crushed Oreos for the crust and topping, plus a few whole cookies to garnish the cheesecake cups.
Step-by-Step Instructions
Step 1: Crush the Oreos
Start by crushing the Oreo cookies. The easiest way to do this is by placing the cookies in a plastic bag, sealing it, and then using a rolling pin or sturdy spoon to crush them into fine crumbs. You can also use a food processor for this step, but a plastic bag and rolling pin work just as well and are a little more fun! Set aside about 1 1/2 to 2 tablespoons of the crushed Oreos to form the base of each cheesecake cup.
Step 2: Make the Cheesecake Filling
In a large mixing bowl, beat the softened cream cheese and powdered sugar together using a hand mixer or stand mixer. Mix until it’s smooth and creamy, making sure there are no lumps. Add the vanilla extract and mix again to incorporate the flavor into the cheesecake filling.
Next, gently fold in the Cool Whip. Be careful not to overmix, as you want to keep the fluffiness of the whipped topping. Once the Cool Whip is fully incorporated, fold in the remaining crushed Oreos, which will give the filling a little texture and that Oreo flavor we all love.
Step 3: Assemble the Cheesecake Cups
Take 6 small dessert dishes or cups (with a capacity of at least 3/4 cup to 1 cup each) and spoon about 1 1/2 to 2 tablespoons of the crushed Oreos into the bottom of each cup. This will form the base of your dessert.
Next, spoon the cheesecake filling into each cup, dividing it evenly between the dishes. Use the back of the spoon to gently press the filling down onto the Oreo crust to compact it slightly.
Step 4: Chill and Set
Place the cheesecake cups in the refrigerator and let them chill for at least 30 minutes. This will help the filling set and firm up, making them easier to serve and eat. You can also chill them for longer if desired, but 30 minutes is usually sufficient.
Step 5: Top and Serve
Once the cheesecake cups are chilled and ready to go, top each one with a dollop of whipped cream. For an extra touch, sprinkle more crushed Oreos on top. If desired, you can even place a whole Oreo cookie on top for added decoration and flavor.
Tips for Perfect Oreo No-Bake Cheesecake Cups
- Use Room Temperature Cream Cheese: Make sure the cream cheese is softened before mixing. Cold cream cheese can create lumps in the filling, making it difficult to get that smooth texture.
- Customize the Oreos: While classic Oreos are the standard choice for this recipe, you can experiment with different flavors. Try using golden Oreos for a lighter flavor, or mint-flavored Oreos for a refreshing twist. For a more decadent touch, you could even add chocolate or peanut butter-flavored Oreos.
- Cool Whip Alternatives: If you don’t have Cool Whip on hand, you can substitute it with fresh whipped cream. Just be sure to whip it until stiff peaks form, and fold it in gently to maintain the airy texture.
- Chill Longer: For best results, let the cheesecake cups chill for at least an hour before serving. If you have time, you can even prepare them the night before and let them set overnight.
- Add a Drizzle: If you want to elevate the presentation, drizzle some chocolate or caramel sauce over the whipped cream before serving. This adds an extra layer of flavor and makes the dessert look even more tempting.
Variations to Try
While this recipe is already delicious on its own, there are plenty of ways to customize it to suit your taste or to make it even more decadent.
- Add Fruit: Add a layer of fruit to the bottom of each cup before the cheesecake filling. Fresh raspberries, strawberries, or even a few spoonfuls of fruit preserves can add a burst of flavor and color.
- Nutty Crunch: For added texture, sprinkle some chopped nuts, such as crushed almonds or pecans, on top of the whipped cream. This will add a crunchy contrast to the smoothness of the cheesecake filling.
- Swirl in Chocolate: For a rich, chocolatey twist, swirl in some melted chocolate into the cheesecake filling before chilling. You can also add chocolate chips or drizzle chocolate on top for an extra indulgent treat.
- Crust Variation: Instead of just using Oreos for the crust, you can mix in some graham cracker crumbs for a different base. This creates a delicious flavor contrast with the creamy cheesecake.

Serving Suggestions
These Oreo No-Bake Cheesecake Cups are already a dessert in themselves, but they can be served alongside other treats for a fun dessert spread. Pair them with a refreshing fruit salad, or serve them alongside some cold beverages like iced tea or lemonade. They’re also the perfect dessert to bring to a potluck or BBQ, where guests can grab an individual serving.
For a more elegant presentation, serve the cheesecake cups on a decorative platter, and add a few mint leaves or edible flowers to the plate for a pop of color. You can also serve them with extra Oreos on the side for those who want to add more cookie crunch.
Conclusion
Oreo No-Bake Cheesecake Cups are the ultimate dessert for anyone looking for a quick, easy, and irresistibly delicious treat. Whether you’re making them for a special occasion or just because, these creamy, crunchy, and refreshing cups are sure to be a hit. With just a few ingredients and minimal prep time, you can enjoy the classic flavors of cheesecake and Oreos without ever having to turn on the oven. So, grab your ingredients, chill the cheesecake cups, and get ready for a treat that everyone will love!