No Bake Red Velvet Cheesecake

If you’re looking for a decadent, show-stopping dessert without spending hours in the kitchen, look no further than this No Bake Red Velvet Cheesecake. It’s a velvety-smooth, indulgent treat perfect for special occasions like Valentine’s Day, birthdays, or any celebration where you want to impress. With its rich red hue and delightful blend of chocolate and cream cheese flavors, this no-bake cheesecake is sure to become a favorite.
Print
No Bake Red Velvet Cheesecake
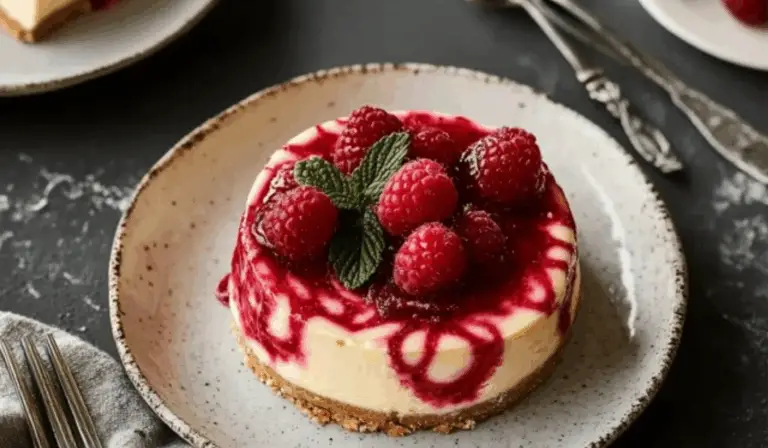
Indulge in the creamy, dreamy layers of this luxurious No Bake Red Velvet Cheesecake! 😍✨ A smooth, tangy cheesecake filling rests on a buttery graham cracker crust, topped with the vibrant, velvety richness of red velvet. ❤️ With no oven required, this beauty is perfect for impressing guests or just treating yourself to a sweet, decadent moment! 🍰
- Total Time: 4 Hours 20 Minutes
- Yield: 12 servings 1x
Ingredients
Instructions
1. Prepare the Crust
Start by making the base of your cheesecake. Combine 1 ½ cups of Oreo crumbs with 5 tablespoons of melted butter. Stir until the mixture becomes moist and crumbly. Press it firmly into the bottom of a 9-inch springform pan, creating an even layer. Pop it into the fridge while you prepare the filling to let it set.
2. Melt the Chocolates
Melt 200 grams of white chocolate and 75 grams of semi-sweet chocolate using the microwave. Heat in 30-second intervals at 50% power, stirring in between until smooth. Let the melted chocolate cool slightly but keep it fluid enough to blend easily into the cheesecake mixture.
3. Make the Cheesecake Filling
In a large mixing bowl, beat together 900 grams of cream cheese (at room temperature) and 1 cup of powdered sugar using a hand mixer. Mix until smooth and creamy, ensuring no lumps remain.
4. Add the Color and Chocolate
Next, add 2 teaspoons of red food coloring paste. Mix well to ensure the color is evenly distributed throughout the cream cheese mixture. Be sure to scrape down the sides of the bowl.
Now, with the mixer on low speed, slowly pour in the melted white and semi-sweet chocolate. Keep mixing until fully incorporated. Make sure your cream cheese is at room temperature, or the chocolate might solidify too quickly.
5. Fold in the Whipped Cream
Gently fold in 1 cup of whipped cream or whipped topping. This step is crucial to achieving a light, airy texture. Continue folding until the mixture is smooth, fluffy, and there are no visible streaks of white from the whipped cream.
6. Assemble the Cheesecake
Remove the crust from the fridge and pour the cheesecake filling into the pan. Smooth the top with a spatula for a clean finish.
7. Chill to Set
Refrigerate the cheesecake for at least 6 hours or preferably overnight. If you’re in a hurry, you can refrigerate it for 2-3 hours, then transfer it to the freezer for another 2-3 hours. Alternatively, you can freeze the cheesecake for 3-4 hours straight, but make sure it’s thoroughly chilled before serving.
8. Serve and Decorate
Before serving, top the cheesecake with a swirl of whipped cream or whipped topping, and sprinkle some Oreo crumbs for an extra touch of decadence. This step is optional but adds a lovely visual appeal to the finished product.
Notes
- Room Temperature Ingredients: It’s essential that your cream cheese is at room temperature before mixing. Cold cream cheese will result in a lumpy filling, and the chocolate might seize up when mixed in.
- Chocolate Melting Tip: When melting chocolate in the microwave, always use 50% power and short intervals to avoid burning the chocolate.
- Food Coloring: For the boldest red color, use food coloring paste rather than liquid. Liquid food coloring can thin out your cheesecake mixture.
- Chilling Time: While the cheesecake can be set in the freezer, for the best texture, let it chill in the refrigerator for the full 6 hours or overnight.
- Don’t Skimp on the Butter in the Crust: The melted butter is crucial to helping the Oreo crumbs bind together to form a sturdy crust.
- Prep Time: 20 Minutes
- Cook Time: 4 hour
- Category: Dessert
- Method: Baking
- Cuisine: American
This dessert combines the classic taste of red velvet cake with the creamy richness of cheesecake, all without needing to turn on your oven. The smooth texture, combined with the crunchy chocolate cookie crust, creates a perfect harmony of flavors and textures in every bite. Let’s dive into this delightful creation!
Why You’ll Love This No Bake Red Velvet Cheesecake
- No Oven Needed: On hot days or when you’re short on time, this no-bake dessert is a lifesaver. Simply prepare, refrigerate, and you’re good to go.
- Perfect for Special Occasions: The deep red color and luxurious chocolate undertones make this an eye-catching dessert for any event.
- Rich and Creamy Texture: The smooth cream cheese filling with melted chocolate delivers a melt-in-your-mouth experience.
- Easy to Make Ahead: Make this cheesecake the day before your event for a stress-free dessert option. It only gets better with time!
Ingredients Breakdown
Here’s what you’ll need to create this luscious dessert:
- 1 ½ cups Oreo baking crumbs: These form the perfect base, adding a crunchy, chocolaty foundation that pairs beautifully with the creamy filling.
- 5 tablespoons melted butter: Combined with the Oreo crumbs, it helps bind the crust, creating a firm base for the cheesecake.
- 900 grams (32 oz) cream cheese: Make sure it’s at room temperature for easy mixing. This gives the cheesecake its rich, smooth texture.
- 1 cup powdered sugar: This sweetens the cream cheese without adding any graininess.
- 2 teaspoons red food coloring paste: The key to achieving that signature red velvet color. Paste works best as it provides a more vibrant hue without watering down the mixture.
- 200 grams (8 oz) white chocolate, melted: Adds sweetness and smoothness to the filling, complementing the tangy cream cheese.
- 75 grams (3 oz) semi-sweet chocolate, melted: Provides a depth of chocolate flavor, balancing the sweetness from the white chocolate.
- 1 cup whipped cream or whipped topping: This lightens the filling, giving it a fluffy texture.
- Whipped cream and Oreo crumbs for garnish (optional): These make the presentation even more irresistible!
Step-by-Step Instructions
1. Prepare the Crust
Start by making the base of your cheesecake. Combine 1 ½ cups of Oreo crumbs with 5 tablespoons of melted butter. Stir until the mixture becomes moist and crumbly. Press it firmly into the bottom of a 9-inch springform pan, creating an even layer. Pop it into the fridge while you prepare the filling to let it set.
2. Melt the Chocolates
Melt 200 grams of white chocolate and 75 grams of semi-sweet chocolate using the microwave. Heat in 30-second intervals at 50% power, stirring in between until smooth. Let the melted chocolate cool slightly but keep it fluid enough to blend easily into the cheesecake mixture.
3. Make the Cheesecake Filling
In a large mixing bowl, beat together 900 grams of cream cheese (at room temperature) and 1 cup of powdered sugar using a hand mixer. Mix until smooth and creamy, ensuring no lumps remain.
4. Add the Color and Chocolate
Next, add 2 teaspoons of red food coloring paste. Mix well to ensure the color is evenly distributed throughout the cream cheese mixture. Be sure to scrape down the sides of the bowl.
Now, with the mixer on low speed, slowly pour in the melted white and semi-sweet chocolate. Keep mixing until fully incorporated. Make sure your cream cheese is at room temperature, or the chocolate might solidify too quickly.
5. Fold in the Whipped Cream
Gently fold in 1 cup of whipped cream or whipped topping. This step is crucial to achieving a light, airy texture. Continue folding until the mixture is smooth, fluffy, and there are no visible streaks of white from the whipped cream.
6. Assemble the Cheesecake
Remove the crust from the fridge and pour the cheesecake filling into the pan. Smooth the top with a spatula for a clean finish.
7. Chill to Set
Refrigerate the cheesecake for at least 6 hours or preferably overnight. If you’re in a hurry, you can refrigerate it for 2-3 hours, then transfer it to the freezer for another 2-3 hours. Alternatively, you can freeze the cheesecake for 3-4 hours straight, but make sure it’s thoroughly chilled before serving.
8. Serve and Decorate
Before serving, top the cheesecake with a swirl of whipped cream or whipped topping, and sprinkle some Oreo crumbs for an extra touch of decadence. This step is optional but adds a lovely visual appeal to the finished product.
Tasting Notes: Flavors, Textures, and Aromas
The first thing you’ll notice about this cheesecake is its vivid red hue and the striking contrast of the dark Oreo crust. As you slice into it, the smooth, creamy filling is a visual treat, inviting you to take that first bite.
When you do, you’ll be met with the luxurious creaminess of the cream cheese, perfectly balanced by the sweet notes of melted white chocolate and the slightly bitter undertones of the semi-sweet chocolate. The chocolate cookie crust adds a crunchy contrast to the velvety filling, creating a delightful textural experience.
Aromatically, you’ll pick up subtle hints of chocolate mingling with the rich tang of cream cheese. The flavors are reminiscent of a classic red velvet cake, but with an added layer of sophistication from the cheesecake elements. The whipped cream topping provides a light, airy finish to each bite.
Tips for Perfecting Your No Bake Red Velvet Cheesecake
- Room Temperature Ingredients: It’s essential that your cream cheese is at room temperature before mixing. Cold cream cheese will result in a lumpy filling, and the chocolate might seize up when mixed in.
- Chocolate Melting Tip: When melting chocolate in the microwave, always use 50% power and short intervals to avoid burning the chocolate.
- Food Coloring: For the boldest red color, use food coloring paste rather than liquid. Liquid food coloring can thin out your cheesecake mixture.
- Chilling Time: While the cheesecake can be set in the freezer, for the best texture, let it chill in the refrigerator for the full 6 hours or overnight.
- Don’t Skimp on the Butter in the Crust: The melted butter is crucial to helping the Oreo crumbs bind together to form a sturdy crust.
Ingredient Substitutions and Variations
- Oreo Crust Substitution: If you don’t have Oreo crumbs on hand, you can substitute with graham cracker crumbs or chocolate wafer cookies. The key is to have a base that complements the red velvet flavor.
- White Chocolate Alternative: If you’re not a fan of white chocolate, you can replace it with milk chocolate for a sweeter, creamier flavor. However, this will slightly alter the taste profile, making it more of a chocolate cheesecake.
- Dairy-Free Version: For those avoiding dairy, you can substitute vegan cream cheese and coconut whipped cream. Just be mindful that the texture may be slightly different, and the cheesecake may need longer to set.
- Flavor Variations: Want to add a twist? Try incorporating a hint of vanilla extract or a teaspoon of espresso powder into the cheesecake filling for an extra flavor boost. The espresso will deepen the chocolate notes without overpowering the red velvet essence.

Serving Suggestions
This No Bake Red Velvet Cheesecake is versatile enough to serve on its own or paired with a variety of garnishes. Here are some ideas to elevate your presentation:
- Drizzle of Chocolate Sauce: For a touch of indulgence, drizzle melted chocolate or chocolate ganache over the top of each slice.
- Fresh Berries: Add a pop of freshness by serving the cheesecake with a side of fresh strawberries, raspberries, or blackberries.
- Whipped Cream Rosettes: Pipe small rosettes of whipped cream around the edges of the cheesecake for a bakery-style presentation.
- Chocolate Shavings: Garnish with dark or white chocolate shavings for a sophisticated look and added texture.
Storing and Freezing Tip
If you’re preparing this dessert ahead of time, it can be stored in the refrigerator in an airtight container for up to 2 days. For longer storage, you can freeze the cheesecake for up to 2 weeks. To thaw, simply transfer it to the fridge overnight before serving.
However, for the best results, it’s recommended to make the cheesecake 1 day in advance and let it chill in the fridge. This allows the flavors to fully develop and the texture to firm up to perfection.
Final Thoughts
With its rich color, smooth texture, and decadent flavor, this No Bake Red Velvet Cheesecake is sure to become a go-to dessert for any occasion. It’s indulgent yet easy to make, striking the perfect balance between a rich cream cheese