Fudgy Red Velvet Crinkle Cookies: A Beginner’s Dream Recipe

There’s something magical about baking cookies from scratch, especially when you see the transformation from raw dough to those picture-perfect, crackling delights fresh out of the oven. If you’re a beginner in the kitchen, the idea of making cookies might seem intimidating, but trust me, these Fudgy Red Velvet Crinkle Cookies are the perfect recipe to help you gain confidence and impress friends and family. The combination of rich cocoa flavor, a tender center, and the signature crinkled exterior will make you feel like a professional baker—no mixer required.
Print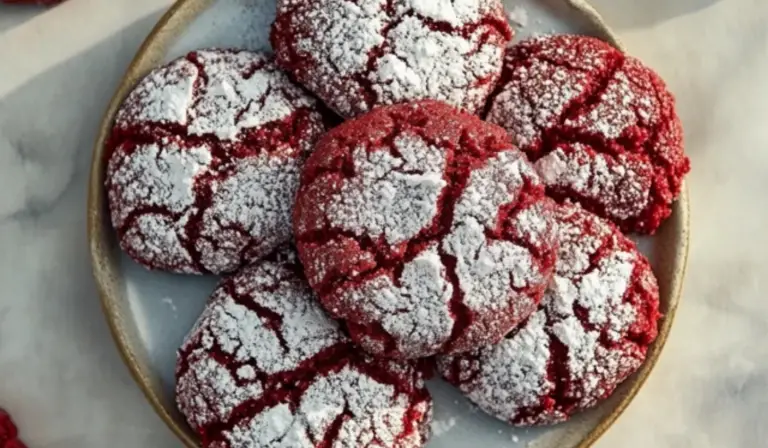
Fudgy Red Velvet Crinkle Cookies: A Beginner’s Dream Recipe
Soft, fudgy, and coated in a snowy sugar crust—these Red Velvet Crinkle Cookies are a beginner’s dream! Rich in flavor and ridiculously easy to make! ❤️🍪✨
- Total Time: 6 hours 33 minutes (including refrigeration time)
- Yield: 20 cookies 1x
Ingredients
- 1½ cups (213 grams) all-purpose flour – This is the base of your cookie dough and gives it structure.
- 1 teaspoon baking powder – Helps the cookies rise and gives them a fluffy texture.
- 1/8 teaspoon baking soda – Works with the baking powder to help the dough rise.
- ¾ cup (150 grams) plus 3 tablespoons granulated sugar – For sweetness and to help the cookies crisp up on the outside.
- ½ cup (100 grams) light brown sugar – Adds a bit of depth and moisture to the dough.
- 2 large eggs and 2 large egg yolks (at room temperature) – Eggs bind the ingredients and provide richness to the dough.
- 1 tablespoon canola oil – Adds moisture and helps the cookies stay soft.
- 1 tablespoon Red Velvet Bakery Emulsion or red food coloring – This gives your cookies their vibrant red color and unique flavor. If you can’t find the emulsion, red food coloring works as a substitute.
- 1 teaspoon pure vanilla extract – Enhances the flavor of the dough.
- ½ teaspoon salt – Balances out the sweetness and deepens the flavor of the dough.
- 4 tablespoons (57 grams) unsalted butter – Adds richness and flavor.
- 3 ounces (85 grams) semisweet or bittersweet chocolate – This is the key to the fudgy, rich texture of these cookies.
- ¼ cup (25 grams) cocoa powder – Provides the chocolate flavor that complements the red velvet.
- ½ cup (60 grams) confectioners’ sugar – Used to coat the cookies and give them that signature crinkle effect.
Instructions
1. Prepare the Dry Ingredients
Start by whisking the dry ingredients together. In a small bowl, combine the flour, baking powder, and baking soda. Whisk them until they’re well mixed and set aside. This ensures that the leavening agents are evenly distributed throughout the dough, which will help the cookies rise evenly as they bake.
2. Mix the Wet Ingredients
In a large bowl, whisk together the granulated sugar, brown sugar, eggs, egg yolks, canola oil, Red Velvet Bakery Emulsion (or red food coloring), vanilla extract, and salt. You’ll want to whisk this mixture until everything is well combined and smooth. This is the base of your cookie dough, and it’s where the color and flavor of your cookies will develop.
3. Melt the Chocolate and Butter
In a small saucepan over low heat, melt the butter and chocolate together. Stir frequently to prevent the chocolate from burning or scorching. Continue stirring until the mixture is smooth. Once melted, remove the saucepan from the heat and immediately whisk in the cocoa powder. The mixture will become thick, but that’s okay—this is what gives your cookies their fudgy texture.
4. Combine Wet and Dry Mixtures
Now that the chocolate and butter mixture is ready, add it to the wet ingredients. Whisk everything together until the mixture is well combined. You should have a rich, glossy dough at this point.
Next, gently fold in the flour mixture using a rubber spatula. Be careful not to overmix the dough. The goal is to incorporate everything until just combined, so you don’t end up with tough cookies.
5. Chill the Dough
This step is crucial. Cover the dough with plastic wrap and refrigerate it for at least 6 hours, or up to overnight. Chilling the dough allows the flavors to meld and the cookies to hold their shape better while baking. Patience is key here—don’t skip this step!
6. Prepare to Bake
Once your dough has chilled, preheat your oven to 350°F (180°C) and line three baking sheets with parchment paper. If you only have one or two sheet pans, don’t worry; you can bake in batches.
7. Roll the Dough
In a small bowl, combine the confectioners’ sugar and the remaining granulated sugar. Scoop about 1½ tablespoons of dough at a time and roll it into a ball using your hands. Then, roll each ball of dough in the sugar mixture, ensuring it is well-coated. This will give your cookies the beautiful crackled top that is signature to crinkle cookies.
8. Bake the Cookies
Place the sugar-coated dough balls on the prepared sheet pans. Make sure to space them out, as they will spread a little while baking. I recommend placing only eight cookies per sheet pan to avoid overcrowding.
Bake the cookies one sheet pan at a time, rotating the pan halfway through to ensure even baking. Bake for 12 to 14 minutes, or until the edges are set and the center is still soft. You’ll notice the edges of the cookies puff up while the center remains fudgy. When they’re done, remove them from the oven and allow them to cool on a wire rack.
Notes
- Room Temperature Ingredients: Be sure to use room-temperature eggs, as this helps them incorporate more easily into the dough. Cold eggs can cause the dough to seize up, leading to uneven texture.
- Chill the Dough: Don’t rush the chilling process! Chilling the dough is essential for achieving the perfect texture and ensuring your cookies don’t spread too much while baking.
- Baking Time: Oven temperatures can vary, so keep a close eye on the cookies during the last few minutes of baking. You want the edges to be set, but the center should still be soft. This will give you that perfect fudgy texture.
- Storage: These cookies stay fresh for up to 3 days when stored in an airtight container at room temperature. They can also be frozen for up to 3 months. To freeze, simply place the unbaked dough balls on a baking sheet, freeze until solid, and then transfer them to a zip-top bag.
- Prep Time: 20 minutes
- Cook Time: 13 minutes
Whether you’re making them for a special occasion or just because you’ve been craving something sweet, these cookies are bound to become a favorite. Plus, they’re much easier to make than you’d expect, thanks to a few simple ingredients and easy-to-follow steps. I’m here to guide you through the process with helpful tips, making sure you get the results you’re looking for every time.
Let’s dive into the details of making these delicious red velvet crinkle cookies, and remember, even if you’re new to baking, these cookies are an achievable and rewarding project!
Ingredients and Preparation
Before jumping into the steps, let’s take a look at the ingredients. You’ll notice that there are no complicated items here—everything is straightforward and easy to find at your local grocery store. These are the essentials to making your fudgy red velvet crinkle cookies:
Ingredients
- 1½ cups (213 grams) all-purpose flour – This is the base of your cookie dough and gives it structure.
- 1 teaspoon baking powder – Helps the cookies rise and gives them a fluffy texture.
- 1/8 teaspoon baking soda – Works with the baking powder to help the dough rise.
- ¾ cup (150 grams) plus 3 tablespoons granulated sugar – For sweetness and to help the cookies crisp up on the outside.
- ½ cup (100 grams) light brown sugar – Adds a bit of depth and moisture to the dough.
- 2 large eggs and 2 large egg yolks (at room temperature) – Eggs bind the ingredients and provide richness to the dough.
- 1 tablespoon canola oil – Adds moisture and helps the cookies stay soft.
- 1 tablespoon Red Velvet Bakery Emulsion or red food coloring – This gives your cookies their vibrant red color and unique flavor. If you can’t find the emulsion, red food coloring works as a substitute.
- 1 teaspoon pure vanilla extract – Enhances the flavor of the dough.
- ½ teaspoon salt – Balances out the sweetness and deepens the flavor of the dough.
- 4 tablespoons (57 grams) unsalted butter – Adds richness and flavor.
- 3 ounces (85 grams) semisweet or bittersweet chocolate – This is the key to the fudgy, rich texture of these cookies.
- ¼ cup (25 grams) cocoa powder – Provides the chocolate flavor that complements the red velvet.
- ½ cup (60 grams) confectioners’ sugar – Used to coat the cookies and give them that signature crinkle effect.
Equipment
- Half Sheet Pan – For baking the cookies. If you don’t have a half sheet pan, a regular baking sheet will work, just be sure to adjust the number of cookies you place on it.
Step-by-Step Instructions
Now that you’ve gathered all your ingredients, let’s move on to the fun part—baking these beautiful red velvet crinkle cookies! Follow these simple steps, and you’ll have cookies in no time.
1. Prepare the Dry Ingredients
Start by whisking the dry ingredients together. In a small bowl, combine the flour, baking powder, and baking soda. Whisk them until they’re well mixed and set aside. This ensures that the leavening agents are evenly distributed throughout the dough, which will help the cookies rise evenly as they bake.
2. Mix the Wet Ingredients
In a large bowl, whisk together the granulated sugar, brown sugar, eggs, egg yolks, canola oil, Red Velvet Bakery Emulsion (or red food coloring), vanilla extract, and salt. You’ll want to whisk this mixture until everything is well combined and smooth. This is the base of your cookie dough, and it’s where the color and flavor of your cookies will develop.
3. Melt the Chocolate and Butter
In a small saucepan over low heat, melt the butter and chocolate together. Stir frequently to prevent the chocolate from burning or scorching. Continue stirring until the mixture is smooth. Once melted, remove the saucepan from the heat and immediately whisk in the cocoa powder. The mixture will become thick, but that’s okay—this is what gives your cookies their fudgy texture.
4. Combine Wet and Dry Mixtures
Now that the chocolate and butter mixture is ready, add it to the wet ingredients. Whisk everything together until the mixture is well combined. You should have a rich, glossy dough at this point.
Next, gently fold in the flour mixture using a rubber spatula. Be careful not to overmix the dough. The goal is to incorporate everything until just combined, so you don’t end up with tough cookies.
5. Chill the Dough
This step is crucial. Cover the dough with plastic wrap and refrigerate it for at least 6 hours, or up to overnight. Chilling the dough allows the flavors to meld and the cookies to hold their shape better while baking. Patience is key here—don’t skip this step!
6. Prepare to Bake
Once your dough has chilled, preheat your oven to 350°F (180°C) and line three baking sheets with parchment paper. If you only have one or two sheet pans, don’t worry; you can bake in batches.
7. Roll the Dough
In a small bowl, combine the confectioners’ sugar and the remaining granulated sugar. Scoop about 1½ tablespoons of dough at a time and roll it into a ball using your hands. Then, roll each ball of dough in the sugar mixture, ensuring it is well-coated. This will give your cookies the beautiful crackled top that is signature to crinkle cookies.
8. Bake the Cookies
Place the sugar-coated dough balls on the prepared sheet pans. Make sure to space them out, as they will spread a little while baking. I recommend placing only eight cookies per sheet pan to avoid overcrowding.
Bake the cookies one sheet pan at a time, rotating the pan halfway through to ensure even baking. Bake for 12 to 14 minutes, or until the edges are set and the center is still soft. You’ll notice the edges of the cookies puff up while the center remains fudgy. When they’re done, remove them from the oven and allow them to cool on a wire rack.
Beginner Tips and Notes
As a beginner, there are a few tips that can help make the baking process smoother and more enjoyable:
- Room Temperature Ingredients: Be sure to use room-temperature eggs, as this helps them incorporate more easily into the dough. Cold eggs can cause the dough to seize up, leading to uneven texture.
- Chill the Dough: Don’t rush the chilling process! Chilling the dough is essential for achieving the perfect texture and ensuring your cookies don’t spread too much while baking.
- Baking Time: Oven temperatures can vary, so keep a close eye on the cookies during the last few minutes of baking. You want the edges to be set, but the center should still be soft. This will give you that perfect fudgy texture.
- Storage: These cookies stay fresh for up to 3 days when stored in an airtight container at room temperature. They can also be frozen for up to 3 months. To freeze, simply place the unbaked dough balls on a baking sheet, freeze until solid, and then transfer them to a zip-top bag.

Serving Suggestions
While these Fudgy Red Velvet Crinkle Cookies are delicious on their own, you can elevate your cookie experience by pairing them with complementary sides and beverages. Here are a few ideas:
- Milk or Coffee: A classic pairing, milk complements the chocolatey richness of these cookies perfectly. For an adult twist, enjoy them with a cup of coffee or even a latte.
- Ice Cream Sandwiches: For an indulgent treat, turn these cookies into ice cream sandwiches. Vanilla, cream cheese, or even chocolate ice cream would pair wonderfully with the red velvet flavor.
- Fruit Compote: If you’re looking to balance the sweetness, a simple berry compote or even fresh strawberries would make a refreshing side dish.
Engagement Features
I hope this recipe inspires you to get in the kitchen and try making these Fudgy Red Velvet Crinkle Cookies! They’re the perfect way to experiment with baking without feeling overwhelmed. The dough is simple to prepare, and the result is absolutely delicious.
If you’ve made these cookies, I’d love to hear how they turned out for you! Share your experiences in the comments below, and let me know if you tried any variations or added your own twist to the recipe. If you’re unsure about any step, don’t hesitate to ask—I’m here to help! Baking can be a learning experience, and it’s all about experimenting and having fun. So grab your apron and give these crinkle cookies a try—your taste buds will thank you!