Fudgy Chocolate Chip Cookie Brownie Bars (Slutty Brownies)
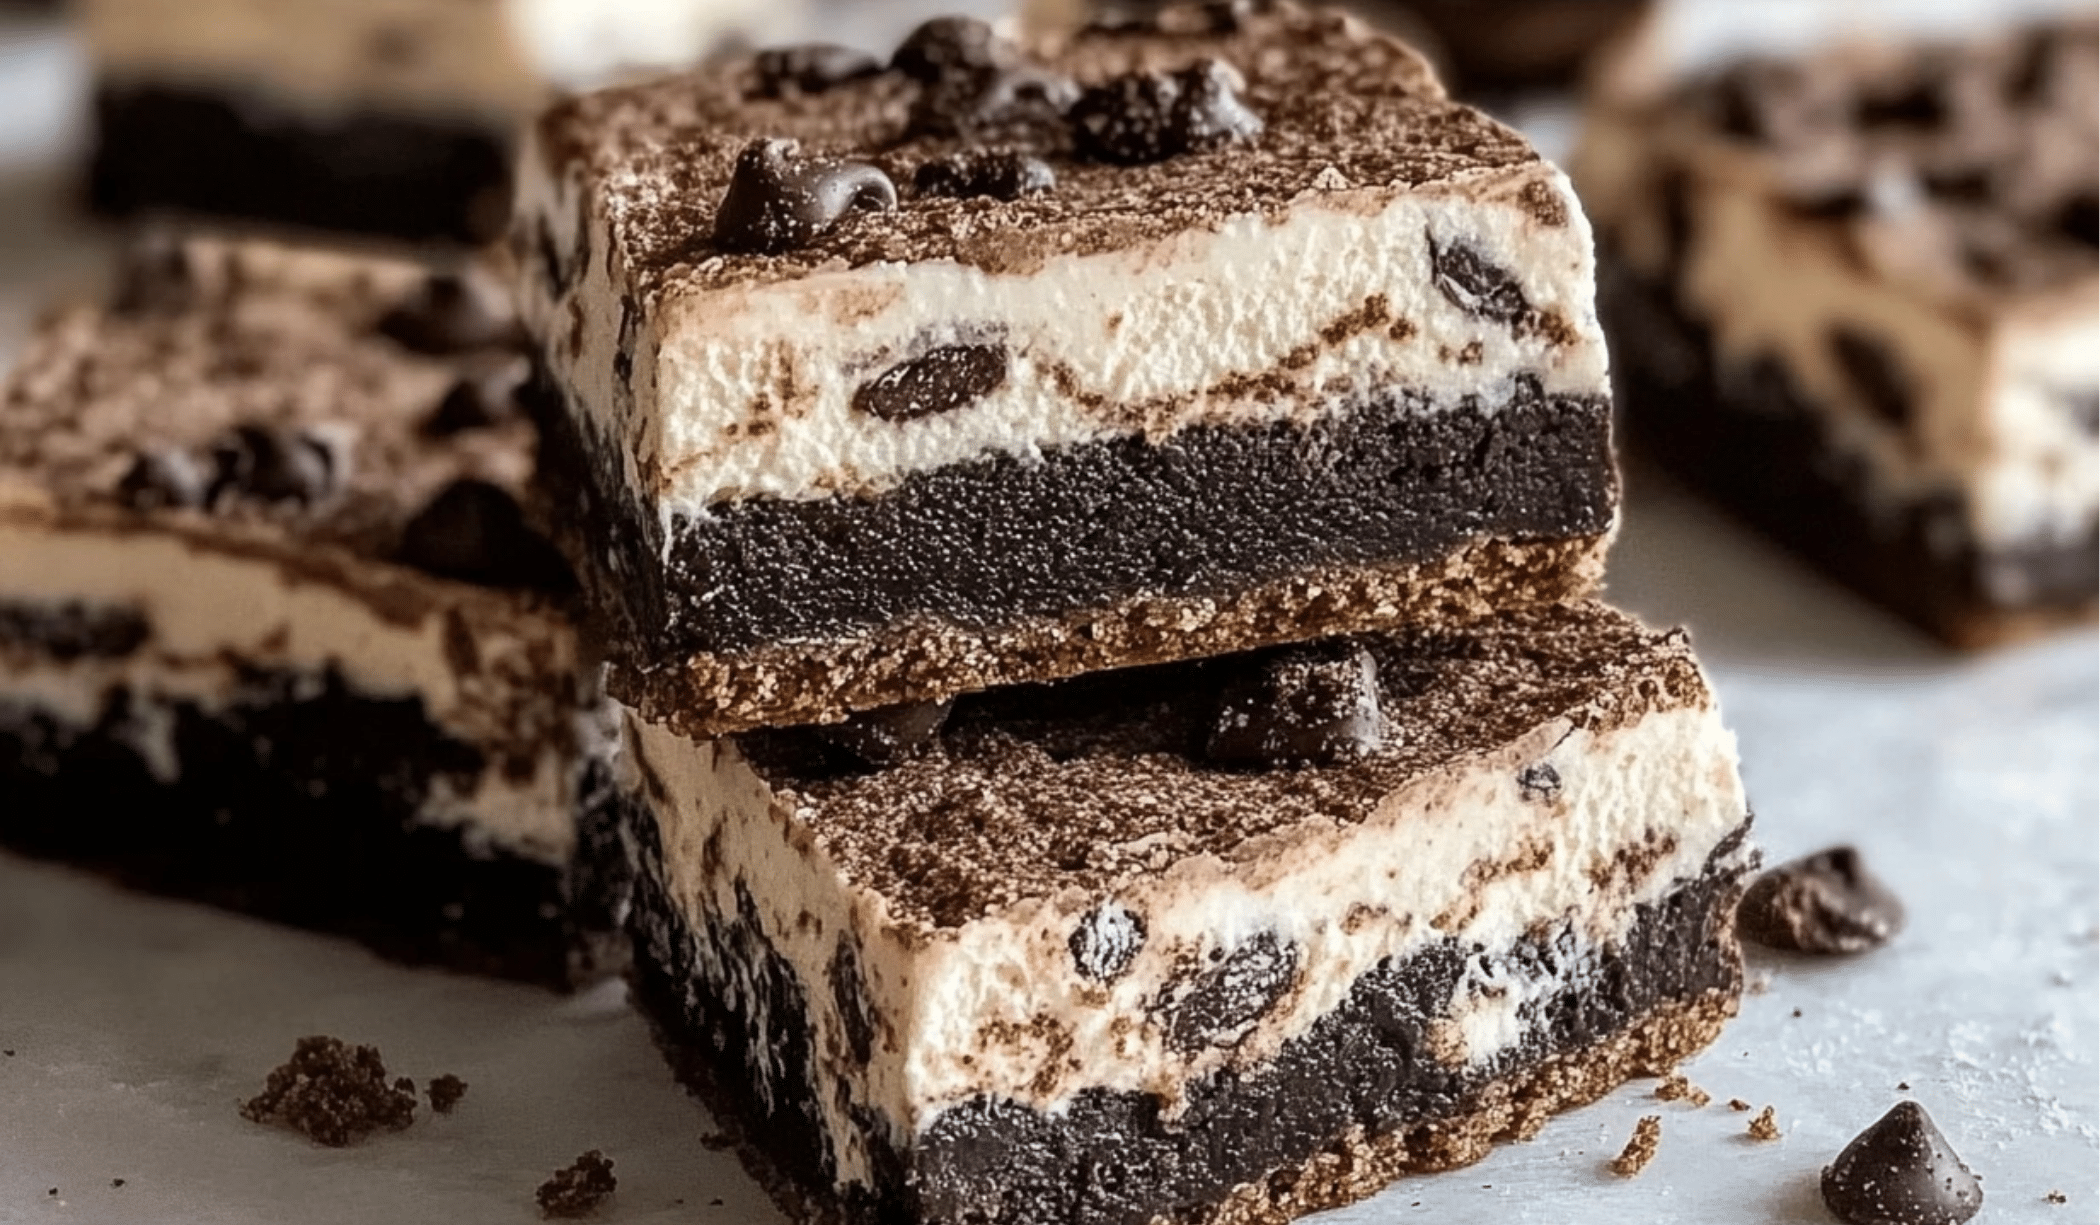
If you’re on a quest for the ultimate dessert that combines the best of three indulgent worlds—chewy cookies, decadent brownies, and irresistible Oreos—look no further. These Fudgy Chocolate Chip Cookie Brownie Bars, also affectionately known as Slutty Brownies, are the epitome of dessert perfection. They feature a buttery cookie base layered with double-stuffed Oreos and topped with rich, gooey brownies. Whether you’re baking for a special occasion or simply craving a sweet treat, these bars deliver a triple-decker experience that will leave everyone reaching for seconds.
Print
Fudgy Chocolate Chip Cookie Brownie Bars (Slutty Brownies)
🍪💖 Slutty Brownies are the ultimate dessert trifecta: chocolate chip cookie dough, Oreo layers, and fudgy brownies! 🌟 Every layer is packed with rich, gooey, and indulgent flavor that will satisfy your sweetest cravings. Whether for sharing or a personal indulgence, this dessert is pure heaven in a bite. Ready to bake this showstopper? 🍫😋
- Total Time: 55 minutes
- Yield: 9 bars 1x
Ingredients
For the Cookie Layer:
- All-purpose flour (150 g): Provides the structure for the cookie dough.
- Baking powder (3/4 tsp): Adds lift and lightness to the cookie base.
- Unsalted butter (85 g): Softened for a creamy, rich flavor.
- Brown sugar (50 g): Enhances the cookie’s chewiness and adds a caramel undertone.
- Caster sugar (55 g): Balances sweetness and gives the cookie a tender crumb.
- Salt (1/4 tsp): Brings out the flavors of the other ingredients.
- Vanilla extract (7 g): Infuses the cookie with warm, aromatic sweetness.
- Large egg (1): Acts as a binder and adds richness.
- Dark chocolate chips (100 g): Melts into gooey pockets of chocolate in the cookie layer.
- Double-stuffed Oreos (15): Creates a creamy, chocolatey barrier between the cookie and brownie layers.
For the Brownie Layer:
- Unsalted butter (83 g): Forms the base of the brownie batter, ensuring moistness.
- Dark cooking chocolate (100 g): Delivers an intense chocolate flavor.
- All-purpose flour (75 g): Provides structure while keeping the brownies fudgy.
- Dutch-processed cocoa powder (16 g): Deepens the chocolate flavor with a smoother finish.
- Salt (pinch): Enhances the sweetness and balances the chocolate.
- Large eggs (2): Create a light, yet rich batter.
- Caster sugar (70 g): Adds sweetness and helps achieve a shiny brownie top.
- Brown sugar (65 g): Contributes to the moist, fudgy texture.
- Vanilla extract (1 tsp): Elevates the chocolate flavor.
- Coffee shot (20 g): Intensifies the chocolate notes and balances the sweetness.
Instructions
Preparing the Cookie Layer
- Preheat the Oven: Set the oven to 160°C (320°F) for fan-forced or 170°C (340°F) for a conventional oven. Spray a 9-inch square baking tin with oil and line it with baking paper, ensuring there’s overhang for easy removal.
- Mix the Dry Ingredients: In a small bowl, whisk the flour and baking powder until combined. Set aside.
- Cream Butter and Sugars: In a large mixing bowl, beat the softened butter, brown sugar, caster sugar, salt, and vanilla extract with an electric mixer until light and fluffy—about 3 minutes.
- Incorporate the Egg: Add the egg and beat until well combined.
- Form the Dough: Gradually fold in the dry ingredients and chocolate chips with a spatula until a soft dough forms.
- Assemble the Base: Press the dough evenly into the prepared tin using your hands or a spatula. Refrigerate the base while preparing the brownie layer.
Creating the Brownie Layer
- Melt the Chocolate: Combine the butter and dark chocolate in a heatproof bowl. Microwave in 30-second increments, stirring each time, until smooth. Alternatively, use a double boiler. Set aside to cool slightly.
- Combine Dry Ingredients: Whisk together the flour, cocoa powder, and salt in the same bowl used for the cookie layer’s dry ingredients.
- Whip Eggs and Sugars: In a large mixing bowl, beat the eggs, caster sugar, brown sugar, and vanilla extract with an electric mixer on high speed until pale, fluffy, and doubled in volume—2 to 3 minutes.
- Add Coffee and Chocolate: Stir in the coffee shot, then gently fold in the melted chocolate mixture until fully incorporated.
- Incorporate Dry Ingredients: Gradually fold in the dry ingredients with a spatula, mixing until no streaks of flour remain.
Assembling and Baking
- Layer the Oreos: Arrange the double-stuffed Oreos in a single layer over the cookie dough base.
- Pour the Brownie Batter: Spread the brownie mixture evenly over the Oreos, ensuring every corner is covered.
- Bake: Place the tin in the oven and bake for 22-25 minutes, or until a toothpick inserted into the center comes out with moist crumbs. Avoid overbaking for maximum fudginess.
- Cool and Slice: Allow the bars to cool completely at room temperature. For cleaner slices, refrigerate for 2 hours before cutting. Use a hot, dry knife for precise cuts.
Notes
- Measure by Weight: For best results, use kitchen scales to measure ingredients. Cup measurements can vary, impacting the texture and consistency.
- Use High-Quality Chocolate: Opt for dark cooking chocolate for a richer, smoother finish in the brownie layer.
- Refrigeration is Key: Cooling the bars in the fridge ensures clean, sharp slices and enhances the flavors.
- Customize the Layers: Swap double-stuffed Oreos for flavored varieties like peanut butter or mint for a unique twist.
- Prep Time: 15 minutes
- Cook Time: 40 minutes
Why You’ll Love This Recipe
The allure of these bars lies in their delightful contrast of textures and flavors. The cookie layer is soft and buttery, with melty chocolate chips in every bite. The Oreo layer adds a sweet, creamy crunch, and the brownie layer is fudgy, rich, and indulgent. The combination is magical—a decadent treat perfect for sharing or savoring solo. Each bite feels like a celebration, making these bars the ultimate crowd-pleaser. Plus, the recipe is straightforward, and every step builds anticipation for the delicious results.
Ingredients Breakdown
For the Cookie Layer:
- All-purpose flour (150 g): Provides the structure for the cookie dough.
- Baking powder (3/4 tsp): Adds lift and lightness to the cookie base.
- Unsalted butter (85 g): Softened for a creamy, rich flavor.
- Brown sugar (50 g): Enhances the cookie’s chewiness and adds a caramel undertone.
- Caster sugar (55 g): Balances sweetness and gives the cookie a tender crumb.
- Salt (1/4 tsp): Brings out the flavors of the other ingredients.
- Vanilla extract (7 g): Infuses the cookie with warm, aromatic sweetness.
- Large egg (1): Acts as a binder and adds richness.
- Dark chocolate chips (100 g): Melts into gooey pockets of chocolate in the cookie layer.
- Double-stuffed Oreos (15): Creates a creamy, chocolatey barrier between the cookie and brownie layers.
For the Brownie Layer:
- Unsalted butter (83 g): Forms the base of the brownie batter, ensuring moistness.
- Dark cooking chocolate (100 g): Delivers an intense chocolate flavor.
- All-purpose flour (75 g): Provides structure while keeping the brownies fudgy.
- Dutch-processed cocoa powder (16 g): Deepens the chocolate flavor with a smoother finish.
- Salt (pinch): Enhances the sweetness and balances the chocolate.
- Large eggs (2): Create a light, yet rich batter.
- Caster sugar (70 g): Adds sweetness and helps achieve a shiny brownie top.
- Brown sugar (65 g): Contributes to the moist, fudgy texture.
- Vanilla extract (1 tsp): Elevates the chocolate flavor.
- Coffee shot (20 g): Intensifies the chocolate notes and balances the sweetness.
Step-by-Step InstructionsPreparing the Cookie Layer
- Preheat the Oven: Set the oven to 160°C (320°F) for fan-forced or 170°C (340°F) for a conventional oven. Spray a 9-inch square baking tin with oil and line it with baking paper, ensuring there’s overhang for easy removal.
- Mix the Dry Ingredients: In a small bowl, whisk the flour and baking powder until combined. Set aside.
- Cream Butter and Sugars: In a large mixing bowl, beat the softened butter, brown sugar, caster sugar, salt, and vanilla extract with an electric mixer until light and fluffy—about 3 minutes.
- Incorporate the Egg: Add the egg and beat until well combined.
- Form the Dough: Gradually fold in the dry ingredients and chocolate chips with a spatula until a soft dough forms.
- Assemble the Base: Press the dough evenly into the prepared tin using your hands or a spatula. Refrigerate the base while preparing the brownie layer.
Creating the Brownie Layer
- Melt the Chocolate: Combine the butter and dark chocolate in a heatproof bowl. Microwave in 30-second increments, stirring each time, until smooth. Alternatively, use a double boiler. Set aside to cool slightly.
- Combine Dry Ingredients: Whisk together the flour, cocoa powder, and salt in the same bowl used for the cookie layer’s dry ingredients.
- Whip Eggs and Sugars: In a large mixing bowl, beat the eggs, caster sugar, brown sugar, and vanilla extract with an electric mixer on high speed until pale, fluffy, and doubled in volume—2 to 3 minutes.
- Add Coffee and Chocolate: Stir in the coffee shot, then gently fold in the melted chocolate mixture until fully incorporated.
- Incorporate Dry Ingredients: Gradually fold in the dry ingredients with a spatula, mixing until no streaks of flour remain.
Assembling and Baking
- Layer the Oreos: Arrange the double-stuffed Oreos in a single layer over the cookie dough base.
- Pour the Brownie Batter: Spread the brownie mixture evenly over the Oreos, ensuring every corner is covered.
- Bake: Place the tin in the oven and bake for 22-25 minutes, or until a toothpick inserted into the center comes out with moist crumbs. Avoid overbaking for maximum fudginess.
- Cool and Slice: Allow the bars to cool completely at room temperature. For cleaner slices, refrigerate for 2 hours before cutting. Use a hot, dry knife for precise cuts.
Tips for Success
- Measure by Weight: For best results, use kitchen scales to measure ingredients. Cup measurements can vary, impacting the texture and consistency.
- Use High-Quality Chocolate: Opt for dark cooking chocolate for a richer, smoother finish in the brownie layer.
- Refrigeration is Key: Cooling the bars in the fridge ensures clean, sharp slices and enhances the flavors.
- Customize the Layers: Swap double-stuffed Oreos for flavored varieties like peanut butter or mint for a unique twist.
Variations and Serving Suggestions
- Flavor Twists: Add peanut butter chips or caramel swirls to the brownie layer for extra indulgence.
- Serving Ideas: Pair with a scoop of vanilla ice cream or drizzle with salted caramel sauce for a dessert that’s restaurant-worthy.
- Mini Versions: Bake the layers in muffin tins for individual portions—great for parties or gifting.
The Final BiteThese Fudgy Chocolate Chip Cookie Brownie Bars are everything you’d want in a dessert—rich, chewy, and irresistibly chocolatey. They combine the nostalgic flavors of childhood treats with the sophistication of a perfectly balanced dessert. Whether you’re baking for a celebration or indulging in a weekend treat, these bars are sure to steal the show. Their indulgent layers make every bite an experience to savor, and their ease of preparation ensures you’ll return to this recipe time and again. So preheat your oven, gather your ingredients, and prepare to delight your taste buds with this triple-layered masterpiece.

Conclusion
Fudgy Chocolate Chip Cookie Brownie Bars, or Slutty Brownies, are the perfect dessert for anyone who loves layers of flavor and texture. From the buttery, chocolate-studded cookie base to the creamy Oreo middle and the rich, fudgy brownie top, each bite is a harmonious blend of sweetness, crunch, and decadence. These bars are not only a visual showstopper but also a guaranteed hit at any gathering, whether it’s a casual family dinner or a festive celebration.
What makes these brownies even better is their versatility—you can customize them with different flavors, layer variations, or even serve them with ice cream or a drizzle of sauce for an extra-special touch. They’re simple enough for beginners to bake yet impressive enough to wow seasoned bakers and dessert lovers alike.
So why not treat yourself and your loved ones to this incredible dessert? With straightforward steps, easy-to-find ingredients, and undeniably delicious results, this recipe is destined to become a go-to favorite in your kitchen. One thing is for sure: once you’ve had a taste of these indulgent bars, they’ll hold a permanent place in your dessert repertoire. Happy baking!