Cowboy Queso: A Beginner-Friendly Tex-Mex Classic for Effortless Entertaining

I remember the first time I made Cowboy Queso. It was during a casual game night at a friend’s house—everyone brought something, and I offered to handle the dip. I didn’t have much kitchen experience at the time, but I wanted something bold, satisfying, and foolproof. I stumbled upon the idea of a hearty cheese dip loaded with savory meat, veggies, and Tex-Mex spices. That night, it was gone within minutes—and I left with half a dozen requests for the recipe.
Print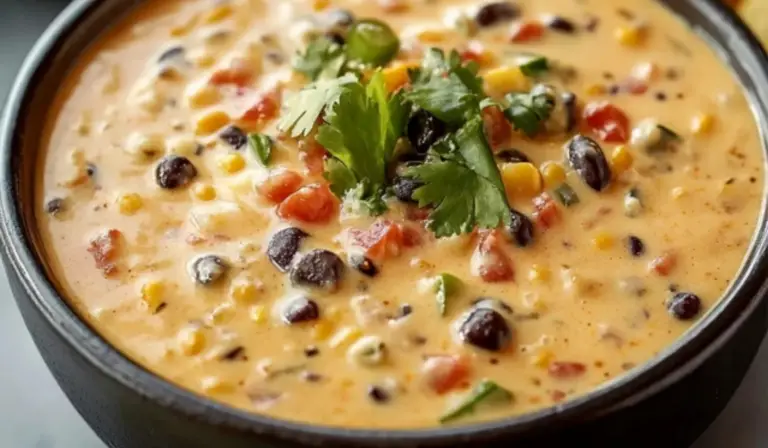
Cowboy Queso: A Beginner-Friendly Tex-Mex Classic for Effortless Entertaining
Say hello to your new go-to salad! 🦐🥑 This Avocado Shrimp Salad is bursting with freshness and takes just minutes to make—perfect for beginners! 🥗🍅 With plump shrimp, creamy avocado, and a tangy citrus kick, every bite is clean, crisp, and satisfying. Light, healthy, and oh-so-delicious, it’s everything you need in one bowl! 💫🌿
- Total Time: 25 minutes
- Yield: 6–8 servings 1x
Ingredients
- ½ lb ground beef or chicken sausage (choose lean meat for a lighter version)
- ½ lb Velveeta cheese, cubed (for a creamy, melty texture)
- ½ lb pepper jack cheese, shredded (adds heat and flavor)
- 1 can (10 oz) diced tomatoes with green chilies (like Rotel), undrained
- ½ cup black beans, drained and rinsed
- ½ cup corn kernels (fresh, frozen, or canned)
- ¼ cup red onion, finely chopped
- 1 jalapeño, finely chopped (optional, for extra heat)
- ¼ cup fresh cilantro, chopped (optional, for garnish)
- ½ teaspoon ground cumin
- ½ teaspoon chili powder
- ¼ teaspoon garlic powder
- Salt and black pepper, to taste
- Tortilla chips, for serving
Instructions
1. Cook the Meat
Heat a skillet: Place a large skillet over medium heat.
Brown the meat: Add your ground beef or chicken sausage to the pan. Use a wooden spoon or spatula to break it into small pieces as it cooks. Stir occasionally until it’s fully browned—this should take about 6–8 minutes.
Drain excess fat: Once the meat is cooked, carefully drain off any excess grease to avoid a greasy dip.
2. Add the Flavorful Ingredients
Lower the heat: Reduce the heat to medium-low. This will help the cheese melt evenly without burning.
Add cheeses and mix-ins: To the skillet with the meat, add the Velveeta cubes, shredded pepper jack, diced tomatoes with green chilies (don’t drain them), black beans, corn, red onion, jalapeño (if using), cumin, chili powder, and garlic powder.
Stir to combine: Mix everything gently but thoroughly so the cheese starts to melt and the ingredients are evenly distributed.
3. Melt and Simmer
Melt the cheese slowly: Stir continuously for about 5–7 minutes, or until both cheeses are completely melted and the dip is smooth. Make sure to scrape the bottom of the pan occasionally to prevent burning.
Adjust the seasoning: Taste the queso and add salt and black pepper to your liking. Depending on the saltiness of the cheese and canned ingredients, you may not need much.
4. Serve
Garnish: Stir in the chopped cilantro just before serving for a fresh burst of flavor.
Plate it up: Transfer the queso to a heatproof serving bowl or keep it in the skillet for a rustic presentation. Serve warm with tortilla chips on the side.
Notes
Cooking Tips
- Even browning: Make sure your meat is fully cooked with no pink spots remaining. Browning adds flavor, so give it time to sear.
- Melt cheese slowly: High heat can cause the cheese to seize or separate. Keep it low and slow for a creamy consistency.
- Avoid overmixing: Stir gently once everything is added. Overmixing can break down the texture of the corn and beans.
Troubleshooting
- Cheese too thick or gloopy? Add a splash of milk or water to thin it out a bit.
- Burning on the bottom? Lower the heat and stir more frequently. You can also use a nonstick skillet for easier cleanup.
- Veggies too soft? Add the beans, corn, and onion halfway through the melting process next time for firmer texture.
Efficiency Hacks
- Prep everything first: Chop the onion, jalapeño, and cilantro before you start cooking. Having everything ready makes the process faster and more enjoyable.
- Use pre-shredded cheese: While freshly shredded melts better, bagged cheese can save you time if you’re in a rush.
- One-pan cleanup: If you have an oven-safe skillet, you can keep the queso warm by popping it into a low oven (around 200°F) while you finish other dishes.
- Prep Time: 10 minutes
- Cook Time: 15 minutes
Cowboy Queso is the kind of recipe that delivers big flavor with minimal effort. It’s perfect for beginners because it doesn’t require any advanced skills, specialty equipment, or hard-to-find ingredients. It’s also fast, flexible, and surprisingly well-balanced—bringing protein, vegetables, and spice together in one skillet. Whether you’re prepping for a party, game day, or just a movie night at home, this recipe is guaranteed to become a favorite in your rotation.
Ingredients and Preparation
Here’s what you’ll need to make Cowboy Queso. We’ve also included some flexible ingredient swaps in case you’re working with limited pantry items or dietary preferences.
Ingredients
- ½ lb ground beef or chicken sausage (choose lean meat for a lighter version)
- ½ lb Velveeta cheese, cubed (for a creamy, melty texture)
- ½ lb pepper jack cheese, shredded (adds heat and flavor)
- 1 can (10 oz) diced tomatoes with green chilies (like Rotel), undrained
- ½ cup black beans, drained and rinsed
- ½ cup corn kernels (fresh, frozen, or canned)
- ¼ cup red onion, finely chopped
- 1 jalapeño, finely chopped (optional, for extra heat)
- ¼ cup fresh cilantro, chopped (optional, for garnish)
- ½ teaspoon ground cumin
- ½ teaspoon chili powder
- ¼ teaspoon garlic powder
- Salt and black pepper, to taste
- Tortilla chips, for serving
Ingredient Swaps and Options
- Meat: If you don’t eat beef, ground chicken or turkey works just as well. For a vegetarian version, skip the meat and double the beans.
- Cheese: Monterey Jack or cheddar can replace pepper jack if you prefer a milder flavor.
- Tomatoes and chilies: If you can’t find Rotel, use a can of diced tomatoes and add a small can of green chilies separately.
- Corn: Canned corn works in a pinch, but fresh or frozen will give you better texture.
- Beans: Pinto beans are a good alternative to black beans if that’s what you have on hand.
Step-by-Step Instructions
Follow these simple steps to make your Cowboy Queso. You’ll go from prep to plate in about 25 minutes.
1. Cook the Meat
Heat a skillet: Place a large skillet over medium heat.
Brown the meat: Add your ground beef or chicken sausage to the pan. Use a wooden spoon or spatula to break it into small pieces as it cooks. Stir occasionally until it’s fully browned—this should take about 6–8 minutes.
Drain excess fat: Once the meat is cooked, carefully drain off any excess grease to avoid a greasy dip.
2. Add the Flavorful Ingredients
Lower the heat: Reduce the heat to medium-low. This will help the cheese melt evenly without burning.
Add cheeses and mix-ins: To the skillet with the meat, add the Velveeta cubes, shredded pepper jack, diced tomatoes with green chilies (don’t drain them), black beans, corn, red onion, jalapeño (if using), cumin, chili powder, and garlic powder.
Stir to combine: Mix everything gently but thoroughly so the cheese starts to melt and the ingredients are evenly distributed.
3. Melt and Simmer
Melt the cheese slowly: Stir continuously for about 5–7 minutes, or until both cheeses are completely melted and the dip is smooth. Make sure to scrape the bottom of the pan occasionally to prevent burning.
Adjust the seasoning: Taste the queso and add salt and black pepper to your liking. Depending on the saltiness of the cheese and canned ingredients, you may not need much.
4. Serve
Garnish: Stir in the chopped cilantro just before serving for a fresh burst of flavor.
Plate it up: Transfer the queso to a heatproof serving bowl or keep it in the skillet for a rustic presentation. Serve warm with tortilla chips on the side.
Beginner Tips and Notes
This recipe is designed to be as approachable as possible, but here are a few extra tips that can make your cooking experience even smoother.
Cooking Tips
- Even browning: Make sure your meat is fully cooked with no pink spots remaining. Browning adds flavor, so give it time to sear.
- Melt cheese slowly: High heat can cause the cheese to seize or separate. Keep it low and slow for a creamy consistency.
- Avoid overmixing: Stir gently once everything is added. Overmixing can break down the texture of the corn and beans.
Troubleshooting
- Cheese too thick or gloopy? Add a splash of milk or water to thin it out a bit.
- Burning on the bottom? Lower the heat and stir more frequently. You can also use a nonstick skillet for easier cleanup.
- Veggies too soft? Add the beans, corn, and onion halfway through the melting process next time for firmer texture.
Efficiency Hacks
- Prep everything first: Chop the onion, jalapeño, and cilantro before you start cooking. Having everything ready makes the process faster and more enjoyable.
- Use pre-shredded cheese: While freshly shredded melts better, bagged cheese can save you time if you’re in a rush.
- One-pan cleanup: If you have an oven-safe skillet, you can keep the queso warm by popping it into a low oven (around 200°F) while you finish other dishes.

Serving Suggestions
Cowboy Queso is more versatile than it might seem at first glance. Here are a few ways to elevate the experience:
Pair With:
- Tortilla chips: The classic dipper—choose sturdy chips that can handle the weight of the queso.
- Toasted baguette slices: For a more upscale twist.
- Vegetables: Try serving with bell pepper strips, cucumber slices, or celery for a lower-carb option.
Make It a Meal:
- Queso nachos: Spread tortilla chips on a baking sheet, drizzle with the queso, and broil for 2–3 minutes. Add toppings like avocado, sour cream, or green onions.
- Queso tacos: Use it as a taco filling base—just add some lettuce and pico de gallo.
- Queso bowls: Spoon it over rice or quinoa, top with fresh veggies, and enjoy a quick Tex-Mex grain bowl.
Leftovers and Storage:
- Fridge: Store leftovers in an airtight container in the refrigerator for up to 3 days.
- Reheat: Warm in a skillet over low heat, adding a splash of milk to restore creaminess.
- Freezing not recommended: Due to the dairy content, this dip doesn’t freeze well—it can separate when thawed.
Engagement Features
Cowboy Queso is one of those recipes that invites creativity and customization. Whether you’re trying it for the first time or making it your signature dish, we hope it brings joy and ease into your kitchen. Don’t worry if it’s not perfect the first time around—each batch is a chance to make it even better.
If you give this recipe a try, we’d love to hear how it turned out. Did you add your own twist? Maybe swap in turkey sausage or go meatless? Drop a comment and share your version. Your feedback helps others and builds a community of beginner cooks who are learning together.
So grab your skillet, pick your favorite cheese, and start dipping—you’ve got this.