Quick & Easy Frozen Fruit Salad: The Perfect No-Bake Dessert for Beginners

The summer heat often calls for desserts that are quick, refreshing, and easy to make, without requiring hours of time in a hot kitchen. If you’re new to cooking or just looking for a simple yet delicious treat, the Quick & Easy Frozen Fruit Salad is your go-to recipe. This American classic combines the sweetness of fruit with the creaminess of whipped topping and cream cheese, creating a dish that’s perfect for any summer gathering. It’s cool, refreshing, and can be made in just about 15 minutes of prep time—perfect for beginners who want a stress-free dessert.
Print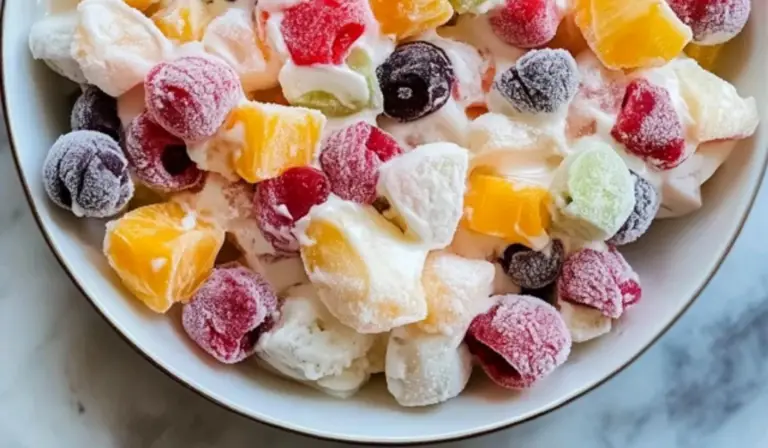
Quick & Easy Frozen Fruit Salad: The Perfect No-Bake Dessert for Beginners
Cool, creamy, and loaded with colorful fruit—this no-bake frozen fruit salad is the ultimate make-ahead treat! Perfect for potlucks, picnics, or sweet cravings. ❄️🍓🍍✨
- Total Time: 15 minutes (plus 2 hours freezing time)
- Yield: 12 servings 1x
Ingredients
- 2 cups mini marshmallows: These little guys add a delightful sweetness and chewy texture to the salad.
- 8 ounces cream cheese (softened): The base of the creamy element. If you’re looking for a lighter option, you can also try using low-fat cream cheese.
- 8 ounces frozen whipped topping (thawed): This gives the fruit salad its smooth texture, making it feel like a creamy frozen treat.
- 2 cans (15 ounces each) fruit cocktail in juice (thoroughly drained): Fruit cocktail is the main fruit component of this dessert. Be sure to drain it well to avoid excess liquid in the salad.
- ½ cup maraschino cherries (drained and halved): These cherries provide a vibrant pop of color and a sweet-tart flavor.
Instructions
1. Prepare the Dish
Start by preparing a 9×13-inch baking dish. Lightly spray it with non-stick spray to ensure the fruit salad doesn’t stick to the sides. If you don’t have a 9×13-inch dish, any similarly sized dish will do. Just ensure there is enough space to hold all the ingredients without overflowing.
2. Beat the Cream Cheese
Next, take the softened cream cheese and place it in a large mixing bowl. Use either a stand mixer or a hand mixer, and beat the cream cheese on medium-high speed. The goal here is to make the cream cheese smooth and fluffy. If your cream cheese isn’t softened enough, it may be lumpy and harder to blend. To soften cream cheese quickly, you can microwave it for 10-15 seconds or leave it at room temperature for about 15 minutes before using it.
3. Fold in the Whipped Topping
Once your cream cheese is fluffy, it’s time to add the frozen whipped topping. This is where the dessert gets its light, airy texture. Gently fold the whipped topping into the cream cheese mixture. Be careful not to deflate the whipped topping too much; you want to maintain that airy consistency.
4. Add the Fruit and Marshmallows
Now comes the fun part—adding the fruit! Open the two cans of fruit cocktail and drain them thoroughly. It’s important to drain the juice to avoid making the salad too watery. Once drained, add the fruit to your cream cheese and whipped topping mixture.
Also, add in the maraschino cherries, which should be drained and halved. If you love cherries, feel free to add a bit more for an extra burst of flavor. Finally, add the mini marshmallows and give everything a good stir. Make sure that all the fruit, marshmallows, and cream mixture are evenly distributed. This step should be done gently to avoid breaking up the fruit too much.
5. Freeze and Wait Patiently
Now that everything is mixed together, transfer your fruit salad to the prepared 9×13-inch dish. Spread it out evenly and cover the dish with plastic wrap. The next step is the hardest part: patience! Place the dish in the freezer for at least two hours. The frozen fruit salad needs to chill long enough to firm up, making it easier to slice and serve.
6. Serve and Enjoy
When you’re ready to serve the fruit salad, remove it from the freezer about 10-15 minutes before cutting into it. This will allow it to thaw slightly, making it easier to slice into squares or scoop out. The salad will still be cold and refreshing, but not too solid, which is perfect for serving.
Notes
- Make sure the cream cheese is soft: If the cream cheese is too firm, it can be difficult to blend, leaving behind lumps. Be sure to soften it well either at room temperature or by microwaving it for a short time.
- Drain the fruit well: This step is crucial to avoid excess liquid, which can make the salad watery. Use a fine mesh strainer or colander to thoroughly drain the fruit cocktail and maraschino cherries.
- Don’t skip the freezing time: Although it may be tempting to serve the salad right away, freezing it is what gives it the right texture. It needs time to firm up so it can be cut into neat squares.
- Customize the recipe: This is a very flexible recipe. If you don’t have fruit cocktail, you can substitute it with your favorite fresh or frozen fruits. For a tropical twist, try adding diced pineapple, mango, or strawberries.
- Use a hand mixer or stand mixer: If you’re mixing the cream cheese by hand, it can take a lot of elbow grease. A hand or stand mixer helps create that light, fluffy texture that makes this dessert so special.
- Prep Time: 15 minutes
What makes this recipe ideal for beginner cooks is its simplicity. It requires no baking, and the ingredients are easy to find at any grocery store. Plus, it’s a versatile recipe, allowing for swaps and variations based on what you have in your pantry. Whether you’re preparing a potluck dish, serving family, or treating yourself, this frozen fruit salad will be the hit of the party.
Ingredients and Preparation
Before you dive into the steps, let’s make sure you have everything ready. Here’s a list of the ingredients you’ll need for the Quick & Easy Frozen Fruit Salad:
- 2 cups mini marshmallows: These little guys add a delightful sweetness and chewy texture to the salad.
- 8 ounces cream cheese (softened): The base of the creamy element. If you’re looking for a lighter option, you can also try using low-fat cream cheese.
- 8 ounces frozen whipped topping (thawed): This gives the fruit salad its smooth texture, making it feel like a creamy frozen treat.
- 2 cans (15 ounces each) fruit cocktail in juice (thoroughly drained): Fruit cocktail is the main fruit component of this dessert. Be sure to drain it well to avoid excess liquid in the salad.
- ½ cup maraschino cherries (drained and halved): These cherries provide a vibrant pop of color and a sweet-tart flavor.
Preparation
Once you’ve gathered your ingredients, it’s time to start preparing your frozen fruit salad. The prep work is straightforward, but it’s important to follow each step closely to achieve the perfect balance of creamy and fruity goodness.
Step-by-Step Instructions
1. Prepare the Dish
Start by preparing a 9×13-inch baking dish. Lightly spray it with non-stick spray to ensure the fruit salad doesn’t stick to the sides. If you don’t have a 9×13-inch dish, any similarly sized dish will do. Just ensure there is enough space to hold all the ingredients without overflowing.
2. Beat the Cream Cheese
Next, take the softened cream cheese and place it in a large mixing bowl. Use either a stand mixer or a hand mixer, and beat the cream cheese on medium-high speed. The goal here is to make the cream cheese smooth and fluffy. If your cream cheese isn’t softened enough, it may be lumpy and harder to blend. To soften cream cheese quickly, you can microwave it for 10-15 seconds or leave it at room temperature for about 15 minutes before using it.
3. Fold in the Whipped Topping
Once your cream cheese is fluffy, it’s time to add the frozen whipped topping. This is where the dessert gets its light, airy texture. Gently fold the whipped topping into the cream cheese mixture. Be careful not to deflate the whipped topping too much; you want to maintain that airy consistency.
4. Add the Fruit and Marshmallows
Now comes the fun part—adding the fruit! Open the two cans of fruit cocktail and drain them thoroughly. It’s important to drain the juice to avoid making the salad too watery. Once drained, add the fruit to your cream cheese and whipped topping mixture.
Also, add in the maraschino cherries, which should be drained and halved. If you love cherries, feel free to add a bit more for an extra burst of flavor. Finally, add the mini marshmallows and give everything a good stir. Make sure that all the fruit, marshmallows, and cream mixture are evenly distributed. This step should be done gently to avoid breaking up the fruit too much.
5. Freeze and Wait Patiently
Now that everything is mixed together, transfer your fruit salad to the prepared 9×13-inch dish. Spread it out evenly and cover the dish with plastic wrap. The next step is the hardest part: patience! Place the dish in the freezer for at least two hours. The frozen fruit salad needs to chill long enough to firm up, making it easier to slice and serve.
6. Serve and Enjoy
When you’re ready to serve the fruit salad, remove it from the freezer about 10-15 minutes before cutting into it. This will allow it to thaw slightly, making it easier to slice into squares or scoop out. The salad will still be cold and refreshing, but not too solid, which is perfect for serving.
Beginner Tips and Notes
While this recipe is simple, there are a few tips and tricks that can help you avoid common mistakes and improve your experience.
- Make sure the cream cheese is soft: If the cream cheese is too firm, it can be difficult to blend, leaving behind lumps. Be sure to soften it well either at room temperature or by microwaving it for a short time.
- Drain the fruit well: This step is crucial to avoid excess liquid, which can make the salad watery. Use a fine mesh strainer or colander to thoroughly drain the fruit cocktail and maraschino cherries.
- Don’t skip the freezing time: Although it may be tempting to serve the salad right away, freezing it is what gives it the right texture. It needs time to firm up so it can be cut into neat squares.
- Customize the recipe: This is a very flexible recipe. If you don’t have fruit cocktail, you can substitute it with your favorite fresh or frozen fruits. For a tropical twist, try adding diced pineapple, mango, or strawberries.
- Use a hand mixer or stand mixer: If you’re mixing the cream cheese by hand, it can take a lot of elbow grease. A hand or stand mixer helps create that light, fluffy texture that makes this dessert so special.

Serving Suggestions
Though the Quick & Easy Frozen Fruit Salad is delicious on its own, you can always elevate the dish with a few serving suggestions.
- Pair with light snacks: Serve this dessert alongside light, savory appetizers like veggie sticks, crackers, or grilled chicken. The creamy fruit salad offers a refreshing contrast to savory dishes.
- Add a drizzle of honey: If you like a touch of extra sweetness, drizzle a bit of honey over the top just before serving. This pairs especially well if you’ve used tropical fruits or berries.
- Serve with a whipped cream topping: If you love even more creaminess, you can top your fruit salad with extra whipped cream right before serving. This adds an extra fluffy texture that’s sure to delight your guests.
- Store for later: If you happen to have leftovers, you can store the fruit salad in the freezer for up to a week. Just be sure to cover it well with plastic wrap or foil to prevent freezer burn.
Engagement Features
Making a recipe like the Quick & Easy Frozen Fruit Salad isn’t just about following steps; it’s about sharing a moment of joy with friends and family. Whether it’s for a BBQ, picnic, or just a casual afternoon snack, this dessert is guaranteed to bring smiles. We’d love to hear how it turns out for you! Let us know in the comments if you tried any ingredient substitutions, how it was received at your event, or any tips you might have for making this recipe your own.
Feel free to share your experience and tips with fellow beginners. Who knows? Maybe your next variation could inspire someone else to try something new!
This frozen fruit salad is the perfect combination of simplicity and flavor, ideal for beginner cooks who want to impress with little effort. The beauty of this recipe lies not just in its ease but in how it brings people together with its cool, creamy, fruity goodness. So what are you waiting for? Grab your ingredients, whip up this dessert, and enjoy the fruits of your labor. Don’t forget to leave a comment and share your thoughts with us—we can’t wait to hear how your frozen fruit salad turns out!