Molten Dulce de Leche Cakes for Two: A Beginner’s Guide to Decadence

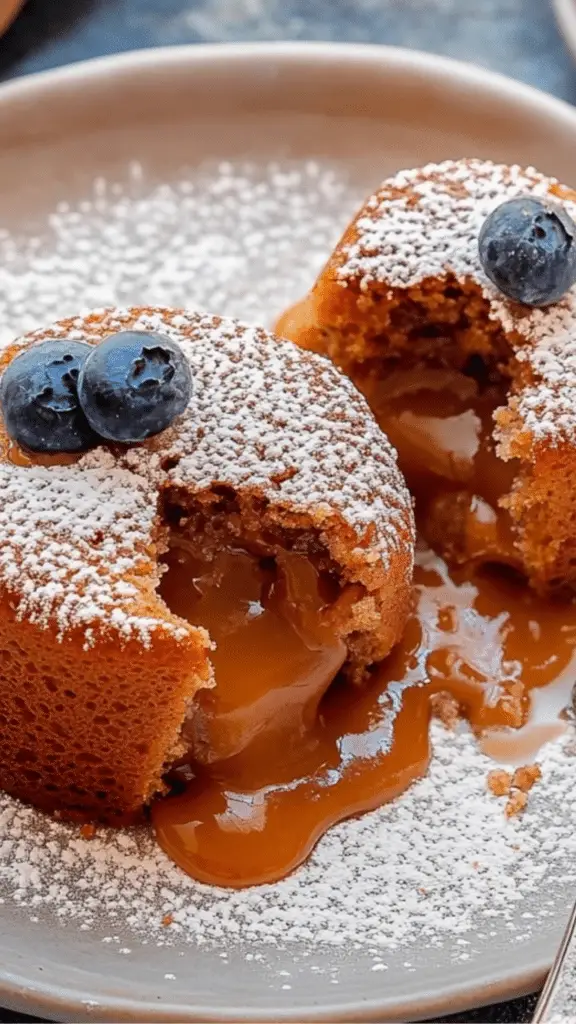
There’s something truly magical about molten cakes—the kind of dessert that brings elegance and indulgence to the table while being incredibly simple to make. Imagine cutting into a cake with a fork, only to watch a river of warm, gooey dulce de leche flow out. It’s a sight to behold and a treat to savor. Whether you’re planning a date night, celebrating a special occasion, or simply treating yourself, this recipe for Molten Dulce de Leche Cakes is sure to impress.
Print
Molten Dulce de Leche Cakes for Two: A Beginner’s Guide to Decadence
💕 Make dessert unforgettable with these Molten Dulce de Leche Cakes for Two! 🍰✨ Soft, golden cakes with luscious, molten dulce de leche centers—this is the perfect recipe for beginners wanting to impress. 🌟💛 Whether for date night or just because, this indulgent treat is as easy as it is delicious. 😋💫 Ready to share the sweetest moment with someone special? 🍴💖
#MoltenDulceDeLecheCakes #DessertInspo #EasyAndElegant #DateNightMagic #SweetIndulgence #GooeyDesserts #BeginnerBaking #DulceDeLecheDreams #CozyDesserts #TwoIsBetterThanOne 🍰💕
- Total Time: 20 minutes
- Yield: 2 to 4 servings 1x
Ingredients
- 1 egg
- 2 egg yolks – These contribute to the cake’s rich and creamy texture.
- 1 tablespoon vanilla extract – For a hint of warmth and depth.
- 1 cup dulce de leche – The star of the show, lending its caramel-like sweetness to the dessert.
- A pinch of salt – To balance the sweetness and enhance the flavors.
- 3 tablespoons flour – Just enough to hold the cake together while keeping the center molten.
- Butter and flour – For greasing and dusting the ramekins to ensure the cakes release easily.
Instructions
- Preheat the Oven:
- Set your oven to 425°F (220°C) to ensure it’s at the right temperature by the time you’re ready to bake.
- Prepare the Ramekins:
- Grease 2 to 4 ramekins (depending on their size) with butter and dust them lightly with flour.
- Tip: If you don’t have ramekins, a muffin pan works just as well.
- Mix the Eggs and Vanilla:
- In a large bowl, whisk together the egg, egg yolks, and vanilla extract. Whisk until the mixture becomes creamy and slightly pale.
- Tip: Use a hand whisk for better control. You don’t need a mixer for this recipe!
- Incorporate the Dulce de Leche and Salt:
- Gradually add the dulce de leche to the egg mixture while whisking. Sprinkle in a pinch of salt to balance the sweetness. Continue whisking until the mixture is smooth and well combined.
- Add the Flour:
- Gently fold in the flour with a wooden spoon or spatula. Be careful not to overmix, as this can affect the texture of the cake.
- Fill the Ramekins:
- Divide the batter evenly among the prepared ramekins, leaving a little space at the top for the cakes to rise.
- Bake:
- Place the ramekins on a baking sheet and bake in the preheated oven for about 15 minutes.
- Tip: The cakes are done when the edges are set but the center remains slightly jiggly.
- Cool and Serve:
- Remove the ramekins from the oven and let the cakes cool for 1 minute. Run a sharp knife around the edges to loosen the cakes and carefully flip them onto individual plates.
- Garnish with powdered sugar and fresh berries for a finishing touch.
Notes
- Check for Doneness: The center of the cakes should remain slightly jiggly. Overbaking will result in less molten centers. Start checking at the 12-minute mark to avoid overcooking.
- Avoid Overmixing: When adding the flour, fold gently. Overmixing can make the cakes dense instead of light and gooey.
- Use the Right Tools: A whisk is sufficient for mixing the batter. If you don’t have ramekins, muffin pans or heatproof ceramic cups can be used as substitutes.
- Make Ahead: The batter can be prepared up to 2 days in advance and stored in the refrigerator. If baking straight from the fridge, add an extra 30-60 seconds to the baking time to account for the chilled batter.
- Prep Time: 5 minutes
- Cook Time: 15 minutes
This recipe is a great introduction for beginner bakers who want to try their hand at a show-stopping dessert. With just a few staple ingredients, clear instructions, and minimal prep time, you can whip up this decadent treat with ease. Let’s explore why this dish is perfect for beginners and how you can create a dessert that feels like it belongs on a restaurant menu.
Why This Recipe Is Perfect for Beginners
- Simplicity: This recipe uses basic ingredients that are easy to find in most kitchens or grocery stores. The steps are straightforward, so there’s no need to feel intimidated.
- Quick to Prepare: From start to finish, this recipe takes just 20 minutes. That’s less time than it takes to watch an episode of your favorite show!
- Impressive Results: Despite its simplicity, the final product looks and tastes luxurious. You’ll feel like a pro when you serve these cakes.
- Flexible Portions: The recipe is designed for two but can be scaled up to serve four. This makes it perfect for intimate settings or small gatherings.
Ingredients and Preparation
To start, gather the following ingredients:
- 1 egg
- 2 egg yolks – These contribute to the cake’s rich and creamy texture.
- 1 tablespoon vanilla extract – For a hint of warmth and depth.
- 1 cup dulce de leche – The star of the show, lending its caramel-like sweetness to the dessert.
- A pinch of salt – To balance the sweetness and enhance the flavors.
- 3 tablespoons flour – Just enough to hold the cake together while keeping the center molten.
- Butter and flour – For greasing and dusting the ramekins to ensure the cakes release easily.
Step-by-Step Instructions
Let’s break the process into simple, beginner-friendly steps:
- Preheat the Oven:
- Set your oven to 425°F (220°C) to ensure it’s at the right temperature by the time you’re ready to bake.
- Prepare the Ramekins:
- Grease 2 to 4 ramekins (depending on their size) with butter and dust them lightly with flour.
- Tip: If you don’t have ramekins, a muffin pan works just as well.
- Mix the Eggs and Vanilla:
- In a large bowl, whisk together the egg, egg yolks, and vanilla extract. Whisk until the mixture becomes creamy and slightly pale.
- Tip: Use a hand whisk for better control. You don’t need a mixer for this recipe!
- Incorporate the Dulce de Leche and Salt:
- Gradually add the dulce de leche to the egg mixture while whisking. Sprinkle in a pinch of salt to balance the sweetness. Continue whisking until the mixture is smooth and well combined.
- Add the Flour:
- Gently fold in the flour with a wooden spoon or spatula. Be careful not to overmix, as this can affect the texture of the cake.
- Fill the Ramekins:
- Divide the batter evenly among the prepared ramekins, leaving a little space at the top for the cakes to rise.
- Bake:
- Place the ramekins on a baking sheet and bake in the preheated oven for about 15 minutes.
- Tip: The cakes are done when the edges are set but the center remains slightly jiggly.
- Cool and Serve:
- Remove the ramekins from the oven and let the cakes cool for 1 minute. Run a sharp knife around the edges to loosen the cakes and carefully flip them onto individual plates.
- Garnish with powdered sugar and fresh berries for a finishing touch.
Beginner Tips and Notes
- Check for Doneness: The center of the cakes should remain slightly jiggly. Overbaking will result in less molten centers. Start checking at the 12-minute mark to avoid overcooking.
- Avoid Overmixing: When adding the flour, fold gently. Overmixing can make the cakes dense instead of light and gooey.
- Use the Right Tools: A whisk is sufficient for mixing the batter. If you don’t have ramekins, muffin pans or heatproof ceramic cups can be used as substitutes.
- Make Ahead: The batter can be prepared up to 2 days in advance and stored in the refrigerator. If baking straight from the fridge, add an extra 30-60 seconds to the baking time to account for the chilled batter.
Serving Suggestions
Pair your Molten Dulce de Leche Cakes with any of the following to elevate your dessert experience:
- Vanilla Ice Cream: The cold, creamy texture pairs beautifully with the warm, molten center.
- Fresh Berries: Strawberries, raspberries, or blueberries add a refreshing tartness to balance the sweetness.
- Whipped Cream: A dollop of whipped cream adds a light, airy element to the rich dessert.
- Salted Caramel Drizzle: For an extra layer of indulgence, drizzle salted caramel sauce over the top.
Storage and Leftovers
- If you have leftovers, store the cakes in an airtight container in the refrigerator for up to 2 days.
- To reheat, place the cakes in a microwave-safe dish and heat for 10-15 seconds. Be cautious not to overheat, as this could cook the molten center.
Engage and Experiment
Cooking is as much about creativity as it is about following recipes. Once you’ve mastered these Molten Dulce de Leche Cakes, feel free to experiment:
- Add a Twist: Sprinkle a pinch of cinnamon or nutmeg into the batter for a warm, spiced flavor.
- Chocolate Variation: Substitute some of the dulce de leche with melted chocolate for a chocolate-caramel hybrid.
- Nutty Touch: Add a teaspoon of finely chopped nuts (such as almonds or pecans) to the batter for a subtle crunch.
Conclusion
Baking doesn’t have to be complicated to be impressive, and this recipe is proof of that. With minimal effort, you can create a dessert that not only tastes divine but also wows anyone lucky enough to try it. Whether you’re a beginner looking to boost your confidence in the kitchen or an experienced cook wanting a quick and satisfying treat, these Molten Dulce de Leche Cakes are a must-try.
Now it’s your turn! Give this recipe a go, and let us know how it turned out. Did the molten center flow perfectly? Did you add your own twist? Share your experiences and tips in the comments—we’d love to hear from you. Happy baking!


