Homemade Krispy Kreme Donuts: The Beginner’s Guide to Mastering Fluffy, Glazed Perfection

I remember the first time I bit into a warm Krispy Kreme donut—it was soft, sweet, and practically melted in my mouth. I was standing in line at a gas station in a small town, and the “Hot Now” sign had just lit up. I had no idea what I was in for, but that one bite sparked a lasting obsession. Years later, I started experimenting in my own kitchen, determined to replicate that magical experience. The thought of making donuts from scratch felt intimidating at first—yeast, kneading, frying—but as I discovered, it’s surprisingly doable with a little guidance.
Print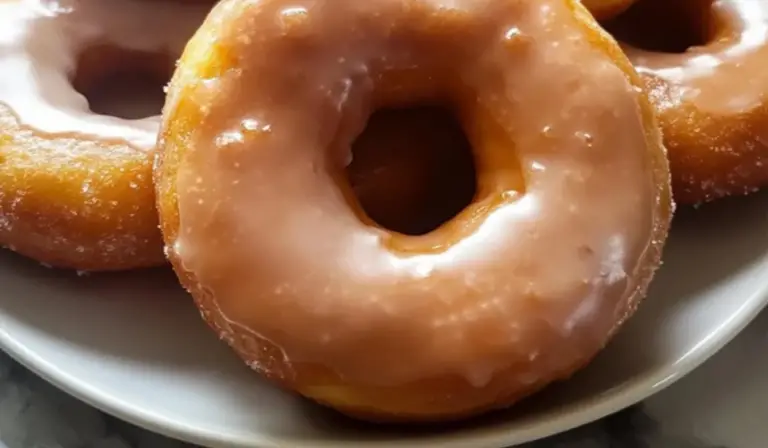
Homemade Krispy Kreme Donuts: The Beginner’s Guide to Mastering Fluffy, Glazed Perfection
Soft, airy, and glazed to perfection—these homemade Krispy Kreme donuts are beginner-friendly and dangerously good! Just like the real deal, fresh from your kitchen! ✨🍩🥛
- Total Time: 45 minutes
- Yield: 6 donuts 1x
Ingredients
For the Donuts:
- 2 cups all-purpose flour
- ¼ cup whole milk, lukewarm
- ¼ cup water, lukewarm
- 2 teaspoons dry active yeast
- 1 egg, at room temperature
- 3 tablespoons granulated sugar
- ¼ cup unsalted butter, at room temperature
- A pinch of kosher salt
- Neutral oil for frying (vegetable or canola works well)
For the Glaze:
- 2 cups confectioners’ sugar
- ¼ cup whole milk, lukewarm
- 2 tablespoons heavy cream
- 1 teaspoon pure vanilla extract
Ingredient Substitutes and Notes:
- If you’re out of heavy cream, you can substitute it with an extra tablespoon of milk and a teaspoon of melted butter.
- For a dairy-free version, plant-based milk and vegan butter can be used, though the texture may vary slightly.
- Make sure your yeast is fresh—expired yeast won’t activate properly and can result in flat dough.
Instructions
1. Activate the Yeast
In a small mixing bowl, combine lukewarm water, lukewarm milk, 1 tablespoon of flour, 1 tablespoon of sugar, and the dry active yeast. Stir gently and let the mixture sit in a warm spot for about 10 minutes. You’ll know it’s ready when the surface becomes frothy and bubbly. This means your yeast is alive and kicking.
2. Prepare the Dry Ingredients
In a larger bowl, add the remaining flour and a pinch of kosher salt. Stir to combine. Then, gradually add in the room-temperature butter. Using clean hands or a pastry cutter, work the butter into the flour until it forms a crumbly, sand-like texture.
3. Mix the Dough
Add the sugar, room-temperature egg, and the activated yeast mixture into the flour mixture. Use your hands or a stand mixer fitted with a dough hook to bring the dough together. Knead it for about 5 minutes until it becomes smooth and slightly elastic.
4. Knead and Rest
Lightly dust a clean surface with flour and turn the dough out onto it. Knead the dough for an additional 5 to 8 minutes. You’ll know the dough is ready when you press your finger into it and it slowly bounces back.
Place the dough into a lightly oiled bowl, turning it once to coat all sides. Cover with a clean cloth or plastic wrap and set it aside in a warm area for 1 hour or until it doubles in size.
5. Shape the Donuts
Once the dough has risen, transfer it back to a lightly floured surface. Divide it into four equal parts and gently shape each into a ball. Use a rolling pin to flatten the dough into a ½-inch thick sheet.
Using a donut cutter or two round cutters (one larger, one smaller), cut out your donut shapes. You can also roll smaller bits of dough into donut holes if you don’t want to waste anything.
Place the shaped donuts on a baking sheet lined with parchment or lightly dusted with flour. Cover with a cloth and let them rise again for about 30 to 40 minutes.
6. Fry the Donuts
Heat oil in a heavy-bottomed pot to 375°F (190°C). Carefully lower 1–2 donuts into the hot oil at a time, being careful not to overcrowd the pan. Fry each side for 70 to 90 seconds or until golden brown. The donuts should float and puff up. If they sink, they may need a few more minutes to proof.
Use a slotted spoon to remove the donuts and place them on a wire rack to drain and cool slightly.
7. Make the Glaze
While the donuts cool, prepare the glaze by whisking together the confectioners’ sugar, lukewarm milk, heavy cream, and vanilla extract in a bowl. The glaze should be smooth and pourable. Adjust the consistency by adding more sugar to thicken or more milk to thin.
8. Glaze the Donuts
Dip each warm donut into the glaze, coating it on one side or all over depending on your preference. Let any excess drip off before placing the donuts back on the wire rack to set.
Now, take a step back and admire your work—light, golden, fluffy donuts with a glossy vanilla glaze.
Notes
- Warm, Not Hot: When using yeast, make sure your milk and water are warm—not hot. Too much heat will kill the yeast, and too little won’t activate it.
- Check the Dough: A well-kneaded dough should be smooth and slightly elastic. If it tears easily or feels too sticky, knead a bit longer and dust with a touch of flour.
- Proofing Tips: If your kitchen is cool, place your dough in the oven with the light on (but the heat off) to create a warm environment for proofing.
- Watch the Oil Temperature: Use a thermometer to keep the oil steady at 375°F. If the oil is too hot, the outside will brown before the inside cooks. Too cool, and your donuts will absorb oil and turn greasy.
- Avoid Overcrowding: Frying too many at once will lower the oil temperature and make the donuts cook unevenly. Stick to one or two at a time for best results.
- Prep Time: 20 minutes
- Cook Time: 25 minutes
This homemade Krispy Kreme-style donut recipe is a dream for beginners. It’s simple, efficient with time, and makes a lighter, fluffier donut than you’d expect. If you’ve never worked with yeast before or fried anything in oil, this is a great place to start. With clear instructions and a few helpful tips along the way, you’ll be glazing your own warm donuts like a pro in no time.
Let’s dive in and turn your kitchen into the sweetest spot in the house.
Ingredients and Preparation
This recipe makes about six large donuts, though you can easily double it for more. Every ingredient here plays a key role in creating that airy, melt-in-your-mouth texture.
For the Donuts:
- 2 cups all-purpose flour
- ¼ cup whole milk, lukewarm
- ¼ cup water, lukewarm
- 2 teaspoons dry active yeast
- 1 egg, at room temperature
- 3 tablespoons granulated sugar
- ¼ cup unsalted butter, at room temperature
- A pinch of kosher salt
- Neutral oil for frying (vegetable or canola works well)
For the Glaze:
- 2 cups confectioners’ sugar
- ¼ cup whole milk, lukewarm
- 2 tablespoons heavy cream
- 1 teaspoon pure vanilla extract
Ingredient Substitutes and Notes:
- If you’re out of heavy cream, you can substitute it with an extra tablespoon of milk and a teaspoon of melted butter.
- For a dairy-free version, plant-based milk and vegan butter can be used, though the texture may vary slightly.
- Make sure your yeast is fresh—expired yeast won’t activate properly and can result in flat dough.
Step-by-Step Instructions
1. Activate the Yeast
In a small mixing bowl, combine lukewarm water, lukewarm milk, 1 tablespoon of flour, 1 tablespoon of sugar, and the dry active yeast. Stir gently and let the mixture sit in a warm spot for about 10 minutes. You’ll know it’s ready when the surface becomes frothy and bubbly. This means your yeast is alive and kicking.
2. Prepare the Dry Ingredients
In a larger bowl, add the remaining flour and a pinch of kosher salt. Stir to combine. Then, gradually add in the room-temperature butter. Using clean hands or a pastry cutter, work the butter into the flour until it forms a crumbly, sand-like texture.
3. Mix the Dough
Add the sugar, room-temperature egg, and the activated yeast mixture into the flour mixture. Use your hands or a stand mixer fitted with a dough hook to bring the dough together. Knead it for about 5 minutes until it becomes smooth and slightly elastic.
4. Knead and Rest
Lightly dust a clean surface with flour and turn the dough out onto it. Knead the dough for an additional 5 to 8 minutes. You’ll know the dough is ready when you press your finger into it and it slowly bounces back.
Place the dough into a lightly oiled bowl, turning it once to coat all sides. Cover with a clean cloth or plastic wrap and set it aside in a warm area for 1 hour or until it doubles in size.
5. Shape the Donuts
Once the dough has risen, transfer it back to a lightly floured surface. Divide it into four equal parts and gently shape each into a ball. Use a rolling pin to flatten the dough into a ½-inch thick sheet.
Using a donut cutter or two round cutters (one larger, one smaller), cut out your donut shapes. You can also roll smaller bits of dough into donut holes if you don’t want to waste anything.
Place the shaped donuts on a baking sheet lined with parchment or lightly dusted with flour. Cover with a cloth and let them rise again for about 30 to 40 minutes.
6. Fry the Donuts
Heat oil in a heavy-bottomed pot to 375°F (190°C). Carefully lower 1–2 donuts into the hot oil at a time, being careful not to overcrowd the pan. Fry each side for 70 to 90 seconds or until golden brown. The donuts should float and puff up. If they sink, they may need a few more minutes to proof.
Use a slotted spoon to remove the donuts and place them on a wire rack to drain and cool slightly.
7. Make the Glaze
While the donuts cool, prepare the glaze by whisking together the confectioners’ sugar, lukewarm milk, heavy cream, and vanilla extract in a bowl. The glaze should be smooth and pourable. Adjust the consistency by adding more sugar to thicken or more milk to thin.
8. Glaze the Donuts
Dip each warm donut into the glaze, coating it on one side or all over depending on your preference. Let any excess drip off before placing the donuts back on the wire rack to set.
Now, take a step back and admire your work—light, golden, fluffy donuts with a glossy vanilla glaze.
Beginner Tips and Notes
- Warm, Not Hot: When using yeast, make sure your milk and water are warm—not hot. Too much heat will kill the yeast, and too little won’t activate it.
- Check the Dough: A well-kneaded dough should be smooth and slightly elastic. If it tears easily or feels too sticky, knead a bit longer and dust with a touch of flour.
- Proofing Tips: If your kitchen is cool, place your dough in the oven with the light on (but the heat off) to create a warm environment for proofing.
- Watch the Oil Temperature: Use a thermometer to keep the oil steady at 375°F. If the oil is too hot, the outside will brown before the inside cooks. Too cool, and your donuts will absorb oil and turn greasy.
- Avoid Overcrowding: Frying too many at once will lower the oil temperature and make the donuts cook unevenly. Stick to one or two at a time for best results.

Serving Suggestions
These donuts are delicious all on their own, but you can elevate them with a few simple additions:
- Serve with Fresh Fruit: Berries or sliced bananas offer a nice contrast to the sweet glaze.
- Add a Side of Coffee or Tea: The warmth of a drink balances the richness of the donuts.
- Try a Chocolate Drizzle: Melt a small amount of semi-sweet chocolate and drizzle it over the glazed donuts for a richer flavor.
- Dust with Cinnamon Sugar: If you prefer variety, skip the glaze on a few donuts and toss them in cinnamon sugar while still warm.
Storage Tips:
Donuts are best eaten fresh, but you can store leftovers in an airtight container at room temperature for up to 2 days. To refresh them, pop them in the microwave for 10 seconds. If you plan to keep them longer, skip the glaze and freeze the donuts in a sealed container for up to a month. Thaw and glaze before serving.
Engagement Features
Making donuts from scratch may seem ambitious at first, but this recipe is designed to empower even the most hesitant beginner. The process is hands-on and satisfying, the ingredients are simple, and the result is nothing short of bakery-quality.
Give this recipe a try and let your kitchen fill with the comforting scent of freshly fried donuts and warm vanilla glaze. Whether you’re baking for family, friends, or just yourself, these donuts are guaranteed to impress.
Have questions along the way? Wondering about filling options or glaze alternatives? Leave a comment below—I’d love to hear how your donuts turn out and help with any troubleshooting. Cooking is a journey, and these donuts are a sweet step forward.