Easy Cherry Cheesecake Cups: A Beginner-Friendly Dessert for Any Occasion

Who doesn’t love a dessert that’s not only indulgent but also incredibly easy to make? Easy Cherry Cheesecake Cups are the perfect solution for beginner cooks looking to wow their family or friends without spending hours in the kitchen. Imagine soft, creamy cheesecake filling tucked into handheld bites of crescent dough, topped with sweet cherry pie filling, and finished with a glossy glaze. They’re quick, fun, and packed with flavor—ideal for both weeknight treats and special occasions.
Print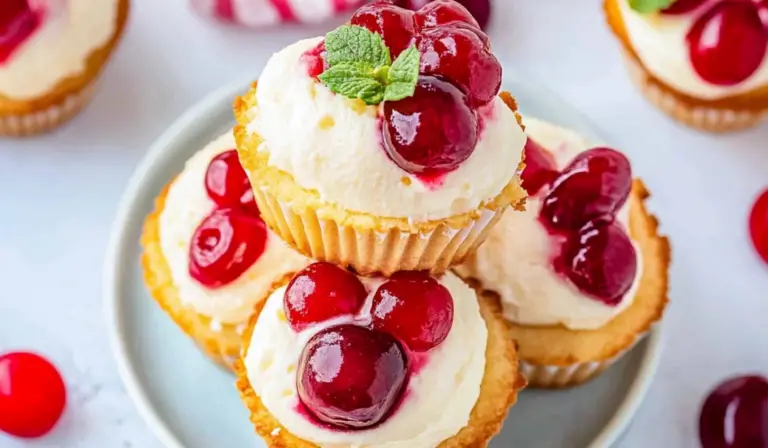
Easy Cherry Cheesecake Cups: A Beginner-Friendly Dessert for Any Occasion
🍒✨ Sweet, creamy, and oh-so-easy—these Cherry Cheesecake Cups are your new go-to dessert! 🧁💕 With layers of velvety cheesecake filling, graham cracker crust, and a luscious cherry topping, these cups are perfect for any occasion. 😋🎉 Beginner-friendly and no fuss, they’re great for parties, potlucks, or when you need a quick sweet fix. 🍴💖 Ready to make dessert magic in no time?
#CherryCheesecakeCups #EasyDessertIdeas #CheesecakeLovers #NoFussTreats #BeginnerFriendlyBakes #SweetAndCreamy #CherryGoodness #PerfectForAnyOccasion #DessertInspo #BiteSizedDelights 🍒🧁
- Total Time: 25 minutes
- Yield: 8 cheesecake cups 1x
Ingredients
- 4 ounces cream cheese, softened: The star of the filling. Make sure it’s softened for easy mixing.
- 1 ½ cups powdered sugar, divided: Adds sweetness to both the filling and glaze.
- 1 large egg: Helps bind the cheesecake mixture.
- ½ teaspoon vanilla extract: Enhances the overall flavor with a warm, aromatic touch.
- 2 tablespoons all-purpose flour: Provides structure to the cheesecake filling.
- 8-ounce can crescent dough sheet: Acts as the crust for these cheesecake cups.
- ¾ cup cherry pie filling: Adds fruity sweetness; you can substitute with blueberry, apple, or strawberry filling.
- 1 tablespoon whole milk: Combines with powdered sugar to create a smooth glaze.
Instructions
1. Preheat and Prep the Muffin Tin
- Preheat your oven to 375°F.
- Grease 8 sections of a muffin tin using baking spray. Use a pastry brush to evenly coat each section, ensuring your cheesecake cups don’t stick.
2. Whip the Cheesecake Filling
- In a medium-sized bowl, whip the softened cream cheese with an electric hand mixer for about 1 minute until smooth.
- Add ½ cup of powdered sugar and mix until fully incorporated.
- Beat in the egg and vanilla extract, ensuring a smooth consistency.
- Finally, add the flour and mix just until combined.
3. Prepare the Dough
- Roll out the crescent dough sheet on a clean work surface. Cut it into 8 even sections.
- Press each dough section into the greased muffin tin, ensuring the corners overlap to form a cup shape.
4. Assemble the Cheesecake Cups
- Divide the cheesecake filling evenly among the dough-lined muffin cups.
- Top each cup with a spoonful of cherry pie filling.
- Fold the corners of the dough over the filling to create a sealed cup.
5. Bake to Perfection
- Bake in the preheated oven for 14–15 minutes or until the dough is golden brown.
- Carefully remove the cups from the muffin tin immediately after baking—they’ll be hot, so use caution.
6. Make the Glaze
- While the cheesecake cups bake, prepare the glaze.
- In a medium-sized bowl, whisk together the remaining 1 cup of powdered sugar with 1 tablespoon of milk until smooth and pourable.
7. Cool and Glaze
- Place the baked cups on a wire rack to cool slightly. These can be served warm, at room temperature, or chilled.
- Drizzle the glaze over the cups just before serving.
Notes
- Avoid Overfilling: Be cautious not to overfill the cups with cheesecake or cherry filling, as they may overflow while baking.
- Check Dough Seals: If using crescent rolls, pinch the perforations tightly to prevent leaks.
- Prevent Overbaking: Check your cups at the 12-minute mark to avoid burning. The dough should be golden brown but not overly dark.
- Handling Hot Cups: Use a small spatula or butter knife to gently lift the cups from the muffin tin after baking.
- Freezing Tips: These cups freeze well! Store them in an airtight container for up to 3 months. When ready to enjoy, thaw in the refrigerator and warm in the microwave.
- Prep Time: 10 minutes
- Cook Time: 15 minutes
I first came across this recipe when I was short on time but needed a dessert to bring to a gathering. These little cheesecake cups saved the day! Their simplicity and versatility instantly made them a favorite in my kitchen. Plus, their individual portions make them great for sharing. Whether you’re new to baking or a seasoned pro looking for a no-fuss dessert, this recipe is sure to deliver.
Why This Recipe is Perfect for Beginners
- Simplicity: With just a few common ingredients and easy-to-follow steps, even first-time bakers can nail this recipe.
- Time Efficiency: You only need about 25 minutes from start to finish.
- Flexible Ingredients: The recipe allows for substitutions and variations, letting you customize it to your liking.
- Beginner-Friendly Techniques: You’ll learn basic skills like folding dough, whipping cream cheese, and making a glaze—all without feeling overwhelmed.
Ingredients and Preparation
Before diving into the recipe, let’s review the ingredients and discuss potential alternatives to suit your preferences or pantry availability.
Ingredients
- 4 ounces cream cheese, softened: The star of the filling. Make sure it’s softened for easy mixing.
- 1 ½ cups powdered sugar, divided: Adds sweetness to both the filling and glaze.
- 1 large egg: Helps bind the cheesecake mixture.
- ½ teaspoon vanilla extract: Enhances the overall flavor with a warm, aromatic touch.
- 2 tablespoons all-purpose flour: Provides structure to the cheesecake filling.
- 8-ounce can crescent dough sheet: Acts as the crust for these cheesecake cups.
- ¾ cup cherry pie filling: Adds fruity sweetness; you can substitute with blueberry, apple, or strawberry filling.
- 1 tablespoon whole milk: Combines with powdered sugar to create a smooth glaze.
Ingredient Alternatives
- Dough Substitution: If crescent dough sheets are unavailable, crescent rolls work just as well. Just be sure to seal the perforations.
- Fruit Filling Options: Experiment with your favorite pie fillings—blueberry, peach, or even lemon curd for a tangy twist.
- Gluten-Free Adaptation: Swap the crescent dough and all-purpose flour with gluten-free alternatives.
- Dairy-Free Version: Use vegan cream cheese and almond milk for a dairy-free dessert.
Step-by-Step Instructions
This recipe breaks down into simple, manageable steps, so even beginners can achieve bakery-worthy results.
1. Preheat and Prep the Muffin Tin
- Preheat your oven to 375°F.
- Grease 8 sections of a muffin tin using baking spray. Use a pastry brush to evenly coat each section, ensuring your cheesecake cups don’t stick.
2. Whip the Cheesecake Filling
- In a medium-sized bowl, whip the softened cream cheese with an electric hand mixer for about 1 minute until smooth.
- Add ½ cup of powdered sugar and mix until fully incorporated.
- Beat in the egg and vanilla extract, ensuring a smooth consistency.
- Finally, add the flour and mix just until combined.
3. Prepare the Dough
- Roll out the crescent dough sheet on a clean work surface. Cut it into 8 even sections.
- Press each dough section into the greased muffin tin, ensuring the corners overlap to form a cup shape.
4. Assemble the Cheesecake Cups
- Divide the cheesecake filling evenly among the dough-lined muffin cups.
- Top each cup with a spoonful of cherry pie filling.
- Fold the corners of the dough over the filling to create a sealed cup.
5. Bake to Perfection
- Bake in the preheated oven for 14–15 minutes or until the dough is golden brown.
- Carefully remove the cups from the muffin tin immediately after baking—they’ll be hot, so use caution.
6. Make the Glaze
- While the cheesecake cups bake, prepare the glaze.
- In a medium-sized bowl, whisk together the remaining 1 cup of powdered sugar with 1 tablespoon of milk until smooth and pourable.
7. Cool and Glaze
- Place the baked cups on a wire rack to cool slightly. These can be served warm, at room temperature, or chilled.
- Drizzle the glaze over the cups just before serving.
Beginner Tips and Notes
To ensure your Easy Cherry Cheesecake Cups turn out perfectly, here are some additional tips:
- Avoid Overfilling: Be cautious not to overfill the cups with cheesecake or cherry filling, as they may overflow while baking.
- Check Dough Seals: If using crescent rolls, pinch the perforations tightly to prevent leaks.
- Prevent Overbaking: Check your cups at the 12-minute mark to avoid burning. The dough should be golden brown but not overly dark.
- Handling Hot Cups: Use a small spatula or butter knife to gently lift the cups from the muffin tin after baking.
- Freezing Tips: These cups freeze well! Store them in an airtight container for up to 3 months. When ready to enjoy, thaw in the refrigerator and warm in the microwave.

Serving Suggestions
These versatile cheesecake cups can be dressed up or down depending on the occasion:
- Elevate Your Dessert: Serve with a dollop of whipped cream and a sprinkle of crushed graham crackers or chocolate shavings.
- Pair with Drinks: Complement these cups with a cup of coffee, tea, or a glass of dessert wine for a cozy treat.
- Perfect for Parties: Arrange the cups on a dessert platter with other bite-sized treats for an impressive presentation.
- Storage Tips: Store leftovers in an airtight container in the fridge for up to 3 days. Serve them chilled or reheat briefly in the microwave for a warm dessert.
Engaging Features: Invite Readers to Share Their Creations
Baking should be fun and rewarding, especially for beginners. These Easy Cherry Cheesecake Cups are a great way to build confidence in the kitchen while creating something delicious.
Did you try this recipe? I’d love to hear how it turned out! Share your tips, tricks, or flavor variations in the comments below. Don’t forget to snap a photo of your cheesecake cups and tag us on social media. Let’s inspire each other with our culinary creations!
So, what are you waiting for? Grab your ingredients and start baking—these little cheesecake cups are calling your name!